Networking (Standard and Distributed)
This section will cover both standard networking and distributed networking (vCenter server required for distributed networking), first I will start with standard networking.
The VMkernel can create virtual switches called vSwitches, the virtual machines virtual NIC's are plugged into vSwitches these are then mapped to the physical NIC's on the ESXi server. This means many virtual machines can use the physical NIC's on the ESXI server. The other clever thing VMware can do is that if two virtual machines communicate with each other on the same vSwitch no physical network traffic is generated. The VMkernel moves the data into memory seamlessly from one virtual machine to another without ever involving the physical network interface. Knowing this knowledge you can design your VM's that communicate with each other to use the same vSwitches thus increasing performance.
vSwitches are VLAN aware and can control outbound traffic using a VMware technology called traffic shaping, you can also impose security settings. A vSwitch can contain 0,1 or many physical NIC's assigned to it, a vSwitch without any NIC's attached to it is called a internal vSwitch, as it only allows communication with the host. The internal vSwitch could be used as staging area before moving it into Production, one note to remember is that vSwitches do not communicate with one another.
The only drawback of internal vSwitches is that you cannot carry out vMotion events without first disconnecting users from the virtual machine. Since they are internal to the ESXi server, we cannot guarantee that users would have a continuous connection to the virtual machine during the vMotion event.
A vSwitch with one physical NIC gives you basic connectivity to the outside world. This might be suitable for vMotion or one that does not require fault tolerance (FT), ideally this would be for testing, development environments, etc. A vSwitch with two physical NIC's gives you fault tolerance (FT) and load balancing, this would be idea for vMotion and could be used in Production environments.
You can have up to 20 physical NIC's in an ESXi server of any link speed, there are now 56 ports by default on a vSwitch and this is configurable for up to 4,088 ports.
vSwitches can be divided into smaller units called port groups, there are three types of port groups
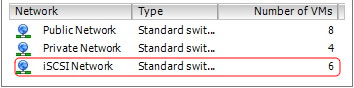
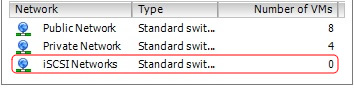
You could create one big fat vSwitch and connect all the NIC's to this but you should really separate the network traffic on separate NIC's. Try and name your port groups with a meaningful name so that if support up the service they can see what the port group is used for, idea names would be vlan25, vlan26. An important note to remember is that if you rename a port group virtual machines become orphaned from the switch because the name of the virtual switch to which the virtual machine is attached is held in the virtual machines configuration file (.vmx), so bear that in mind if you rename a port group that many have many virtual machines attached, that's a lot of work to resolve the problem and many even need a script to resolve it. An example of this that I change my iSCSI network port group to iSCSI networks (additional s in network) and as you can see in the image on the left had 6 virtual machines attached, a simple name change now has orphaned all 6 virtual machines, see the image on the right (the images were taken from the summary screen of the ESXi server)
|
|
Here is a guide on how to create the various standard vSwitch
| Internal standard vSwitch | To create a internal vSwitch follow the notes below, remember to name your vSwitch appropriately
You should end up with something like below
|
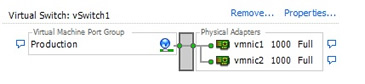
| Teamed Standard Switch | To create a teamed vSwitch it is the same as above, apart from selecting two or more physical adapters, you should end up with something like below
|
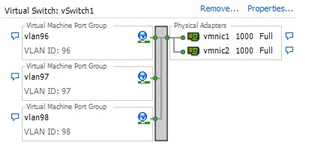
| Standard vSwitch with VLAN support | ESXi supports two main methods of enabling access to VLAN's
To create a VLAN vSwitch follow below
Hopefully you should have something like below
|
| VMKernel standard vSwitch for vMotion | When you create a vMotion port group you will be asked for the following details
You can use vMotion across routers using the gateway but this is not a preferred way, normally ESXi servers are attached to the same network to increase performance and other problems. To create a vMotion vSwitch follow below
Hopefully you should get something like below, you may get a license warning come up, it still will create the port group.
|
Configuration and Problems of vSwitches and Port Groups
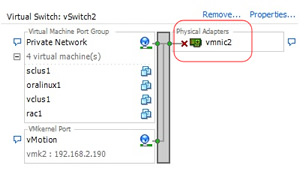
To check to see if a NIC has a problem connecting to the network, go to the Networking screen and check if there is a red-cross against the NIC, see the below image, use standard networking fault finding to correct the problem.
There are a number of configuration settings on vSwitches and Port Groups
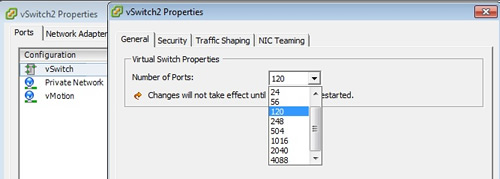
| Increase the number of ports on a vSwitch | You can now change the number of ports up to 4088 with ESXi 4, if you have a large number of VM's you may have to increase this value To increase the number of ports on a vSwitch
|
||||||
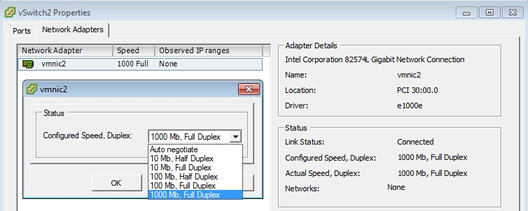
| Setting speed and duplex on physical NIC's | You can change the speed and duplex of any on the physical NIC's in your ESXi server, generally they will auto-negotiate
|
||||||
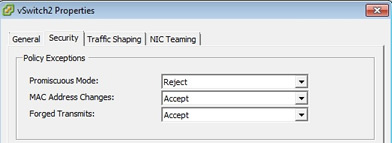
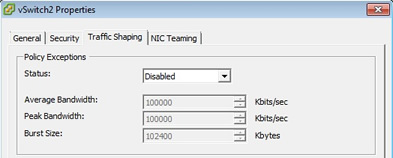
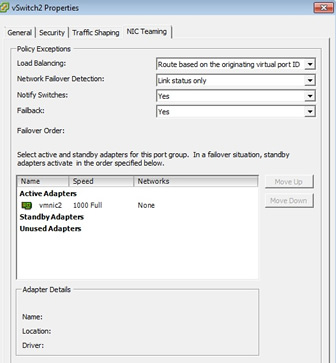
| Setting vSwitch and Port Group policies | I am going to cover these briefly, you have three additional areas that can be changed
|
ESXi 4 the networking architecture treats the Service Console as if it were just another VM connected to a vSwitch, this default vSwitch is called vSwitch0, the service console ports have a special name vswif which stands for virtual switch interface. You should try to have a backup service console port or try to protect the existing by making use it is fault tolerant to network failures. If you were to lose the service console to have to go to the command-line to either re-install it of repair it. Here are some commands that will help in recovering a failed service console
Service Console troubleshooting |
|
| Correcting your NIC selection | # Displaying the vSwitch configurations # Display all the NIC's # Link another NIC to the switch |
| Correcting IP settings | # Display current IP address settings # Change the Service console network esxcfg-vmknic "Management Network" -i 192.168.0.190 -n 255.255.255.0 # Restart the network services |
| Configuring the Cisco Discovery Protocol | # Display current CDP settings, it should return "listen" esxcfg-vswitch -b vSwitch0 |
| Change the MTU value | # Change the MTU value esxcfg-vswitch -m 1500 vSwitch0 |
Distributed virtual networking (DVN) is completely new to version 4, it enhances the network layer of the VMkernel, in uses features such as below, however you must be using vCenter in order to create DvSwitches
At a basic level a DvSwitch is a global switch, rather than configure vSwitches for each ESXi server, you create a DvSwitch that can be applied to every ESXi server, they also implement private VLAN's (PVLAN) within VMware. DvSwitches can do all the things a normal vSwitch can do, they also offer more ports than a standard vSwitch.
DvSwitches use distributed virtual uplink (DvUplink) ports, it is merely a container for holding a reference to a physical NIC. When you create a DvSwitch the system attempts to set the correct number of DvUplink ports for you, it does this by looking at all the ESXi servers and searching for the ESXI server with the most uplinks. DvUplinks can be renamed this allows you given more meaningful names.
I am going to combine a number of items to explain how to create and configure a DvSwitch, I am going to create a DvSwitch, add a port group and then add another port group that uses vMotion. This should give you a fairly good understanding of DvSwitches, I will finish off looking at the advanced features (actually they are pretty much the same as a standard vSwitch).
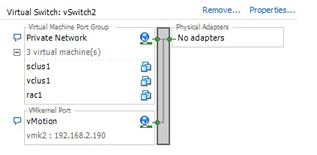
First let me explain what I had already configure, I had a vSwitch configured with two port groups one for the private LAN and one port group for vMotion (don't worry too much about vMotion for the moment I will be covering this in greater detail in a later section).
| Current setup and freeing up some NIC's | This what I had setup before, a vSwitch with two port groups. Each ESXi server I have (vmware1 and vmware2) has this vSwitch setup.
The first thing I do is free up some NIC's by removing the Physical adapters from both ESXi servers, you should end up with something like below, you can keep the groups in case you want to restore back to what you had.
|
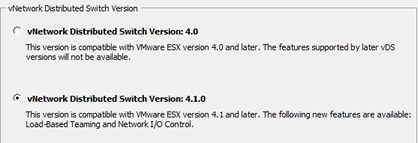
| Creating a DvSwitch | To create a DvSwitch first go to the home page in the vCenter and select networking. You can either select the "New vNetwork Distributed switch" icon or select the "Add a vNetwork Distributed Switch" in the main screen, you then get the the below screen
Select vNetwork Distributed Switch Version 4.1.0 (unless you need version 4.0) and click Next
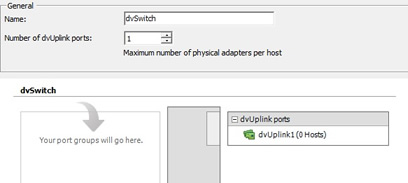
I changed the name to "Private DvSwitch" but you can call it whatever you want, because I have only one NIC to offer from each of my ESXi servers (vmware1 and vmware2), I change the "Number of dvUplink ports" to one. In the real world you probably will have many NIC's to add so this can be increased, click next when finished.
Expand the ESXi server which then should display the available NIC's (if you remember these are the ones we free 'ed up earlier). Select all NICs and then click next to continue
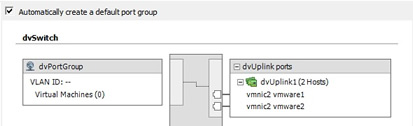
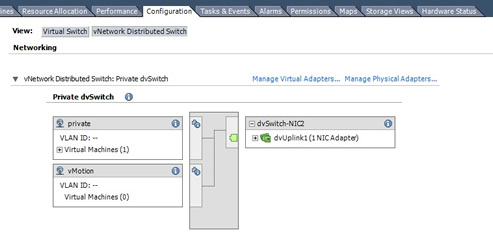
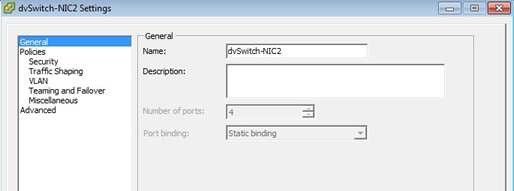
You now get a summary screen, notice the "automatically create a default port group" is ticked, you can leave this as we will make use of this group. Click next to create the DvSwitch. After renaming the dvSwitch to "dvswitch-NIC2" and renaming the port group to "Private" (you can do this by right-clicking each item and selecting edit settings, then change the name at the top", you should have something like below
If you select the dvSwitch-NIC2 icon you get a number of tabs appear, to view the ports select ports, remember we selected one dvUplink port for each ESXi server which gives us two in total, you can also see that "Connectee" comes from each ESXi server
You can confirm the ESXi servers by then select the "Hosts" tab
|
So what you have now is a DvSwitch with two NIC's attached (one from vmware1 and one from vmware2), you can makes changes to the NIC's and it will be implemented on both ESXi servers, this can be very handy if you have lots of ESXi servers to manage as most configurations only need slight tuning. The private port group will be empty as we have no VM's using it, I will be discussing how a VM can make use of this in my virtual machine section.
Next we will create a vMotion port group within our DvSwitch, follow below
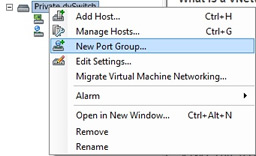
| Create a vMotion port group | Right click on the DvSwitch icon and select "New port group"
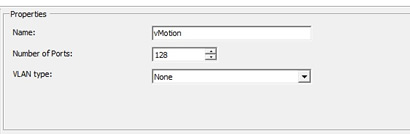
I have change the name to "vmotion", but again you can choose whatever you want
Once the port group is created you need to add the vMotion information for each ESXi server, you will need to provide an IP address and the subnet mask for each ESXi server using the vMotion. ************** YOU WILL NEED TO REPEAT THE BELOW STEPS FOR EACH ESXI SERVER ************ So from the Home page select "Hosts and Clusters", from there select the first ESXi server (in my case it is vmware1) and select the configuration tab. Select Networking from the hardware then select the "vNetwork Distributed Switch and you then should have a screen similar to below. Select the "Manage Virtual Adapters" ,then select add at the top
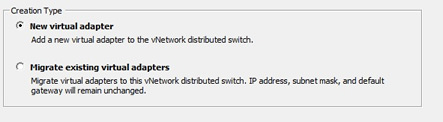
You should then have the screen below, select "New Virtual adapter"
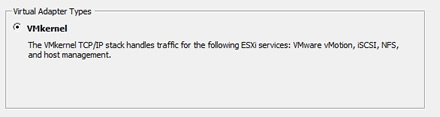
then select "VMKernel" (this was the only choice for me)
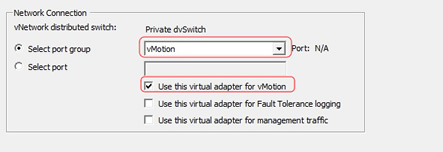
Now select the vmotion port group from the first drop down list and also tick the "Use this virtual adapter for vMotion"
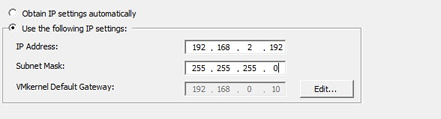
Now enter the IP address and subnet mask, when you repeat this step for the other ESXi server remember you use a different IP address but keep it on the same subnet
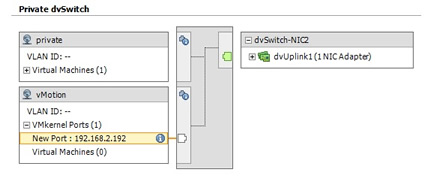
Next comes the summary screen, as you can see the vMotion port group now has a new VMKernel port with the IP address that you choose
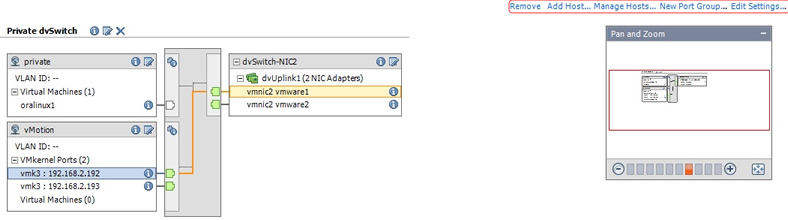
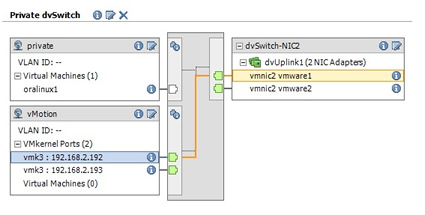
************* NEW REPEAT THIS STEP OF OTHER ESXI SERVERS THAT YOU WANT TO USE VMOTION ********************* Once you have configured all the ESXi servers, if you select from the "home page" -> networking, then select the DvSwitch group icon, then select the configuration tab you will see the screen below. I have two physical NIC's from the ESXi servers and two IP address for the vMotion (one each for each ESXi server). If you click on one of the IP addresses you can see what NIC it goes to (follow the orange line), as you can see IP address 192.168.2.192 goes to vmnic2 vmware1, in this case. Also from this screen if you look in the top right hand corner you can manage the DvSwitch by removing it, adding hosts, managing hosts (use this option to add additional NIC's), creating a new port group and evening editing the existing DvSwitch.
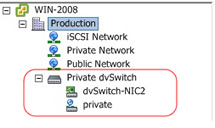
You may have noticed that I have a VM using the private port group, I will cover this in greater detail in my virtual machine section. |
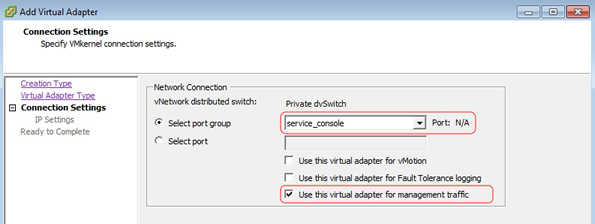
| Create a port group for the Service console | This pretty much the same when you get to the "add Virtual Adapter" screen, I choose the service_console port group (this was a new port group that I added) and then ticked the last option "Use this virtual adapter for management traffic, you will then be ask to enter an IP address and subnet for the service console
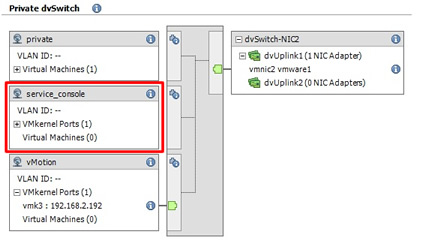
Once you have finished the screen should look like below see my new service console port group.
|
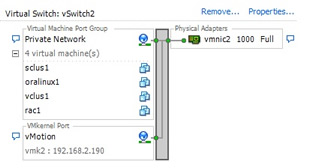
As you see a DvSwitch is very similar to a normal standard vSwitch, have a look at each of them side by side, NIC's are represented on the right-hand side and the port groups are on the left-hand side, there is very little difference in them.
Standard vSwitch |
DvSwitch |
 |
 |
I am not going to discuss how to remove a DvSwitch as it is in reserve order as creating one, first remove from the VMKernel ports from each ESXi server first (otherwise when you try to remove the DvSwitch it will say it's in use), then remove each port group and lastly remove the DvSwitch. Most of the time you remove the item by selecting it's icon and right-clicking, then selecting remove.....
The last topic to cover is the advanced sections of a DvSwitch, again there is very little difference than a normal vSwitch
| Add/Remove NIC | You can add or remove additional NIC's form the DvSwitch view. From the home page select networking, then select the DvSwitch icon then select configuration from the tabs, you should see a screen like below
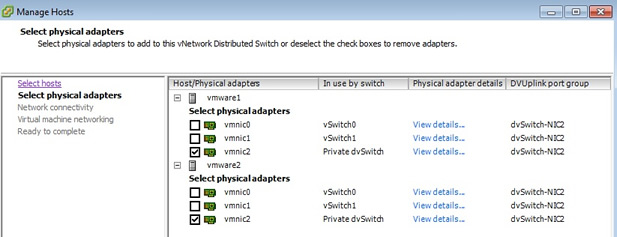
Select manage hosts from the top right-hand corner, then select the hosts from which you wish to add NIC's to then select next, you should see the hosts and available NIC's
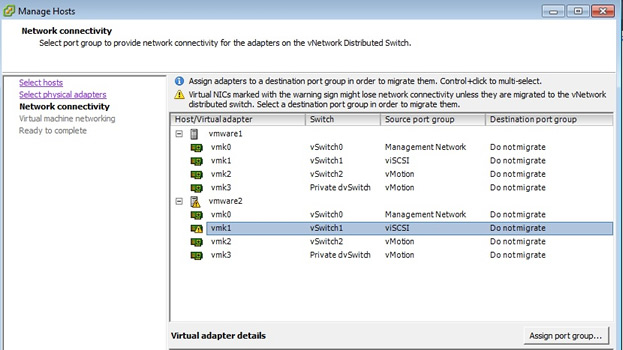
Select the additional NIC's and select next, if the NIC's already belong to an existing port group it will ask you if you wish to migrate them, as you can see the one i select already belong to an existing group hence the warning message. Continue on and the NIC will be added to your DvSwitch.
To remove a NIC just deselect at the "Select Physical Adapters page" and continue through the rest of the screens.
|
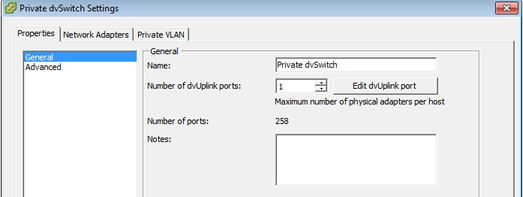
| Advanced settings for a DvSwitch | You can edit the setting of a DvSwitch by right-clicking it's icon and then select "edit settings", the first tab called properties you can change the name, increase/decrease the number of dvUplinks and even put notes for anyone.
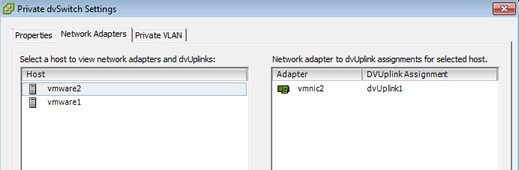
The next tab "Network Adapters" just displays the available ESXi servers and the available dvUplinks
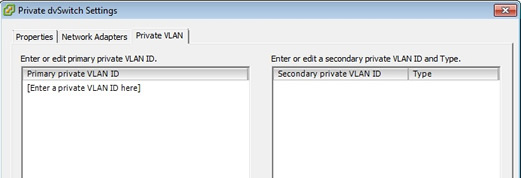
The last tab "private VLAN" you can add primary or secondary VLAN ID's
|
| Advanced settings for the DvSwitch adapters | I am not going into much detail on this as it is pretty much the same as the standard vSwitch
|
DvSwitches are idea for large corporations, it can be a headache to manage lots of standard vSwitches, but bear in mind that you do require vCenter to use DvSwitches which comes with a price and can be off putting to smaller corporations.