NetApp Disk Administration
In this section I will cover the disk administration, I will create another section for common disk and system problems. In this section I will cover the basics on the following:
I have tried to cover as much as possible in as little space (I like to keep things short and sweet), I have briefly touched on some subjects so for more details on these subjects I point you to the NetApp documentation. As i get more experienced with the NetApp products I will come back and update this section.
The storage command can configure and administrate a disk enclosure, the main storage commands are below
| Display | storage show adapter storage show disk [-a|-x|-p|-T] storage show expander storage show fabric storage show fault storage show hub storage show initiators storage show mc storage show port storage show shelf storage show switch storage show tape [supported] storage show acp storage array show storage array show-ports storage array show-luns storage array show-config |
| Enable | storage enable adapter |
| Disable | storage disable adapter |
| Rename switch | storage rename <oldname> <newname> |
| Remove port | storage array remove-port <array_name> -p <WWPN> |
| Load Balance | storage load balance |
| Power Cycle | storage power_cycle shelf -h storage power_cycle shelf start -c <channel name> storage power_cycle shelf completed |
Your NetApp filer will have a number of disks attached that can be used, when attached the disk will have the following device name
| Disk name | This is the physical disk itself, normally the disk will reside in a disk enclosure, the disk will have a pathname like 2a.17 depending on the type of disk enclosure
Any disks that are classed as spare will be used in any group to replace failed disks. They can also be assigned to any aggregate. Disks are assigned to a specific pool. |
There are only four types of disks in Data ONTAP, I will discuss RAID in the aggregate section.
| Data | holds data stored within the RAID group |
| Spare | Does not hold usable data but is available to be added to a RAID group in an aggregate, also known as a hot spare |
| Parity | Store data reconstruction information within the RAID group |
| dParity | Stores double-parity information within the RAID group, if RAID-DP is enabled |
There are a number of disk commands that you can use
| Display | disk show ## list all unnassigned/assigned disks |
| Adding (assigning) | ## Add a specific disk to pool1 the mirror pool disk assign <disk_name> -p 1 ## Assign all disk to pool 0, by default they are assigned to pool 0 if the "-p" ## option is not specififed disk assign all -p 0 |
| Remove (spin down disk) | disk remove <disk_name> |
| Reassign | disk reassign -d <new_sysid> |
| Replace | disk replace start <disk_name> <spare_disk_name> disk replace stop <disk_name> Note: uses Rapid RAID Recovery to copy data from the specified file system to the specified spare disk, you can stop this process using the stop command |
| Zero spare disks | disk zero spares |
| fail a disk | disk fail <disk_name> |
| Scrub a disk | disk scrub start disk scrub stop |
| Sanitize | disk sanitize start <disk list> disk sanitize abort <disk_list> disk sanitize status disk sanitize release <disk_list> Note: the release modifies the state of the disk from sanitize to spare. Sanitize requires a license. |
| Maintanence | disk maint start -d <disk_list> disk maint abort <disk_list> disk maint list disk maint status Note: you can test the disk using maintain mode |
| swap a disk | disk swap disk unswap Note: it stalls all SCSI I/O until you physically replace or add a disk, can used on SCSI disk only. |
| Statisics | disk_stat <disk_name> |
| Simulate a pulled disk | disk simpull <disk_name> |
| Simulate a pushed disk | disk simpush -l disk simpush <complete path of disk obtained from above command> ## Example ontap1> disk simpush -l The following pulled disks are available for pushing: v0.16:NETAPP__:VD-1000MB-FZ-520:14161400:2104448 ontap1> disk simpush v0.16:NETAPP__:VD-1000MB-FZ-520:14161400:2104448 |
Disks are grouped together in aggregates, these aggregates provide storage to the volume or volumes that they contain. Each aggregate has it own RAID configuration, plex structure and set of assigned disks or array LUNs. You can create traditional volumes or NetApp's FlexVol volumes (see below section on volumes). There are two types of aggregate
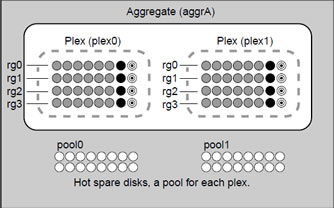
A aggregate has only one plex (pool 0), if you use SyncMirror (licensed product) you can mirror the aggregate in which case it will have two plexes (pool 0 and pool 1). Disks can be assigned to different pools which will be used for hot spares or extending aggregates for those pools. The plexes are updated simultaneously when mirroring aggregates and need to be resynchronized if you have problems with one of the plexes. You can see how mirroring works in the diagram below
When using RAID4 or RAID-DP the largest disks will be used as the parity disk/s, if you add a new larger disk to the aggregate, this will be reassigned as the partity disk/s.
An aggregate can be in one of three states
| Online | Read and write access to volumes is allowed |
| Restricted | Some operations, such as parity reconstruction are allowed, but data access is not allowed |
| Offline | No access to the aggregate is allowed |
The aggregate can have a number of diffrent status values
| 32-bit | This aggregate is a 32-bit aggregate |
| 64-bit | This aggregate is a 64-bit aggregate |
| aggr | This aggregate is capable of contain FlexVol volumes |
| copying | This aggregate is currently the target aggregate of an active copy operation |
| degraded | This aggregate is contains at least one RAID group with single disk failure that is not being reconstructed |
| double degraded | This aggregate is contains at least one RAID group with double disk failure that is not being reconstructed (RAID-DP aggregate only) |
| foreign | Disks that the aggregate contains were moved to the current storage system from another storage system |
| growing | Disks are in the process of being added to the aggregate |
| initializing | The aggregate is in the process of being initialized |
| invalid | The aggregate contains no volumes and none can be added. Typically this happend only after an aborted "aggr copy" operation |
| ironing | A WAFL consistency check is being performewd on the aggregate |
| mirror degraded | The aggregate is mirrored and one of its plexes is offline or resynchronizing |
| mirrored | The aggregate is mirrored |
| needs check | WAFL consistency check needs to be performed on the aggregate |
| normal | The aggregate is unmirrored and all of its RAID groups are functional |
| out-of-date | The aggregate is mirrored and needs to be resynchronized |
| partial | At least one disk was found for the aggregate, but two or more disks are missing |
| raid0 | The aggrgate consists of RAID 0 (no parity) RAID groups |
| raid4 | The agrregate consists of RAID 4 RAID groups |
| raid_dp | The agrregate consists of RAID-DP RAID groups |
| reconstruct | At least one RAID group in the aggregate is being reconstructed |
| redirect | Aggregate reallocation or file reallocation with the "-p" option has been started on the aggregate, read performance will be degraded |
| resyncing | One of the mirror aggregates plexes is being resynchronized |
| snapmirror | The aggregate is a SnapMirror replica of another aggregate (traditional volumes only) |
| trad | The aggregate is a traditional volume and cannot contain FlexVol volumes. |
| verifying | A mirror operation is currently running on the aggregate |
| wafl inconsistent | The aggregate has been marked corrupted; contact techincal support |
You can mix the disks speeds and different types within the aggregate make sure you change the below options
| Mixed disk speeds and types | ## to allow mixed speeds |
Now I am only going to detail the common commands that you use with aggregates, I will update this section and the cheatsheet as I get more experienced with the NetApp product.
| Displaying | aggr status aggr status -r aggr status <aggregate> [-v] |
| Check you have spare disks | aggr status -s |
| Adding (creating) | ## Syntax - if no option is specified then the defult is used ## create aggregated called newfastaggr using 20 x 15000rpm disks Note: -f = overrides the default behavior that does not permit disks in a plex to belong to different disk pools |
| Remove(destroying) | aggr offline <aggregate> aggr destroy <aggregate> |
| Unremoving(undestroying) | aggr undestroy <aggregate> |
| Rename | aggr rename <old name> <new name> |
| Increase size | ## Syntax aggr add <aggr_name> [-f] [-n] [-g {raid_group_name | new |all}] <disk_list> ## add an additonal disk to aggregate pfvAggr, use "aggr status" to get group name aggr status pfvAggr -r aggr add pfvAggr -g rg0 -d v5.25 ## Add 4 300GB disk to aggregate aggr1 aggr add aggr1 4@300 |
| offline | aggr offline <aggregate> |
| online | aggr online <aggregate> |
| restricted state | aggr restrict <aggregate> |
| Change an aggregate options | ## to display the aggregates options |
| show space usage | aggr show_space <aggregate> |
| Mirror | aggr mirror <aggregate> |
| Split mirror | aggr split <aggregate/plex> <new_aggregate> |
| Copy from one agrregate to another | ## Obtain the status aggr copy status ## Start a copy aggr copy start <aggregate source> <aggregate destination> ## Abort a copy - obtain the operation number by using "aggr copy status" aggr copy abort <operation number> ## Throttle the copy 10=full speed, 1=one-tenth full speed aggr copy throttle <operation number> <throttle speed> |
| Scrubbing (parity) | ## Media scrub status Note: Starts parity scrubbing on the named online aggregate. Parity scrubbing compares the data disks to the Look at the following system options: raid.scrub.duration 360 |
| Verify (mirroring) | ## verify status Note: Starts RAID mirror verification on the named online mirrored aggregate. If no name is given, then |
| Media Scrub | aggr media_scrub status Look at the following system options: |
Volumes contain file systems that hold user data that is accessible using one or more of the access protocols supported by Data ONTAP, including NFS, CIFS, HTTP, FTP, FC, and iSCSI.
Each volume depends on its containing aggregate for all its physical storage, that is, for all storage in the aggregate’s disks and RAID groups.
A FlexVol volume is a volume that is loosely coupled to its containing aggregate. A FlexVol volume can share its containing aggregate with other FlexVol volumes. Thus, a single aggregate can be the shared source of all the storage used by all the FlexVol volumes contained by that aggregate.
Because a FlexVol volume is managed separately from the aggregate, you can create small FlexVol volumes (20 MB or larger), and you can increase or decrease the size of FlexVol volumes in increments as small as 4 KB.
When a FlexVol volume is created, it reserves a small amount of extra space (approximately 0.5 percent of its nominal size) from the free space of its containing aggregate. This space is used to store the volume's metadata. Therefore, upon creation, a FlexVol volume with a space guarantee of volume uses free space from the aggregate equal to its size × 1.005. A newly-created FlexVol volume with a space guarantee of none or file uses free space equal to .005 × its nominal size.
There are two types of FlexVolume
If you want to use Data ONTAP to move data between a 32-bit volume and a 64-bit volume, you must use ndmpcopy or qtree SnapMirror. You cannot use the vol copy command or volume SnapMirror between a 32-bit volume and a 64-bit volume.
A traditional volume is a volume that is contained by a single, dedicated, aggregate. It is tightly coupled with its containing aggregate. No other volumes can get their storage from this containing aggregate.
The only way to increase the size of a traditional volume is to add entire disks to its containing aggregate. You cannot decrease the size of a traditional volume. The smallest possible traditional volume uses all the space on two disks (for RAID4) or three disks (for RAID-DP).
Traditional volumes and their containing aggregates are always of type 32-bit. You cannot grow a traditional volume larger than 16 TB.
You can change many attributes on a volume
Every volume has a language. The language of the volume determines the character set Data ONTAP uses to display file names and data for that volume. Changing the language of an existing volume can cause some files to become inaccessible.
The language of the root volume has special significance, because it affects or determines the following items:
The following table displays the possible states for volumes.
| Online | Read and write access to this volume is allowed. |
| Restricted | Some operations, such as parity reconstruction, are allowed, but data access is not allowed. |
| Offline | No access to the volume is allowed. |
There are number of possible status values for volumes
| access denied | The origin system is not allowing access. (FlexCache volumes only.) |
| active redirect | The volume's containing aggregate is undergoing reallocation (with the -p option specified). Read performance may be reduced while the volume is in this state. |
| connecting | The caching system is trying to connect to the origin system. (FlexCache volumes only.) |
| copying | The volume is currently the target of an active vol copy or snapmirror operation. |
| degraded | The volume's containing aggregate contains at least one degraded RAID group that is not being reconstructed after single disk failure. |
| double degraded | The volume's containing aggregate contains at least one degraded RAID-DP group that is not being reconstructed after double disk failure. |
| flex | The volume is a FlexVol volume. |
| flexcache | The volume is a FlexCache volume. |
| foreign | Disks used by the volume's containing aggregate were moved to the current storage system from another storage system. |
| growing | Disks are being added to the volume's containing aggregate. |
| initializing | The volume's containing aggregate is being initialized. |
| invalid | The volume does not contain a valid file system. |
| ironing | A WAFL consistency check is being performed on the volume's containing aggregate. |
| lang mismatch | The language setting of the origin volume was changed since the caching volume was created. (FlexCache volumes only.) |
| mirror degraded | The volume's containing aggregate is mirrored and one of its plexes is offline or resynchronizing. |
| mirrored | The volume's containing aggregate is mirrored. |
| needs check | A WAFL consistency check needs to be performed on the volume's containing aggregate. |
| out-of-date | The volume's containing aggregate is mirrored and needs to be resynchronized. |
| partial | At least one disk was found for the volume's containing aggregate, but two or more disks are missing. |
| raid0 | The volume's containing aggregate consists of RAID0 (no parity) groups (array LUNs only). |
| raid4 | The volume's containing aggregate consists of RAID4 groups. |
| raid_dp | The volume's containing aggregate consists of RAID-DP groups. |
| reconstruct | At least one RAID group in the volume's containing aggregate is being reconstructed. |
| redirect | The volume's containing aggregate is undergoing aggregate reallocation or file reallocation with the -p option. Read performance to volumes in the aggregate might be degraded. |
| rem vol changed | The origin volume was deleted and re-created with the same name. Re-create the FlexCache volume to reenable the FlexCache relationship. (FlexCache volumes only.) |
| rem vol unavail | The origin volume is offline or has been deleted. (FlexCache volumes only.) |
| remote nvram err | The origin system is experiencing problems with its NVRAM. (FlexCache volumes only.) |
| resyncing | One of the plexes of the volume's containing mirrored aggregate is being resynchronized. |
| snapmirrored | The volume is in a SnapMirror relationship with another volume. |
| trad | The volume is a traditional volume. |
| unrecoverable | The volume is a FlexVol volume that has been marked unrecoverable; contact technical support. |
| unsup remote vol | The origin system is running a version of Data ONTAP the does not support FlexCache volumes or is not compatible with the version running on the caching system. (FlexCache volumes only.) |
| verifying | RAID mirror verification is running on the volume's containing aggregate. |
| wafl inconsistent | The volume or its containing aggregate has been marked corrupted; contact technical support . |
Usually, you should leave CIFS oplocks on for all volumes and qtrees. This is the default setting. However, you might turn CIFS oplocks off under certain circumstances.
CIFS oplocks (opportunistic locks) enable the redirector on a CIFS client in certain file-sharing scenarios to perform client-side caching of read-ahead, write-behind, and lock information. A client can then work with a file (read or write it) without regularly reminding the server that it needs access to the file. This improves performance by reducing network traffic.
You might turn CIFS oplocks off on a volume or a qtree under either of the following circumstances:
Otherwise, you can leave CIFS oplocks on. I will discuss in detail CIFS and other File access protocols in another topic.
| CIFS oplock options | cifs.oplocks.enable on cifs.oplocks.opendelta 0 |
Every qtree and volume has a security style setting—NTFS, UNIX, or mixed. The setting determines whether files use Windows NT or UNIX (NFS) security. How you set up security styles depends on what protocols are licensed on your storage system.
Although security styles can be applied to volumes, they are not shown as a volume attribute, and are managed for both volumes and qtrees using the qtree command. The security style for a volume applies only to files and directories in that volume that are not contained in any qtree. The volume security style does not affect the security style for any qtrees in that volume.
The following table describes the three security styles and the effects of changing them.
| Security Style |
Description | Effect of changing to this style |
| NTFS | For CIFS clients, security is handled using Windows NTFS ACLs. For NFS clients, the NFS UID (user id) is mapped to a Windows SID (security identifier) and its associated groups. Those mapped credentials are used to determine file access, based on the NFTS ACL. Note: To use NTFS security, the storage system must be licensed for CIFS. You cannot use an NFS client to change file or directory permissions on qtrees with the NTFS security style. |
If the change is from a mixed qtree, Windows NT permissions determine file access for a file that had Windows NT permissions. Otherwise, UNIXstyle (NFS) permission bits determine file access for files created before the change. Note: If the change is from a CIFS storage system to a multiprotocol storage system, and the /etc directory is a qtree, its security style changes to NTFS. |
| UNIX | Files and directories have UNIX permissions. | The storage system disregards any Windows NT permissions established previously and uses the UNIX permissions exclusively. |
| Mixed | Both NTFS and UNIX security are allowed: A file or directory can have either Windows NT permissions or UNIX permissions. The default security style of a file is the style most recently used to set permissions on that file. |
If NTFS permissions on a file are changed, the storage system recomputes UNIX permissions on that file. If UNIX permissions or ownership on a file are changed, the storage system deletes any NTFS permissions on that file. |
Finally we get to the commands that are used to create and control volumes
General Volume Operations (Traditional and FlexVol) |
|
| Displaying | vol status vol status -l (display language) |
| Remove (destroying) | vol offline <vol_name> vol destroy <vol_name> |
| Rename | vol rename <old_name> <new_name> |
| online | vol online <vol_name> |
| offline | vol offline <vol_name> |
| restrict | vol restrict <vol_name> |
| decompress | vol decompress status vol decompress start <vol_name> vol decompress stop <vol_name> |
| Mirroring | vol mirror volname [-n][-v victim_volname][-f][-d <disk_list>] Note: |
| Change language | vol lang <vol_name> <language> |
| Change maximum number of files | ## Display maximum number of files maxfiles <vol_name> ## Change maximum number of files maxfiles <vol_name> <max_num_files> |
| Change root volume | vol options <vol_name> root |
| Media Scrub | vol media_scrub status [volname|plexname|groupname -s disk-name][-v] Look at the following system options: |
FlexVol Volume Operations (only) |
|
| Adding (creating) | ## Syntax ## Create a 200MB volume using the english character set |
| additional disks | # First find the aggregate the volume uses |
| Resizing | vol size <vol_name> [+|-] n{k|m|g|t} ## Increase flexvol1 volume by 100MB vol size flexvol1 +100m |
| Automatically resizing | vol autosize vol_name [-m size {k|m|g|t}] [-I size {k|m|g|t}] on ## automatically grow by 10MB increaments to max of 500MB vol autosize flexvol1 -m 500m -I 10m on |
| Determine free space and Inodes | df -Ah df -L df -i |
| Determine size | vol size <vol_name> |
| automatic free space preservation | vol options <vol_name> try_first [volume_grow|snap_delete] Note: |
| display a FlexVol volume's containing aggregate | vol container <vol_name> |
| Cloning | vol clone create clone_vol [-s none|file|volume] -b parent_vol [parent_snap] Note: The vol clone create command creates a flexible volume named clone_vol on the local filer that is a clone of a "backing" flexible volume named par_ent_vol. A clone is a volume that is a writable snapshot of another volume. Initially, the clone and its parent share the same storage; more storage space is consumed only as one volume or the other changes. |
| Copying | vol copy start [-S|-s snapshot] <vol_source> <vol_destination> ## Example - Copies the nightly snapshot named nightly.1 on volume vol0 on the local filer to the volume vol0 on remote ## filer named toaster1. Note: Copies all data, including snapshots, from one volume to another. If the -S flag is used, the command copies all snapshots in the source volume to the destination volume. To specify a particular snapshot to copy, use the -s flag followed by the name of the snapshot. If neither the -S nor -s flag is used in the command, the filer automatically creates a distinctively-named snapshot at the time the vol copy start command is executed and copies only that snapshot to the destination volume. |
Traditional Volume Operations (only) |
|
| adding (creating) | vol|aggr create vol_name -v [-l language_code] [-f] [-m] [-n] [-v] [-t {raid4|raid_dp}] [-r raidsize] [-T disk-type] -R rpm] [-L] disk-list ## create traditional volume using vol command vol create tradvol1 -l en -t raid4 -d v5.26 v5.27 ## Create traditional volume using 20 disks, each RAID group can have 10 disks vol create vol1 -r 10 20 |
| additional disks | vol add volname[-f][-n][-g <raidgroup>]{ ndisks[@size]|-d <disk_list> } ## add another disk to the already existing traditional volume vol add tradvol1 -d v5.28 |
| splitting | aggr split <volname/plexname> <new_volname> |
| Scrubing (parity) | ## The more new "aggr scrub " command is preferred |
| Verify (mirroring) | ## The more new "aggr verify" command is preferred Note: Starts RAID mirror verification on the named online mirrored aggregate. If no name is given, then |
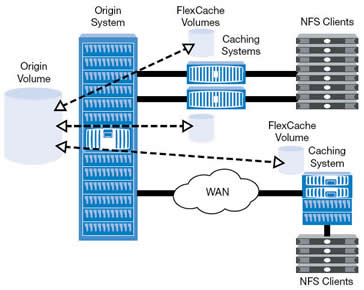
A FlexCache volume is a sparsely-populated volume on a local storage system that is backed by a volume on a different possibly remote storage system, this volume providies access to data in the remote volume without requiring that all the data be in the sparse voluem. This speeds up data access to remote data, because the cached data must be ejected when the data is changed, thus FlexCache volumes work best for data that does not change often.
When a client requests data from the FlexCache volume, the data is read from the origin system and cached on the FlexCache volume, subsequent requests for that data is then served directly from the FlexCache volume. This increases performance as data no longer needs to come across the wire (network). Sometimes a picture best describes things
In order to use FlexCache volumes there are some requirements:
You can have a maximum of 100 FlexCache volumes on a storage system. In addition, there are certain features of Data ONTAP that are not available on FlexCache volumes, and others that are not available on volumes that are backing FlexCache volumes.
You cannot use the following Data ONTAP capabilities on FlexCache volumes (these limitations do not apply to the origin volumes):
As mentioned above the FlexCache volume must be a FlexVol volume, the origin volume can be a FlexVol or a traditional volume. Must FlexCache volumes are setup to automatically grow, thus achieving the best performance. FlexCache volumes by default reserve 100MB of space this can be changed by the below option but it is advised to leave it at its default value.
| FlexCache default reserve space | vol options flexcache_min_reserved |
When you put multiple FlexCache volumes in the same aggregate, each FlexCache volume reserves only a small amount of space (as specified by the flexcache_min_reserved volume option. The rest of the space is allocated as needed. This means that a “hot” FlexCache volume (one that is being accessed heavily) is permitted to take up more space, while a FlexCache volume that is not being accessed as often will gradually be reduced in size. When an aggregate containing FlexCache volumes runs out of free space, Data ONTAP randomly selects a FlexCache volume in that aggregate to be truncated. Truncation means that files are ejected from the FlexCache volume until the size of the volume is decreased to a predetermined percentage of its former size.
If you have regular FlexVol volumes in the same aggregate as your FlexCache volumes, and you start to fill up the aggregate, the FlexCache volumes can lose some of their unreserved space (if they are not currently using it). In this case, when the FlexCache volume needs to fetch a new data block and it does not have enough free space to accommodate it, a data block is ejected from one of the FlexCache volumes to make room for the new data block.
You can control how the FlexCache volume functions when connectivity between the caching and origin systems is lost by using the disconnected_mode and acdisconnected volume options. The disconnected_mode volume option and the acdisconnected timeout, combined with the regular TTL timeouts (acregmax, acdirmax, acsymmax, and actimeo), enable you to control the behavior of the FlexCache volume when contact with the origin volume is lost.
| Disconnect options | disconnected_mode |
A file is the basic object in a FlexCache volume, but sometimes only some of a file's data is cached. If the data is cached and valid, a read request for that data is fulfilled without access to the origin volume. When a data block from a specific file is requested from a FlexCache volume, then the attributes of that file are cached, and that file is considered to be cached, even if not all of its data blocks are
present. If any part of a file is changed, the entire file is invalidated and ejected from the cache. For this reason, data sets consisting of one large file that is frequently updated might not be good candidates for a FlexCache implementation.
Cache consistenancy for FlexCache volumes is achieved by using three techniques
| Delegations | You can think of a delegation as a contract between the origin system and the caching volume; as long as the caching volume has the delegation, the file has not changed. Delegations are used only in certain situations. When data from a file is retrieved from the origin volume, the origin system can give a delegation for that file to the caching volume. Before that file is modified on the origin volume, whether due to a request from another caching volume or due to direct client access, the origin system revokes the delegation for that file from all caching volumes that have that delegation. |
| Attribute cache timeouts | When data is retrieved from the origin volume, the file that contains that data is considered valid in the FlexCache volume as long as a delegation exists for that file. If no delegation exists, the file is considered valid for a certain length of time, specified by the attribute cache timeout. If a client requests data from a file for which there are no delegations, and the attribute cache timeout has been exceeded, the FlexCache volume compares the file attributes of the cached file with the attributes of the file on the origin system. |
| write operation proxy | If a client modifies a file that is cached, that operation is passed back, or proxied through, to the origin system, and the file is ejected from the cache. When the write is proxied, the attributes of the file on the origin volume are changed. This means that when another client requests data from that file, any other FlexCache volume that has that data cached will re-request the data after the attribute cache timeout is reached. |
I have only touched lightly on Cache consistenancy and suggest that you check the documentation and options that are available.
The following table lists the status messages you might see for a FlexCache volume
| access denied | The origin system is not allowing FlexCache access. Check the setting of the flexcache.access option on the origin system. |
| connecting | The caching system is trying to connect to the origin system. |
| lang mismatch | The language setting of the origin volume was changed since the FlexCache volume was created. |
| rem vol changed | The origin volume was deleted and re-created with the same name. Re-create the FlexCache volume to reenable the FlexCache relationship. |
| rem vol unavail | The origin volume is offline or has been deleted. |
| remote nvram err | The origin system is experiencing problems with its NVRAM. |
| unsup remote vol | The origin system is running a version of Data ONTAP that either does not support FlexCache volumes or is not compatible with the version running on the caching system. |
Now for the commands
| Display | vol status vol status -v <flexcache_name> ## How to display the options available and what they are set to vol help options vol options <flexcache_name> |
| Display free space | df -L |
| Adding (Create) | ## Syntax vol create <flexcache_name> <aggr> [size{k|m|g|t}] -S origin:source_vol ## Create a FlexCache volume called flexcache1 with autogrow in aggr1 aggregate with the source volume vol1 ## on storage netapp1 server vol create flexcache1 aggr1 -S netapp1:vol1 |
| Removing (destroy) | vol offline < flexcache_name> vol destroy <flexcache_name> |
| Automatically resizing | vol options <flexcache_name> flexcache_autogrow [on|off] |
| Eject file from cache | flexcache eject <path> [-f] |
| Statistics | ## Client stats flexcache stats -C <flexcache_name> ## Server stats flexcache stats -S <volume_name> -c <client> ## File stats flexcache fstat <path> |
FlexClone volumes are writable, point-in-time copies of a parent FlexVol volume. Often, you can manage them as you would a regular FlexVol volume, but they also have some extra capabilities and restrictions.
The following list outlines some key facts about FlexClone volumes:
The following restrictions apply to parent volumes or their clones:
A FlexClone volume inherits its initial space guarantee from its parent volume. For example, if you create a FlexClone volume from a parent volume with a space guarantee of volume, then the FlexClone volume's initial space guarantee will be volume also. You can change the FlexClone volume's space guarantee.
For example, suppose that you have a 100-MB FlexVol volume with a space guarantee of volume, with 70 MB used and 30 MB free, and you use that FlexVol volume as a parent volume for a new FlexClone volume. The new FlexClone volume has an initial space guarantee of volume, but it does not require a full 100 MB of space from the aggregate, as it would if you had copied the volume. Instead, the aggregate needs to allocate only 30 MB (100 MB minus 70 MB) of free space to the clone.
If you have multiple clones with the same parent volume and a space guarantee of volume, they all share the same shared parent space with each other, so the space savings are even greater.
You can identify a shared Snapshot copy by listing the Snapshot copies in the parent volume with the snap list command. Any Snapshot copy that appears as busy, vclone in the parent volume and is also present in the FlexClone volume is a shared Snapshot copy.
Splitting a FlexClone volume from its parent removes any space optimizations that are currently employed by the FlexClone volume. After the split, both the FlexClone volume and the parent volume require the full space allocation determined by their space guarantees. The FlexClone volume becomes a normal FlexVol volume.
Creating FlexClone files or FlexClone LUNs is highly space-efficient and time-efficient because the cloning operation does not involve physically copying any data. You can create a clone of a file that is present in a FlexVol volume in a NAS environment, and you
can also clone a complete LUN without the need of a backing Snapshot copy in a SAN environment. The cloned copies initially share the same physical data blocks with their parents and occupy negligible extra space in the storage system for their initial metadata.
| Display | vol status vol status <flexclone_name> -v df -Lh |
| adding (create) | ## Syntax vol clone create clone_name [-s {volume|file|none}] -b parent_name [parent_snap] ## create a flexclone called flexclone1 from the parent flexvol1 vol clone create flexclone1 -b flexvol1 |
| Removing (destroy) | vol offline <flexclone_name> vol destroy <flexclone_name> |
| splitting | ## Determine the free space required to perform the split vol clone split estimate <flexclone_name> ## Double check you have the space df -Ah ## Perform the split vol clone split start <flexclone_name> ## Check up on its status vol colne split status <flexclone_name> ## Stop the split vol clone split stop <flexclone_name> |
| log file | /etc/log/clone The clone log file records the following information: • Cloning operation ID • The name of the volume in which the cloning operation was performed • Start time of the cloning operation • End time of the cloning operation • Parent file/LUN and clone file/LUN names • Parent file/LUN ID • Status of the clone operation: successful, unsuccessful, or stopped and some other details |
I have only briefly touched on FlexCloning so I advise you to take a peek at the documentation for a full description, including the FlexClone file, FlexClone LUN and rapid cloning utility for VMWare.
ONTAP Data has an additional feature called deduplication, it improves physical storage space by eliminating duplicate data blocks within a FlexVol volume.
Deduplication works at the block level on the active file system, and uses the WAFL block-sharing mechanism. Each block of data has a digital signature that is compared with all other signatures in a data volume. If an exact block match exists, the duplicate block is discarded and its disk space is reclaimed.
You can configure deduplication operations to run automatically or on a schedule. You can deduplicate new and existing data, or only new data, on a FlexVol volume. You do require a license to enable deduplication.
Data ONTAP writes all data to a storage system in 4-KB blocks. When deduplication runs for the first time on a FlexVol volume with existing data, it scans all the blocks in the FlexVol volume and creates a digital fingerprint for each of the blocks. Each of the fingerprints is compared to all other fingerprints within the FlexVol volume. If two fingerprints are found to be identical, a byte-for-byte comparison is done for all data within the block. If the byte-for-byte comparison detects identical fingerprints, the pointer to the data block is updated, and the duplicate block is freed.
Deduplication runs on the active file system. Therefore, as additional data is written to the deduplicated volume, fingerprints are created for each new block and written to a change log file. For subsequent deduplication operations, the change log is sorted and merged with the fingerprint file, and the deduplication operation continues with fingerprint comparisons as previously described.
| start/restart deduplication operation | sis start -s <path> sis start -s /vol/flexvol1 ## Use previous checkpoint sis start -sp <path> |
| stop deduplication operation | sis stop <path> |
| schedule deduplication | sis config -s <schedule> <path>
|
| enabling | sis on <path> |
| disabling | sis off <path> |
| status | sis status -l <path> |
| Display saved space | df -s <path> |
Again I have only briefly touiched on this subject, for more details checkout the documentation.
QTrees
Qtrees enable you to partition your volumes into smaller segments that you can manage individually. You can set a qtree's size or security style, back it up, and restore it.
You use qtrees to partition your data. You might create qtrees to organize your data, or to manage one or more of the following factors: quotas, backup strategy, security style, and CIFS oplocks setting.
The following list describes examples of qtree usage strategies:
The table below compares qtree with FlexVol and Traditional volumes
| Functionality | QTree |
FlexVolume |
Traditional Volume |
| Enables organizing user data | Yes |
Yes |
Yes |
| Enables grouping users with similar needs | Yes |
Yes |
Yes |
| Accepts a secruity style | Yes |
Yes |
Yes |
| Accepts oplocks configuration | Yes |
Yes |
Yes |
| Can be backed up and restored as a unit using Snap Mirror | Yes |
Yes |
Yes |
| Can be backed up and restored as a unit using Snap Vault | Yes |
No |
No |
| Can be resized | Yes (using quota limits) |
Yes |
Yes |
| Support snapshot copies | No (qtree data can be extracted from volume snapshot copies) |
Yes |
Yes |
| Supports quotas | Yes |
Yes |
Yes |
| Can be cloned | No (except as part of a FlexVol volume) |
Yes |
No |
| Maximum number allowed | 4,995 per volume |
500 per system |
100 per system |
Now for the commands
| Display | qtree status [-i] [-v] Note: The -i option includes the qtree ID number in the display. The -v option includes the owning vFiler unit, if the MultiStore license is enabled. |
| adding (create) | ## Syntax - by default wafl.default_qtree_mode option is used qtree create path [-m mode] ## create a news qtree in the /vol/users volume using 770 as permissions qtree create /vol/users/news -m 770 |
| Remove | rm -Rf <directory> |
| Rename | mv <old_name> <new_name> |
| convert a directory into a qtree directory | ## Move the directory to a different directory mv /n/joel/vol1/dir1 /n/joel/vol1/olddir ## Create the qtree qtree create /n/joel/vol1/dir1 ## Move the contents of the old directory back into the new QTree mv /n/joel/vol1/olddir/* /n/joel/vol1/dir1 ## Remove the old directory name rmdir /n/joel/vol1/olddir |
| stats | qtree stats [-z] [vol_name] Note: -z = zero stats |
CIFS oplocks reduce network traffic and improve storage system performance. However, in some situations, you might need to disable them. You can disable CIFS oplocks for the entire storage system or for a specific volume or qtree.
Usually, you should leave CIFS oplocks on for all volumes and qtrees. This is the default setting. However, you might turn CIFS oplocks off under certain circumstances. CIFS oplocks (opportunistic locks) enable the redirector on a CIFS client in certain file-sharing scenarios to perform client-side caching of read-ahead, write-behind, and lock information. A client can then work with a file (read or write it) without regularly reminding the server that it needs access to the file. This improves performance by reducing network traffic.
You might turn CIFS oplocks off on a volume or a qtree under either of the following circumstances:
Otherwise, you can leave CIFS oplocks on.
| Enabling/Disabling for entire storage | cifs.oplocks.enable on cifs.oplocks.enable off |
| Enabling/Disabling for qtrees | qtree oplocks /vol/vol2/proj enable qtree oplocks /vol/vol2/proj disable |
You might need to change the security style of a new volume or qtree. Additionally, you might need to accommodate other users; for example, if you had an NTFS qtree and subsequently needed to include UNIX files and users, you could change the security style of that qtree from NTFS to mixed.
Make sure there are no CIFS users connected to shares on the qtree whose security style you want to change. If there are, you cannot change UNIX security style to mixed or NTFS, and you cannot change NTFS or mixed security style to UNIX.
| Change the security style | ## Syntax ## Change the security style of /vol/users/docs to mixed |
Also see volumes above for more information about security styles
Quotas provide a way to restrict or track the disk space and number of files used by a user, group, or qtree. You specify quotas using the /etc/quotas file. Quotas are applied to a specific volume or qtree.
You can use quotas to limit resource usage, to provide notification when resource usage reaches specific levels, or simply to track resource usage.
You specify a quota for the following reasons:
Quotas can cause Data ONTAP to send a notification (soft quota) or to prevent a write operation from succeeding (hard quota) when quotas are exceeded. When Data ONTAP receives a request to write to a volume, it checks to see whether quotas are activated for that volume. If so, Data ONTAP determines whether any quota for that volume (and, if the write is to a qtree, for that qtree) would be exceeded by performing the write operation. If any hard quota would be exceeded, the write operation fails, and a quota notification is sent. If any soft quota would be exceeded, the write operation succeeds, and a quota notification is sent.
| Quotas configuration file | /mroot/etc/quotas |
| Example quota file | ## hard limit | thres |soft limit ##Quota Target type disk files| hold |disk file ##------------- ----- ---- ----- ----- ----- ---- |
| Displaying | quota report [<path>] |
| Activating | quota on [-w] <vol_name> |
| Deactivitating | quota off [-w] <vol_name> |
| Reinitializing | quota off [-w] <vol_name> quota on [-w] <vol_name> |
| Resizing | quota resize <vol_name> Note: this commands rereads the quota file |
| Deleting | edit the quota file quota resize <vol_name> |
| log messaging | quota logmsg |