I have already covered some of the theory in my Java Persistence (JPA/Hibernate), this section is more on the practical section. This is not going to be a full blow by blow tutorial but a simple cheatsheet to come back to refresh your memory.
There are a number of relationships that can be configured
- @OneToOne - one entity is related to another, passport or national insurance number is an example
- @OneToMany - one entity is related to many entities (List, Set, Map, SortedSet, SortedMap), one shopping cart can have many items but the cart belongs to one person
- @ManyToOne - the inverse of one to many above
- @ManyToMany - many entities are related to many entities, a join table is used to hold the relationships, for example a student has many classrooms and a classroom has many students.
Some relationships can be either Uni-directional or Bi-directional
- Uni-Directional - mapping is performed one way, one side will not know about the other
- Bi-Directional - mapping is performed both ways both sides know of each other.
The owning side of a relationship will hold the forgein key in the table, when you setup a relationship one side will become the owner and the other the inverse end
- Owner - if owner entity is update then the inverse end is also updated, the owner cares about the relationship
- Inverse End - if the inverse end is updated then the owner is not updated unless you use helper methods, it does not care about the relationship (mappedBy indicates the inverse end)
There are two fetch types in JPA/Hibernate, I have also covered in my Java Persistence section
- Lazy - data is not retrieved until required (@OneToMany, @ManyToMany), a proxy object is used as a place holder
- Eager - data is retrieved up front straight away (@ManyToOne, @OneToOne)
Next there are a number of cascade types which control how state changes from parent to child objects, by default none are applied unless specified
- PERSIST - save operations will cascade to related entities
- MERGE - related entities are merged when the owning entitiy is merged
- REFRESH - related entities are refreshed when the owning entity is refreshed
- REMOVE - remove/delete operations will cascade to relkated entities
- DETACH - detaches all related entiites from the persistence context (hibernate session)
- ALL - all of the above apply
JPA/Hibernate support embeddable types, they are used to define a common set of properties, for example you could have address which is used by shipping address and billing address.
JPA/Hibernate also support inheritance which I have covered my my Java Persistence section.
JPA/Hibernate supports the creation and updating of timestamps which can be used for auditing or debugging, JPA has @PrePersist and @PreUpdate and Hibernate has @CreationTimestamp and @UpdateTimestamp
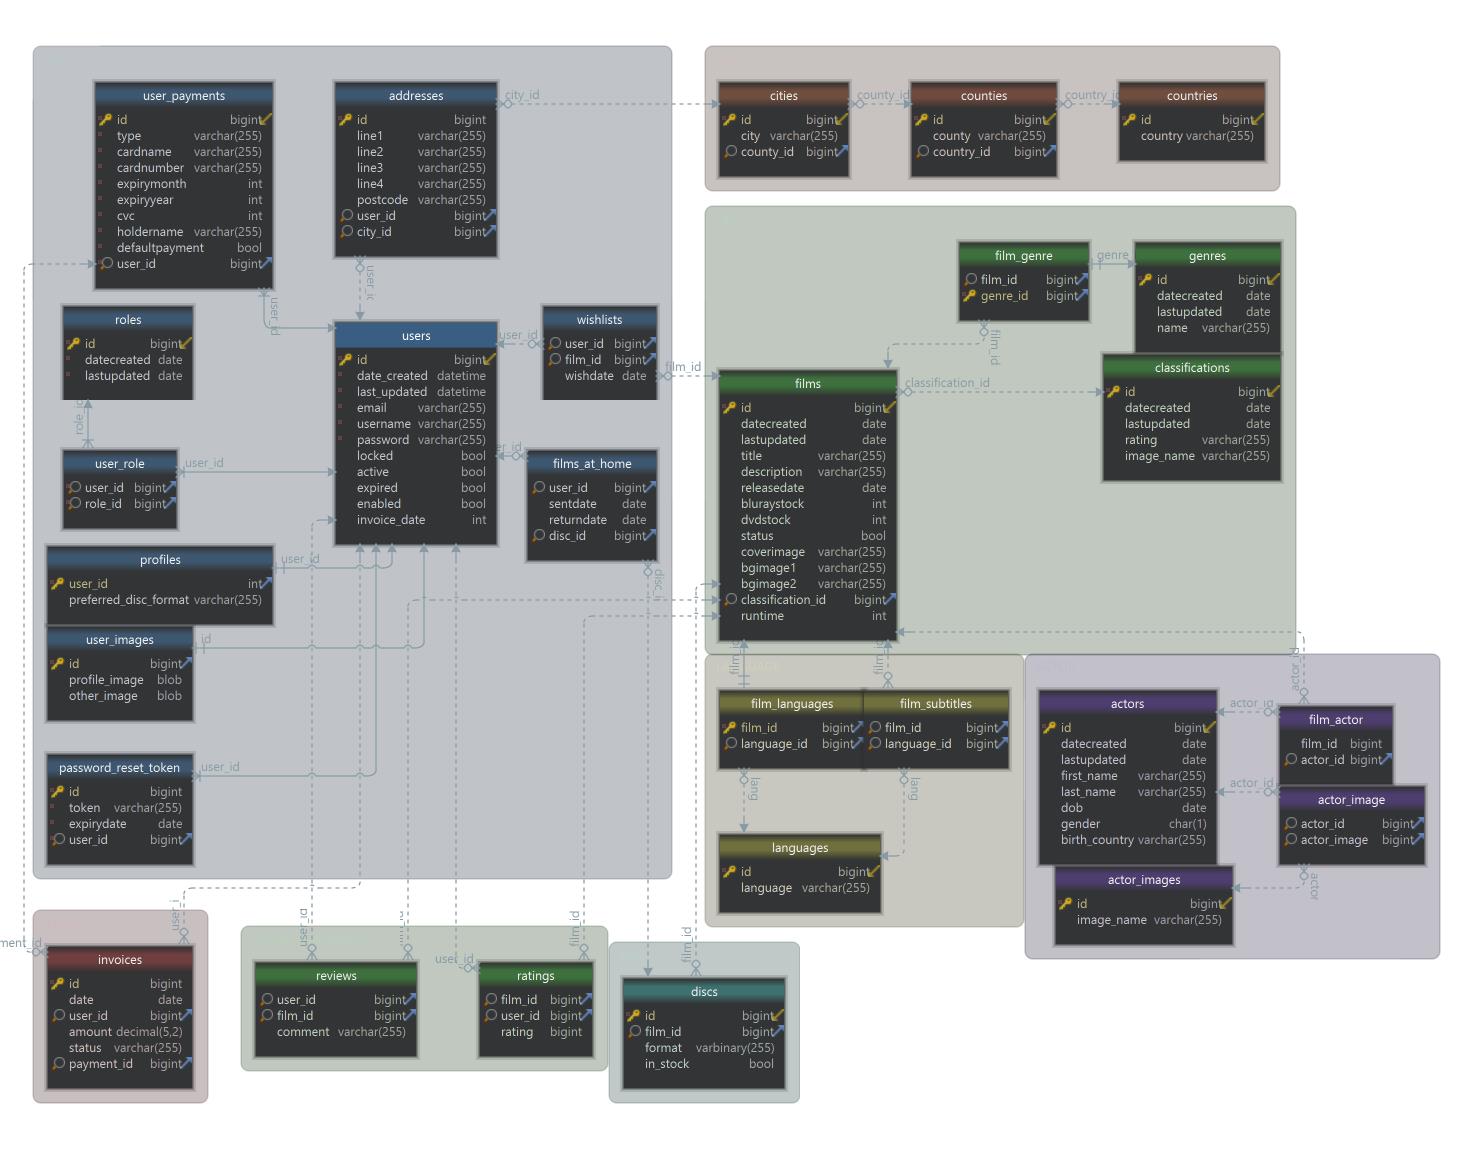
Lastly here is a jpg file that shows the schema that I will be using , its not perfect but will do to explain the JPA/Hibernate concepts below, its basically a dvd/blu-ray rental application based on the old Love Films dvd/blu-ray online rental website.
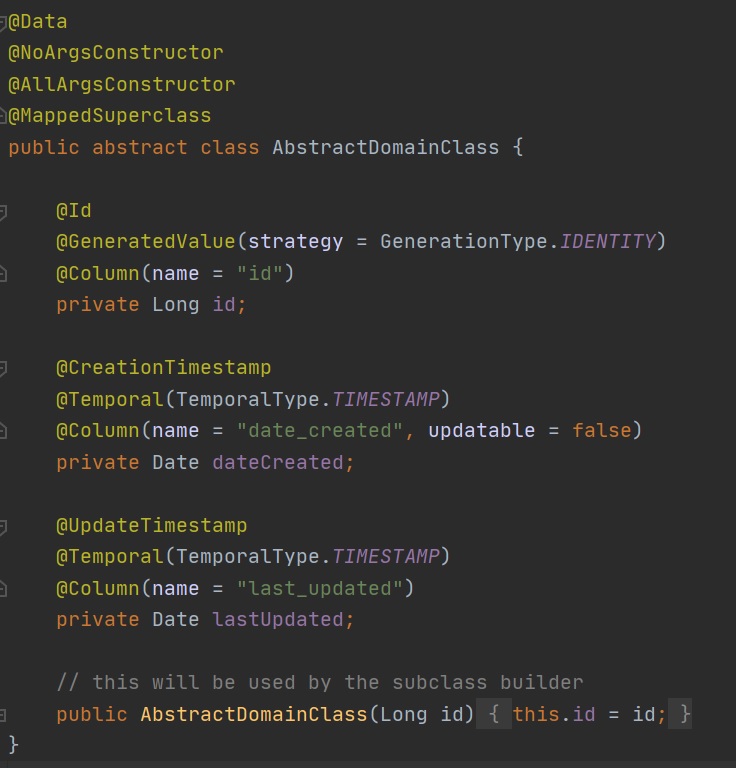
There are various ways to implement timestamps, I have used an abstract class obviously this means I cannot extend any classes further, I have also included the id in this class as well. The @Temporal annotation is used to solve the issue of converting Java date/time objects into the database date/time stamp.
The @Id annotation is used to identify the primary key of the table, you can have multiple columns as a primary key and you would need to use the @Embeddable annotation to achieve this (I cover this later), the @GeneratedValue annotation specifies that the primary key is automatically generated, there are four types of strategies
- Auto - the persistence provider will determine values based on the type of the primary key attribute (you can use UUID in hibernate 5)
- Identity - relies on the IdentityGenerator which expects values generated by an identity column in the database, meaning they are auto-incremented
- Sequence - This generator uses sequences if they're supported by the database, and switches to table generation if they aren't.
- Table - uses an underlying database table that holds segments of identifier generation values.
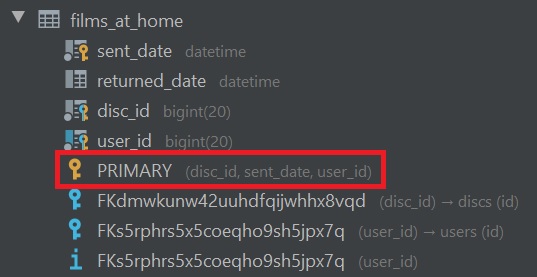
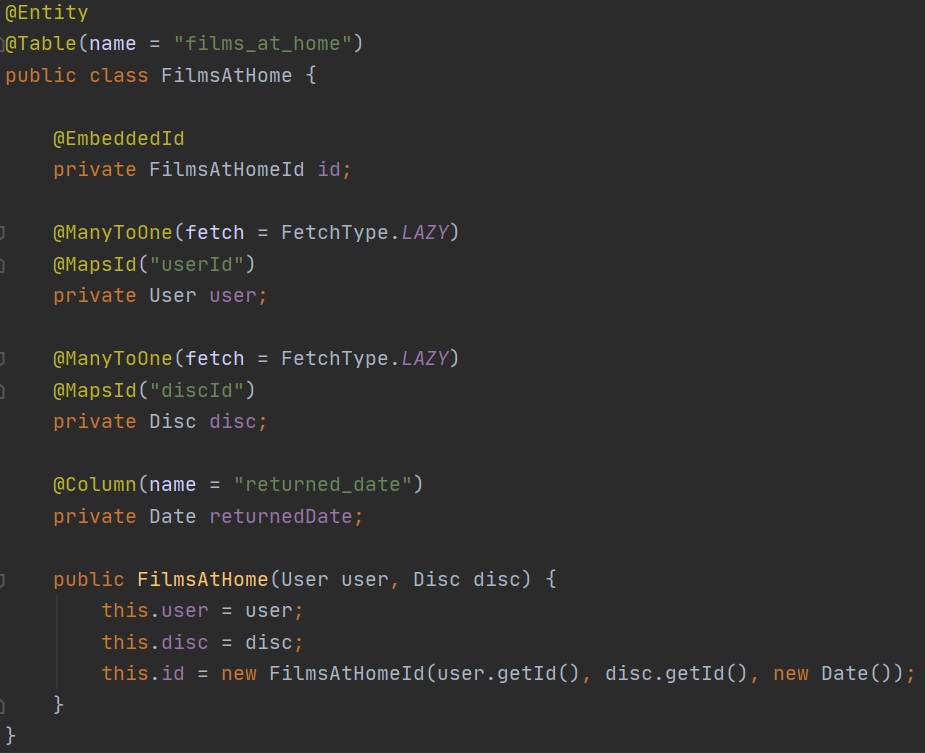
I mentioned above that you can use multiple columns as a primary key, to do this we use the @EmbeddedId and @Embeddable annotations, in this example I am using two foreign key columns and including two additional columns. We use the @MapsId annotation to map the @Embeddable attributes to the FilmsAtHome attributes.
 |
 |
In the screeenshot below you can see that the disc_id and the user_id are two foreign columns but the send_date is a column for this table, the primary key is made up of all three columns making sure that they are unique. Also note the returned_date column is configured in the FilmsAtHome table but the sent_date is configured in the FilmsAtHomeId table, so lot is going on in this type of setup.
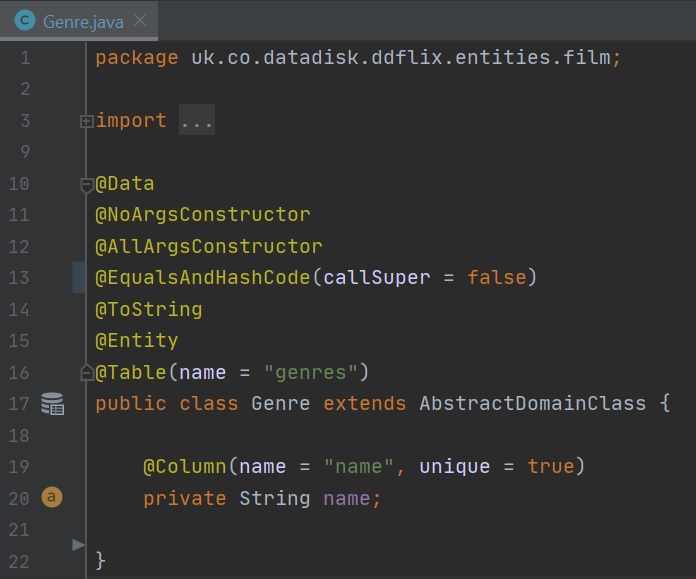
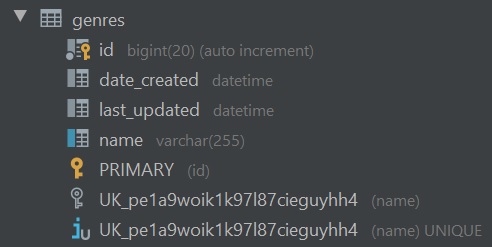
Lets start with a basic entity, note that I am using Lombok for automatic code generation, the annotations I want to focus on is the @Entity and the @Table, basically the @Entity means that this object will be stored into a database table, the table name will default to the name of the class but you can use the @Table annotation to specify a specific name which I have done here. The only column I have added (apart from the AbstractDomainClass columns of id, date_created and last_updated) is name, you use the @Column annotation to name the column and in this case make the column unique. Lombok will take care of creating the constructors, getters/setters, equals/hashCode and the toString() method. The @Column annotation can also specify if it's nullable, insertable, updatable, length, precision and scale. If you configure Spring Boot to create/update table schema then the table will look like the right-hand screenshot (I am using MySQL, see below for database setup in Spring Boot).
 |
 |
You can set a default column value which means if you don't specify a value when creating the row, the default value will be used instead.

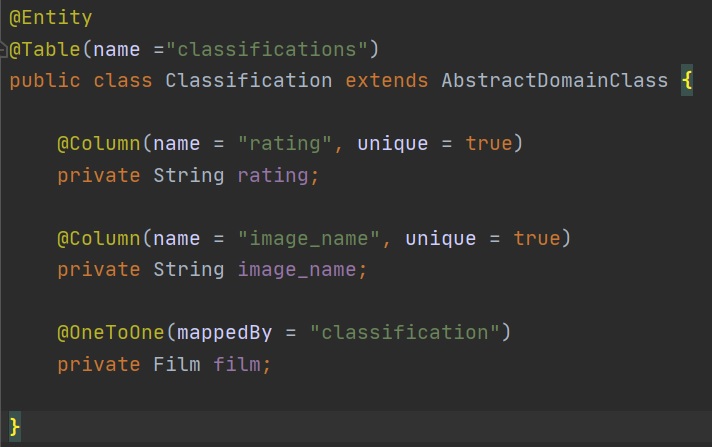
In the below example I use a OneToOne mapping between the film class and the classification class, notice the mappedBy in the classification class this is the inverse end and thus means the film class is the owner of the relationship, we also specify the join column name using the @JoinColumn annotation, the null = false means that the field cannot be null. The classification mappedBy uses the same name as in the film class.
The @OneToOne annotation can also specify fetch type, mappedBy, optional and orphanRemoval (basically remove the child row if the parent row is removed).
| Owner | Inverse End (mappedBy) |
 |
 |
In this example I create a bi-directional mapping, the FilmsAtHome class is the owner of the relationship which it has with the Disc class (inverse end - mappedBy), the FilmsAtHome class uses the lazy fetching type which means when retrieve the Disc references will be a proxy object until the disc data is requested, this increases performance as less data is retrieve. The Disc class uses the cascade option as ALL (see above for cascade options), the orphanRemoval set to true will remove the child entity if it no longer is referenced by its parent. JPA/Hibernate offer other annotations in the Disc class you will notice that I use a @Where annotation this allows you to tweak the SQL being used by Hibernate, also I use the @OrderBy annotation again to tweak the SQL so that the data is ordered when retrieved. I am actually using a Embeddable object as the join table between the FilmsAtHome class and the User class, I will describe this setup later.
The @OneToMany annotation can also specify fetch type, cascade, mappedBy and orphanRemoval, the @ManyToOne annotation can also specify fetch type, cascade and optional.
| Owner | Inverse End (mappedBy) |
 |
 |
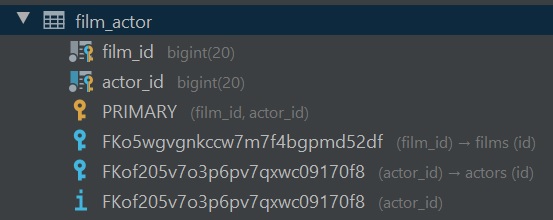
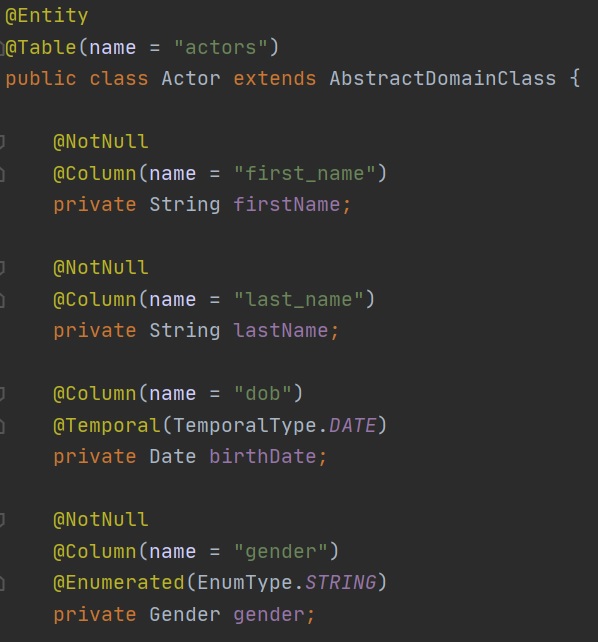
In this example we map many Films to Actors, the Film class is the owning side and this time we use a join table that will be created inside the database called film_actor, we also specify the column names film_id and actor_id as you can see in the screenshot below, the primary key is made up of both columns. The Actor class is the inverse side as indicated by the mappedBy.
The @ManyToMany annotation can also specify fetch type, mappedBy and cascade
| Owner | Inverse End (mappedBy) |
 |
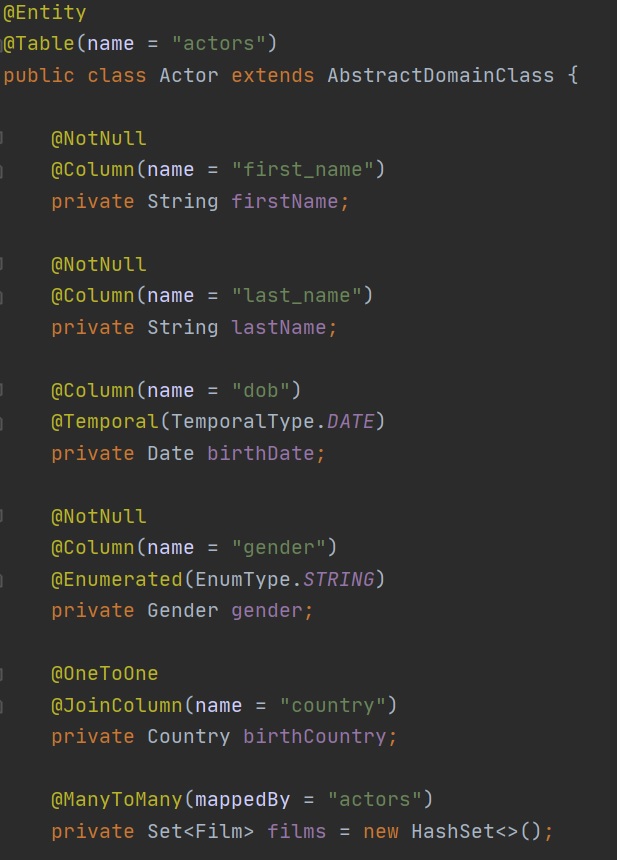 |
I have a Gender class that is used by the Actor class, gender in the Actor class cannot be null (@NotNull), notice the @Enumerated annotation, by default the ordinal value (number value) is used, here I specify to use a a string instead. Be warned that using the ORDINAL number has the potential to change if you add to the middle of the enumeration list, using STRING instead would be unaffected by changes to the list.
 |
 |
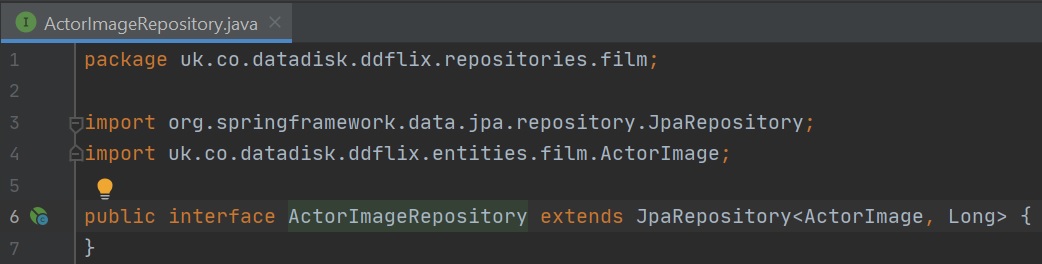
The Spring repositories allows access to CRUD (Create, Read, Update and Delete) operations to the database, these are Spring Beans that are injected into the spring context and can be used within your application, generally they are used at the service level, there are a number of interfaces that you can use, each one builds on top of the other
- CrudRepository - provides basic CRUD functions
- PagingAndSortingRepository - provides methods to do pagination and sort records
- JpaRepository - provides JPA related methods such as flushing the persistence context and delete records in a batch
You create a interface that extends one of the above interfaces, you specify the object class and the object type of the id column. The left-hand screenshot provides the minimum configuration to create repository, the right hand-side screenshot as additional methods that can be created for querying, I will cover this in more later (query creation mechanism).
 |
 |
The CrudRepository contains a number of methods that you can use to save, find data, count rows, delete, etc. The PagingAndSortingRepository extends the CrudRepository and adds methods that use Pageable, the JpaRepoistory extends PagingAndSortRepository and adds flush, saveAndFlush, deleteInBatch and getOne, try to start with the least features (CrudRepository) and only increase as and when you need additional features offered by the others.

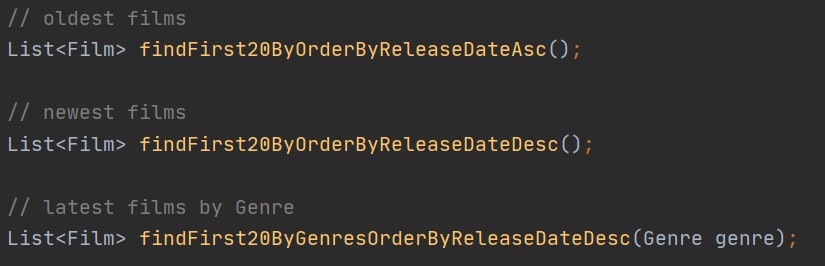
Lastly I want to cover the JPA query creation mechanism, if you noticed in the FilmRepository screenshot above I had few example here as per the below screenshot, we write in plain english what we require and the JPA will generate the SQL from this method name. The mechanism first removes common prefixes from the method name and parses the constraints of the query from the rest of the method name. So taking the top example findFirst20ByOrderByReleaseDateAsc(), it will retrieve the first 20 rows which will be in ascending order of the release date. The third example findFirst20ByGenresOrderByReleaseDateDesc(Genre genre) we are passing a argument a genre, so we find the first 20 rows of a specific genre in descending order by release date.
There are many keywords that can be used like First, Top to add to the query so you have findTopBy, findTop1By, FindFirstBy, findFirst20By. You can use the Distinct keyword in between the find and By keywords, so you have FindDistinctTitleBy or FindfDistinctActorBy, lastly we have the text after the By keyword which is the search criteria FindFirst20DistinctTitleByReleaseDate and additionally you pass arguments for the where clause findFirst20ByOrderBySurname(String surname). You can also use the IsNull keyword findByUserAndDiscAndReturnedDateIsNull. IDE's will help you create the method name for you by supplying the search criteria options as shown in Intellij below

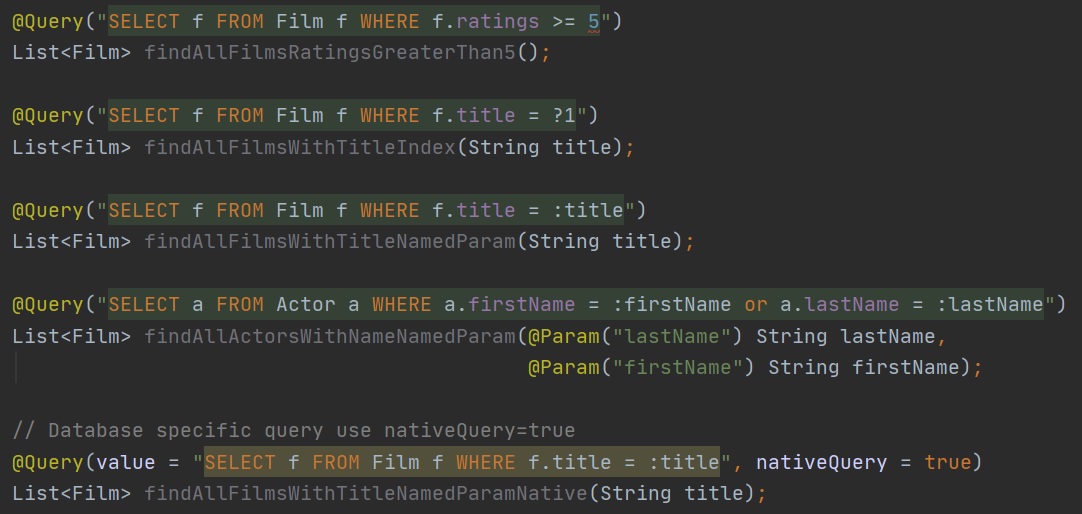
In the above section I covered JPA creation mechanism, but there are times were you may want to supply your own SQL statement, you can use the @Query annotation, you also have the ability to create a native specific database SQL statement. Below are various examples of using the @Query annotation including a native query example. To use simple call the method and pass any required parameters.
In this section I cover how to setup various database connections plus how to initialize databases and other features regarding databases.
First I want to cover the Hibernate property called ddl-auto, but there are two terms that you should know about
- Data Definition Language (DDL) - used to create the schema of the database
- Data Manpuliation Language (DML) - used for querying/inserting/updating/deleting the data in the database
The ddl-auto property controls how the setup of the database on spring startup, it can create database tables (DDL) based on the JPA entities that you create, the supported values are:
- none - won't create anything or validate the database, basically does nothing
- validate - will check the entities against the database tables and will fail startup if any isssues (ideal for Production)
- update - will update an existing database if the entities don't match (don't use in Production)
- create - will perform a initial database creation
- create-drop - will drop any tables first then will perform a initial database creation (used by h2, hsql, etc)
The ddl-auto is setup in the application properties file as below
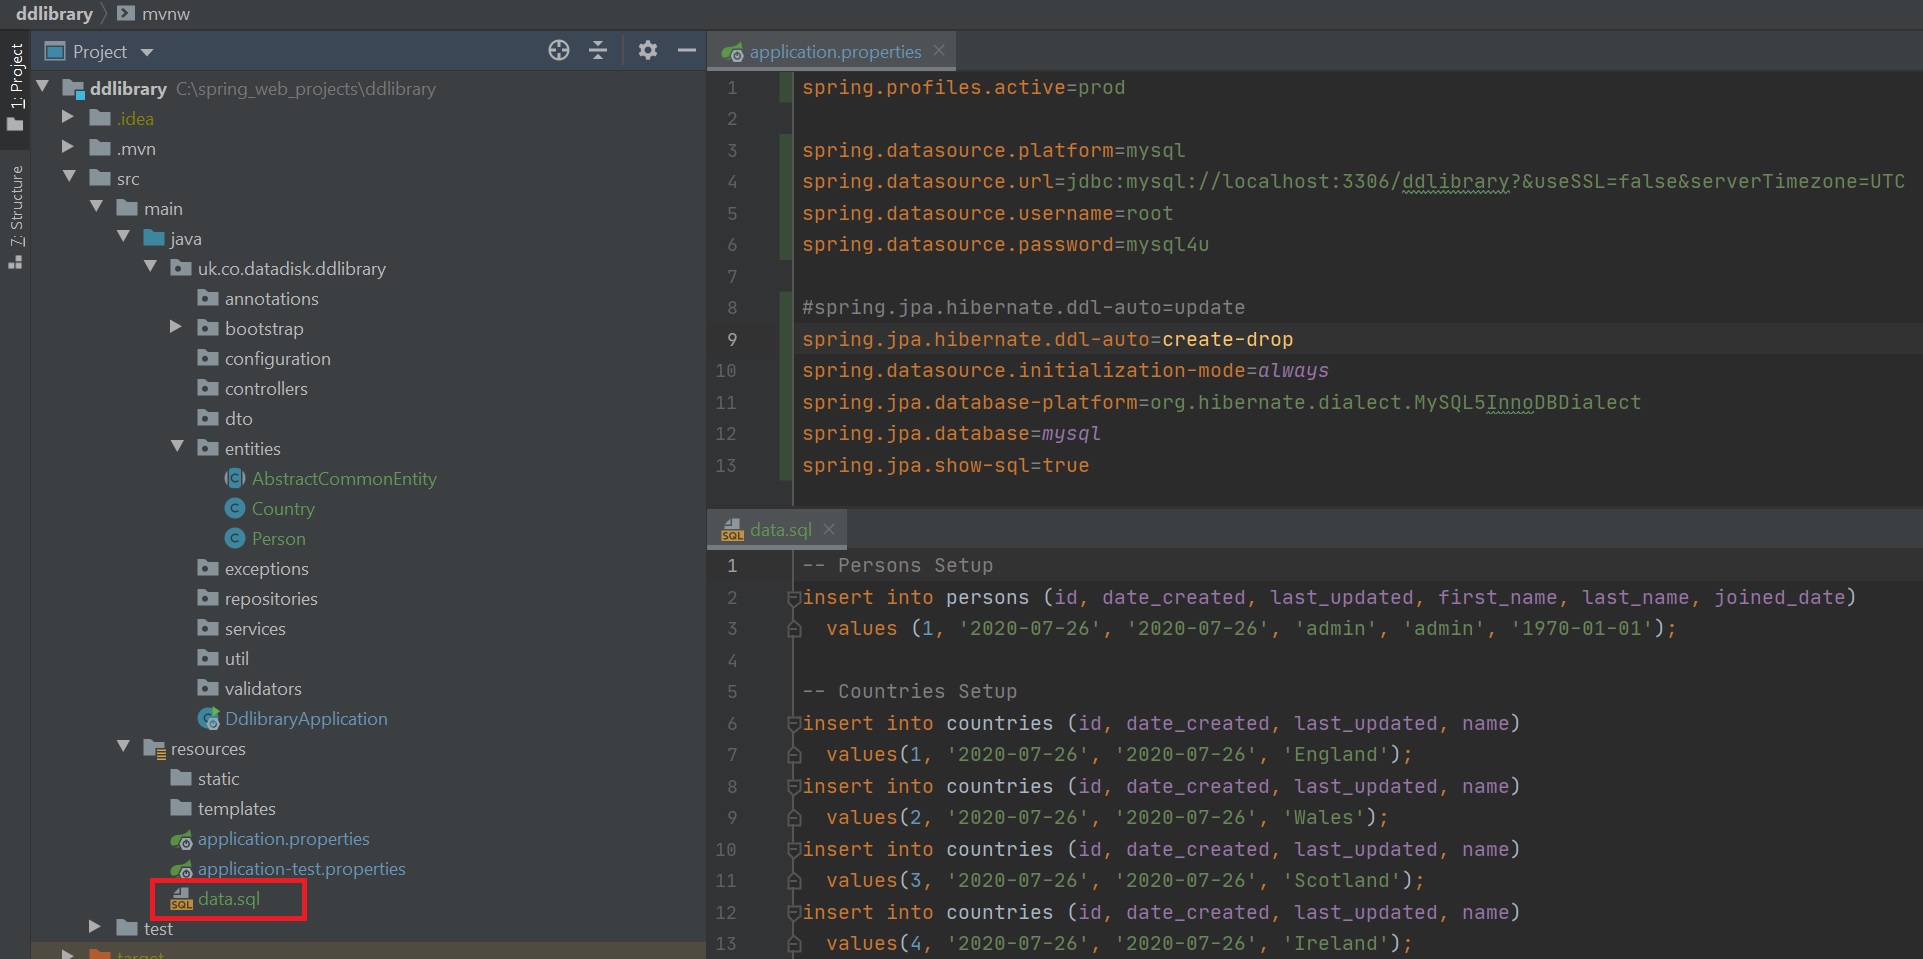
You can also initialize the database using Hibernate, the ddl-auto property has to be set to create or create-drop, you create a file called import.sql that will be loaded during startup, it must be on the root path. Spring also has two files that you can initialize the database schema.sql and data.sql, however you need to set a property called spring.datasource.platform, below is an example using a MySQL database, you also have a property to show the location of the files if not on the root path. The H2 database is the only database that will be initialed by default use the spring.datasource.initialization-mode to allow other databases to get initialized when using files. Try to use either Hibernate or Spring initialization files but not both as it could get very messy.

Below is an example of using a data.sql to load data into MySQL database, notice the spring.datasource.platform and spring.datasource.initialization-mode have been set and that the data.sql is in the resource folder.
Below are some examples of setting up specific databases and the related properties that you need to setup in the application properties file.
| MySQL | 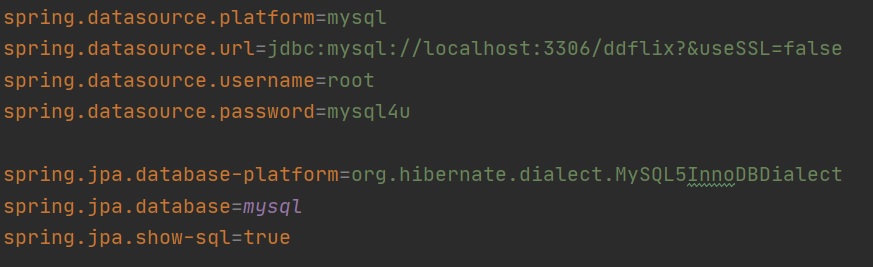 |
| MongoDB | 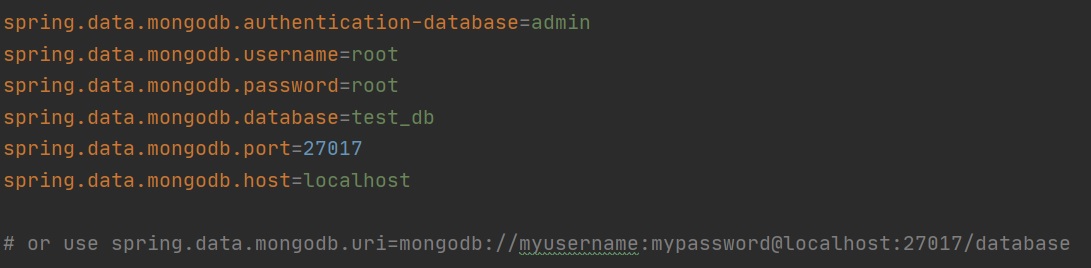 |