Virtual Machines (VM)
Now that you have an ESXi server with networking and storage configured it is time to build some virtual machines, firstly I will explain what a virtual machine is and what it contains, then we will build a Linux VM using local disks, we will also install VMware Tools to the guest O/S and the reason on why you should. I will also cover snapshotting a VM and VM templating.
There are a number of new features with version 7
- Support for VM's with 768 vCPUs and up to 24TB of RAM
- New power-on defaults (a soft power off rather than a hard power off)
- Hot add memory and CPUs to guest O/Ss that support it
- Thinly-provisioned virtual disks, so virtual disks only take up the block they consume and do not waste free space - ideal for virtual desktop environments
- Broader range of guest O/S's RedHat/Centos 8, AWS Linux 2, Debian 9, windows 10, windows server 2019 and many more
- Virtual Machine Communication Interface (VMCI) an experimental method of communication between two VMs on the same ESXi server that does away with using network protocols
A Virtual Machine (VM) is defined by a collections of files, when you create a VM you are creating a text file with the .vmx extension which defines properties such as
- VM's name
- Storage location
- Guest OS type
- Number of vCPUs
- Number of virtual NIC's
- type of virtual SCSI adapter
- Size and location of the virtual disk
You can view some of the files by going to the datastore and looking inside the virtual machine folder, below you can see some of the files used by a RedHat 8 VM.
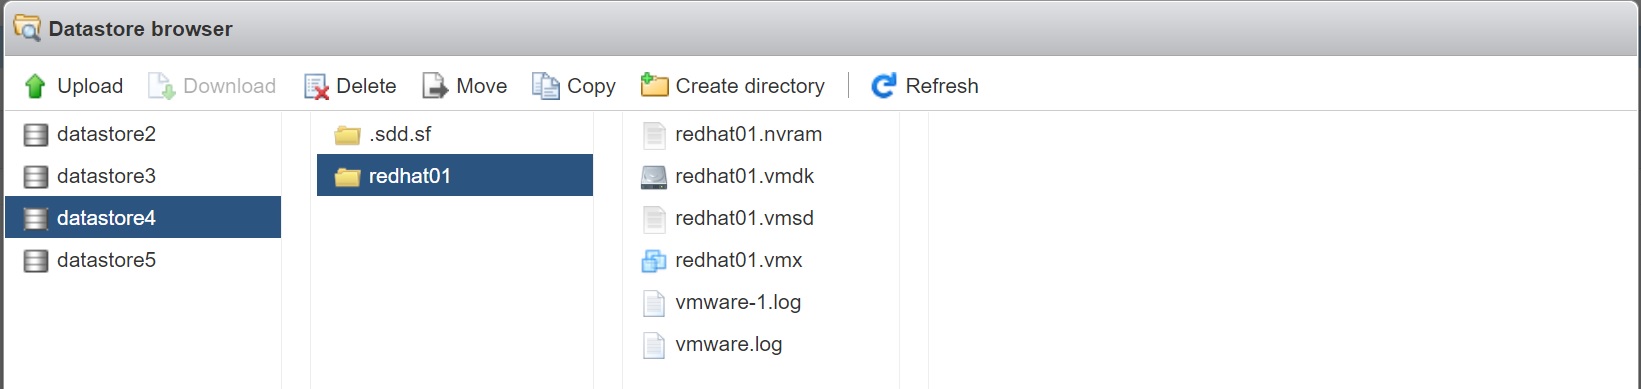
In the below table I list and describe the many of the files associated with a VM
| File Extension | Description |
| .vmx | Configuration file in text format, which means you can open it and read it |
| .nvram | VM's virtual BIOS file |
| .vmdk | VM's metadata/descriptor virtual disk file |
| -flat.vmdk | VM's data virtual disk file (OS/applications, data) |
| -rdm.vmdk | VM's raw device map file (OS/applications, data) |
| -delta.vmdk | VM's snapshot disk file |
| .vswp | VM's swap file |
| 00001.vmdk | Snapshot file |
| .vmss | Suspended state file |
| .vmsn | Snapshot state file |
| .vmsd | Snapshot data file |
| .log | Log file |
| .vmxf | Internal metadata file |
| .vmxt | Virtual machine template file |
| .rdm | RDM file with virtual compatibility |
| .rdmp | RDM file with physical compatibility |
The VM itself presents the appearance of real hardware, even though we know it is actually software, the VM really does believe it is on a physical server and on its own. An ESXi VM actually uses an Intel 440BX-based virtual motherboard using th components below
- Intel 440BX AGPset 82443BX Host Bridge/Controller
- Intel 82371AB (PIIX4) PCI ISA IDE Xcelerator
- National Semiconductor PC87338 ACPI 1.0 and PC98/99 Compliant SuperI/O
- Intel 82093AA I/O Advanced Programmable Interrupt Controller
This was selected because it had very good compatibility and reliability with many Operating Systems including very old O/S. The virtual motherboard can support the following
- One or Two virtual floppy drives
- One or Two virtual CD/DVD drives
- PS/2 interfaces for keyboard and mouse
- Many PCI slots for SCSI controllers, NIC's, video
- 1 to 768 vCPU's
- up to 24TB of RAM
- One parallel port
- One or two serial ports
- One USB controller
It is not possible to add a USB device and present it to a VM, it is used to address compatibility issues that have occurred with some USB redirection services commonly used in virtual desktops. Parallel and serial devices are not fully virtualized and their functionality is provided by the service console not the VMKernel. Also vMotion cannot use Parallel or Serial ports as you need to move the physical hardware attached to the parallel or serial port. However in all cases of USB, Parallel and Serial you can purchase a IP-based hub and redirect this via the network instead.
Physical CD/DVD and floppies are now rarely used, generally you convert them into ISO or FLP files, these can then be uploaded to a storage area within the ESXi server, I generally do this for my Linux ISO files, you can attach a ISO file to a VM and boot from this file.
Although you have PS/2 interfaces for a keyboard or mouse you interact with the VM via a remote console session in either vSphere client or vCenter, it's a bit like accessing a server via the ILO/IMM card. You can watch a VM boot up just like a normal physical server you can even send mouse or keyboard commands to the VM. When you first create a VM you are given a basic video SGA driver, after the guest O/S has been installed it would be wise to install the latest VMware Tools which adds a virtual video adapter driver and VMware virtual mouse driver, this will significantly improve graphics and mouse operations.
Before we create our first VM I have to discuss disk types within a VM, there are three of them
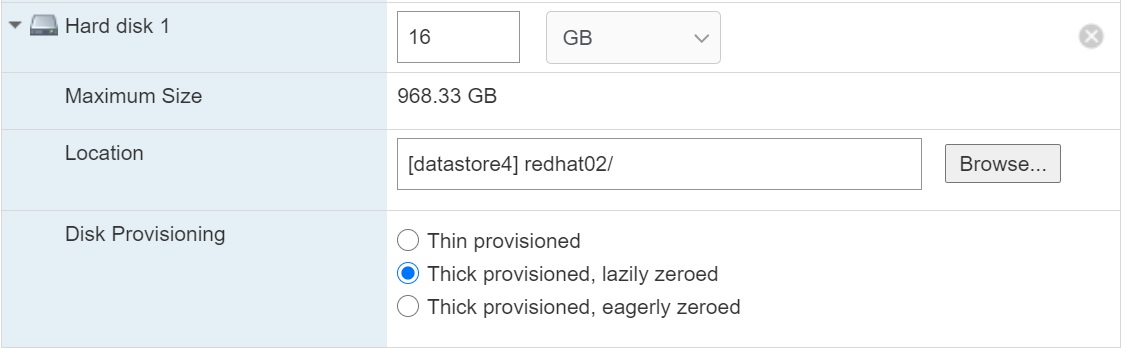
| thin | with a thin virtual disk you may ask for 30GB disk storage, it actually grows in size as you add more data, this is a good space-saving format for test VM's or VDI environments where you are trying to reduce storage costs. Note that this format is incompatible with the Fault Tolerance (FT) feature |
| thick/lazily zeroed | then this type of virtual disk is created it takes up all the space you allocate, ESX virtual disks do not grow as more data is created inside them, this format offers the best performance. As a flat file, the virtual disk will be created in contiguous blocks within the VMFS volume. When the disk is created the file is created very quickly and any existing data on the physical disk is overwritten as data is written to the virtual disk as needed. |
| thick/eagerly zeroed | if you use Fault Tolerance (FT) the disk will be create as this type, basically it is the same as a think disk in that if you allocate 30GB you get 30GB, however when a thick/eagerly zeroed disk is created it zeros all the blocks within the disk , it means it takes longer to create but is faster to read and write to because the free blocks are guaranteed to be blank and available for use. This is a major performance improvement which is need for FT to function correctly. It is also required for 3rd party software such as Microsoft Cluster Software (MSCS) |
Lets create our first VM, I will be installing the RedHat 8.3 O/S, I will also be using a ISO file which will be stored on one of the virtual storage area's to boot from and perform the installation. I generally create a ISO folder on a datastore that is not used for VM's to store all my ISO images.

I will give the VM 30GB of disk space and give it Network interfaces (One on the public network and one on the iSCSI network) if you have setup a test environment like mine, then follow below, if not then use your own environment areas (storage, NIC's). I will first cover creating the VM and discuss how to manage the VM and what options you can change, I will then discuss how to get you ISO onto the ESXi server and how to install the guest O/S.
To create a VM you need open either vSphere client or vCenter
Creating the first VM
|
From the navigator panel select virtual machines, then select the create/register VM button, you are then presented with the below screen, select the create new virtual machine
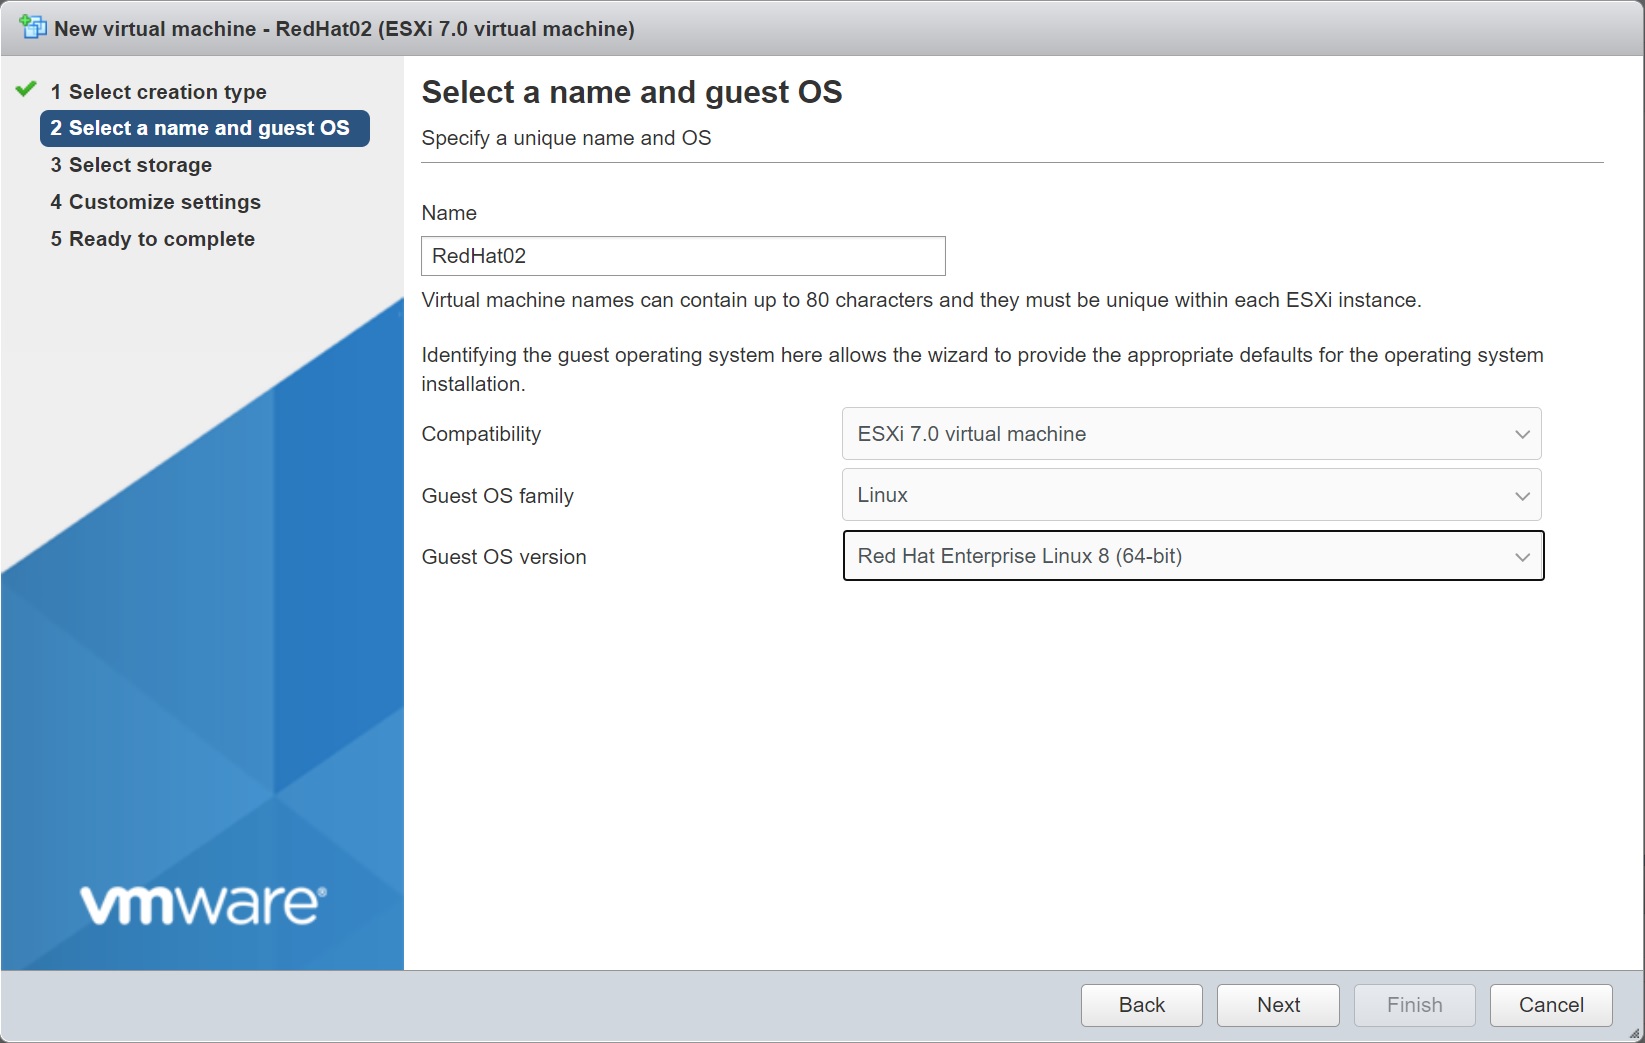
Enter a name for the VM (this is not the hostname of the server), select the compatibility (generally select the lastest version), the OS family in my case this will be Linux and finally select the type of OS that the VM will be running.
Next we need to select the datastore that the VM will be installed in, in my case I will use one of the synology SAN datastores.
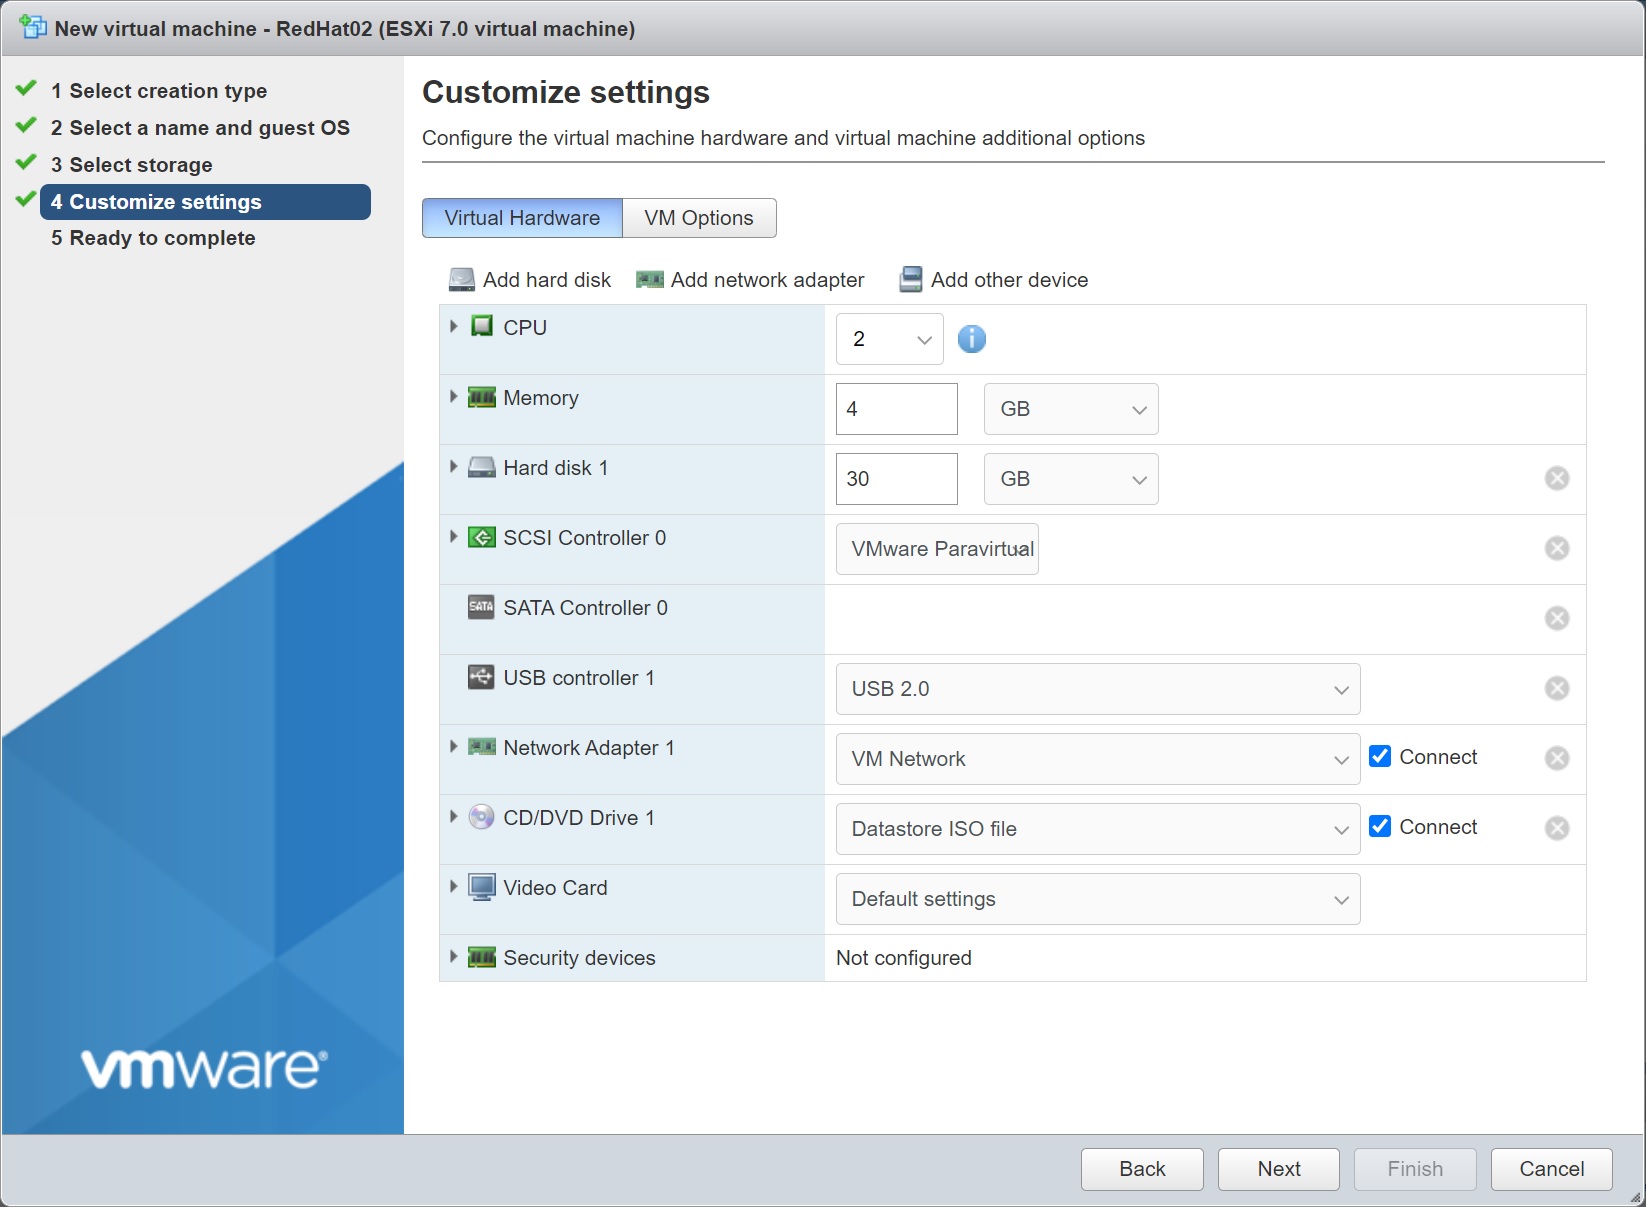
Next we now select the resources the VM will need, CPU's, memory, O/S disk size, etc, also notice that we have selected a Datastore ISO file for the CD/DVD drive (more details below)
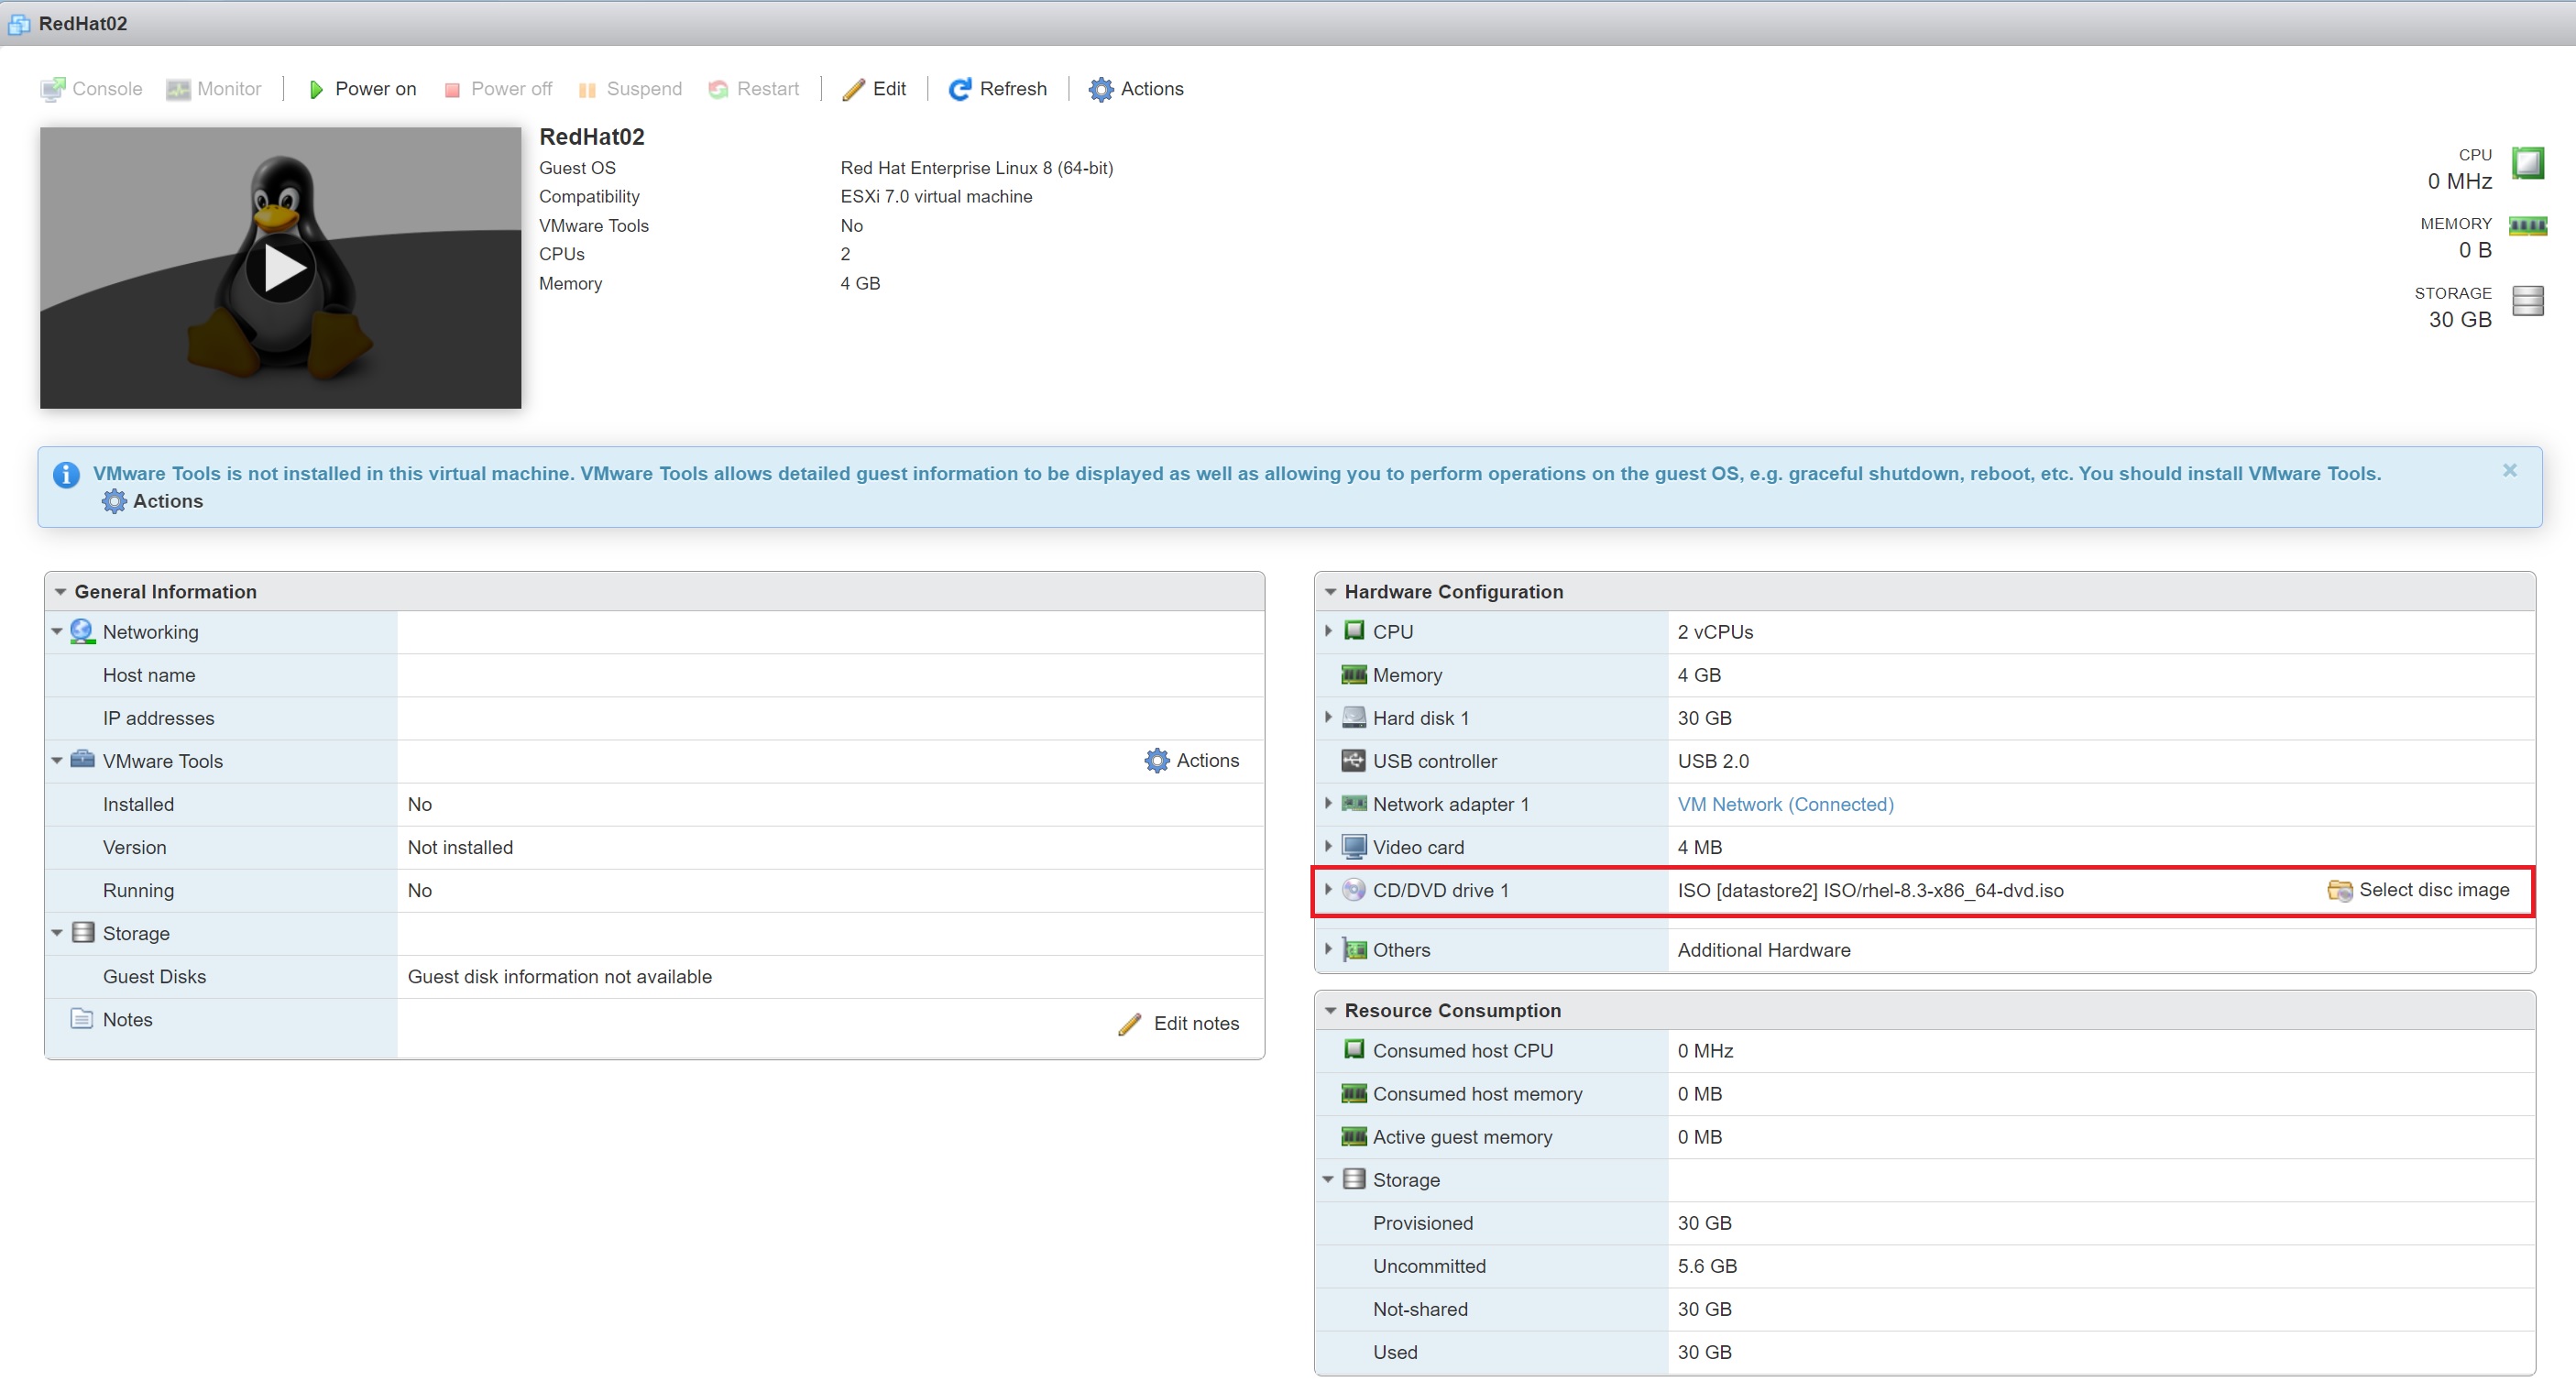
For the CD/DVD drive I selected the RedHat 8.3 ISO image, what this means is when the server boots for the first time this ISO image will be loaded and the RedHat installation process will begin, once the O/S has been installed the CD/DVD drive will then deslect this this so that the O/S boots normally.
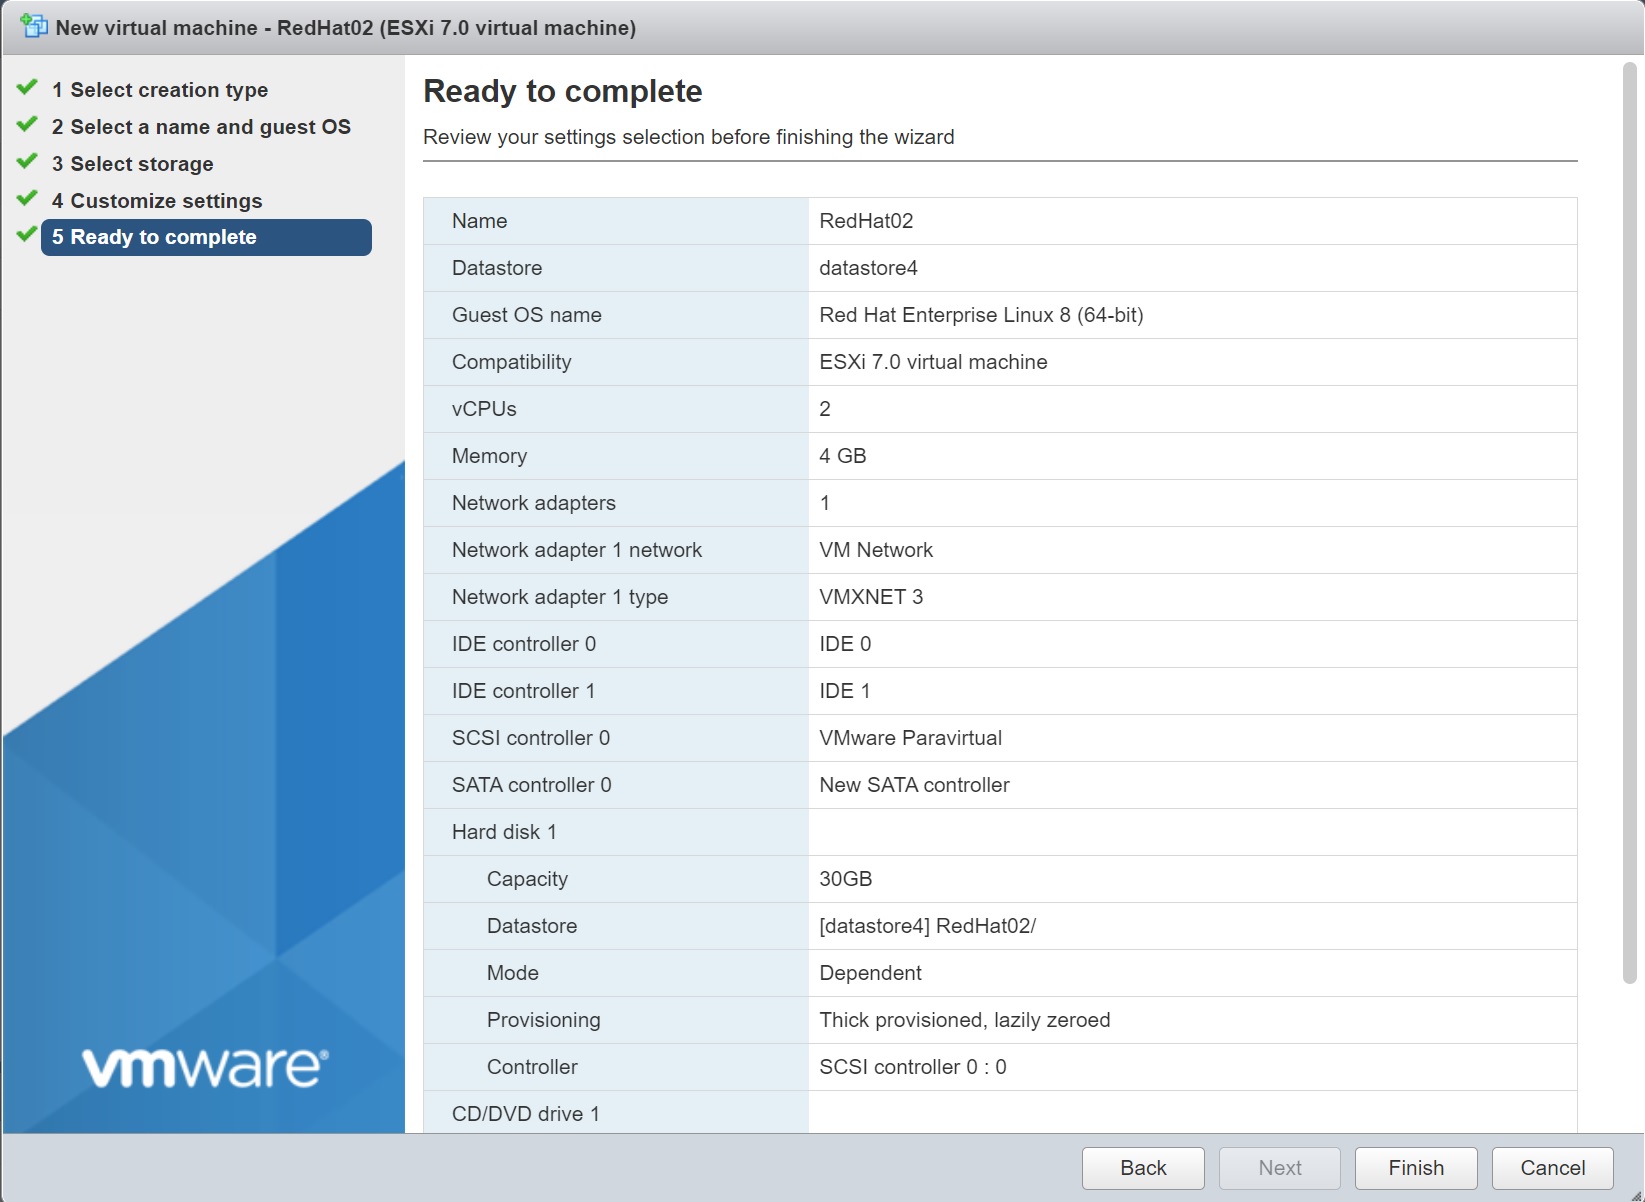
Finally you will get to a summary screen, make sure you are happy with everything and select finish to create the VM
In the recent tasks screen you will see that the VM has been created
In the virtual machines main screen which lists all the virtual machines that have been created you will see the newly created RedHat 8 VM
To get more details of the VM, you can click on the VM name which then takes you to the VM detail screen, here you can see what resources the VM is allocated
Remember that the O/S has not yet been installed only a empty virtual machine has been created |


Now we have built the virtual machine it is now like a physical server with no operating system installed, you can power it on but it will not boot anything, but before we install the guest OS lets see what we can do with this VM, I am not going to explain all the features but highlight a few that I commonly change, some of the advanced features will actually be covered in other sections of my web site, I will be updating this section from time to time when I do get a change to play around with the related feature.
Virtual Machine |
|
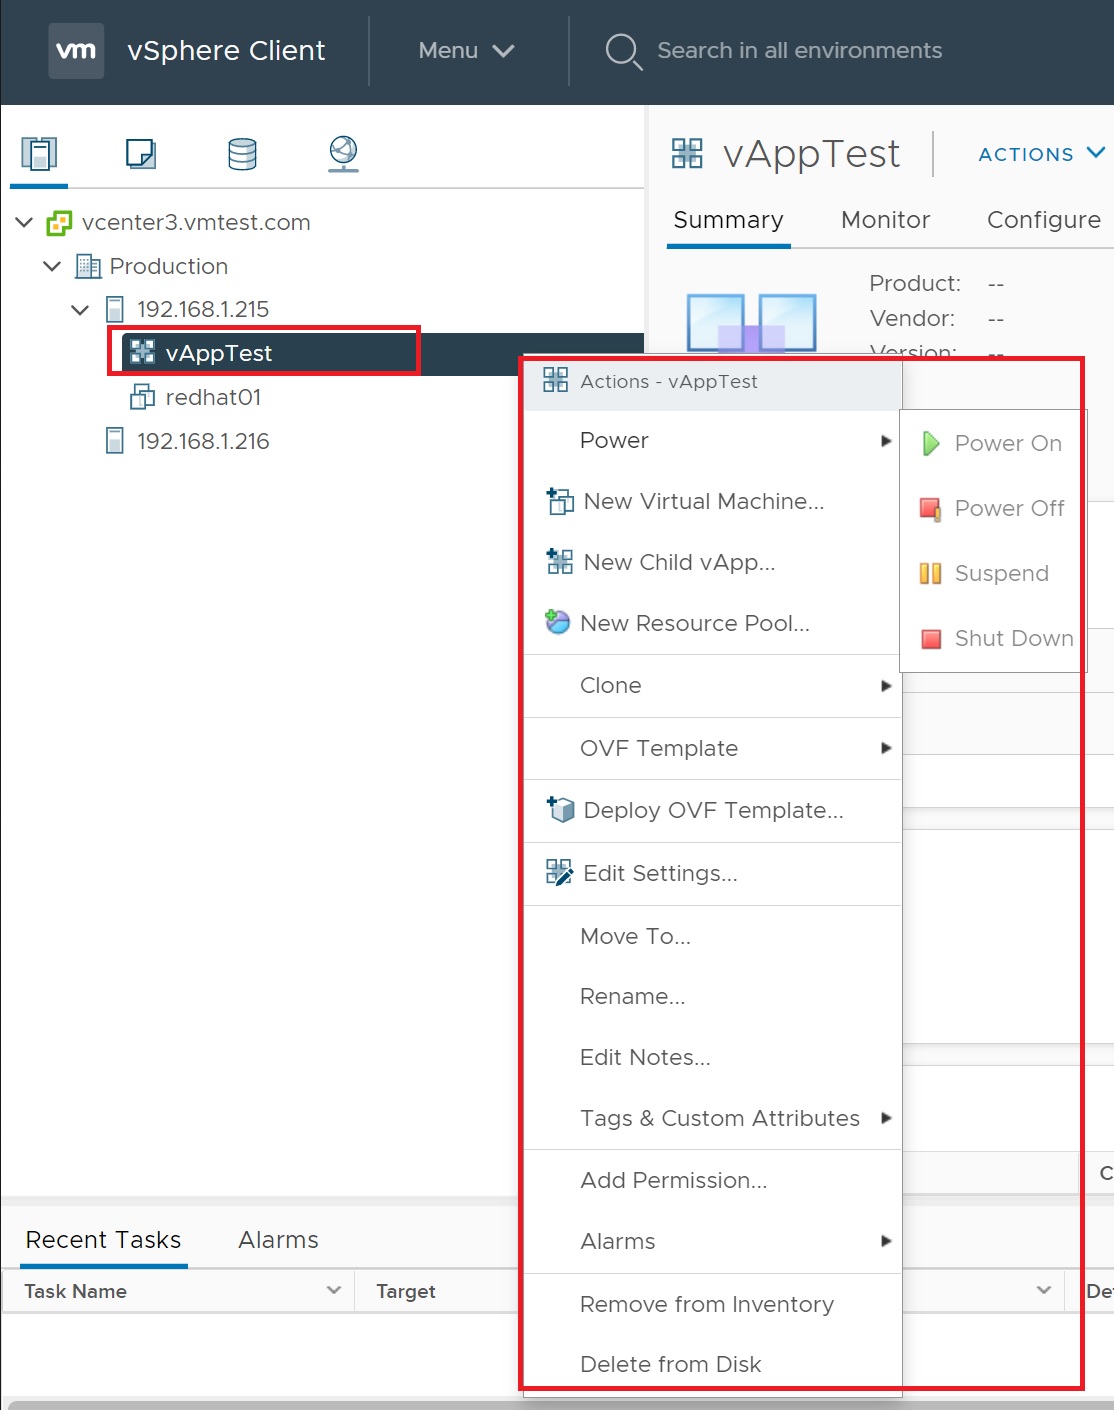
| Power on/off | There are a number of places where you can power on/off/restart your VM, in the main virtual machine screen you have a dedicated power on/off buttons, also in the actions drop down list there is a power option
|
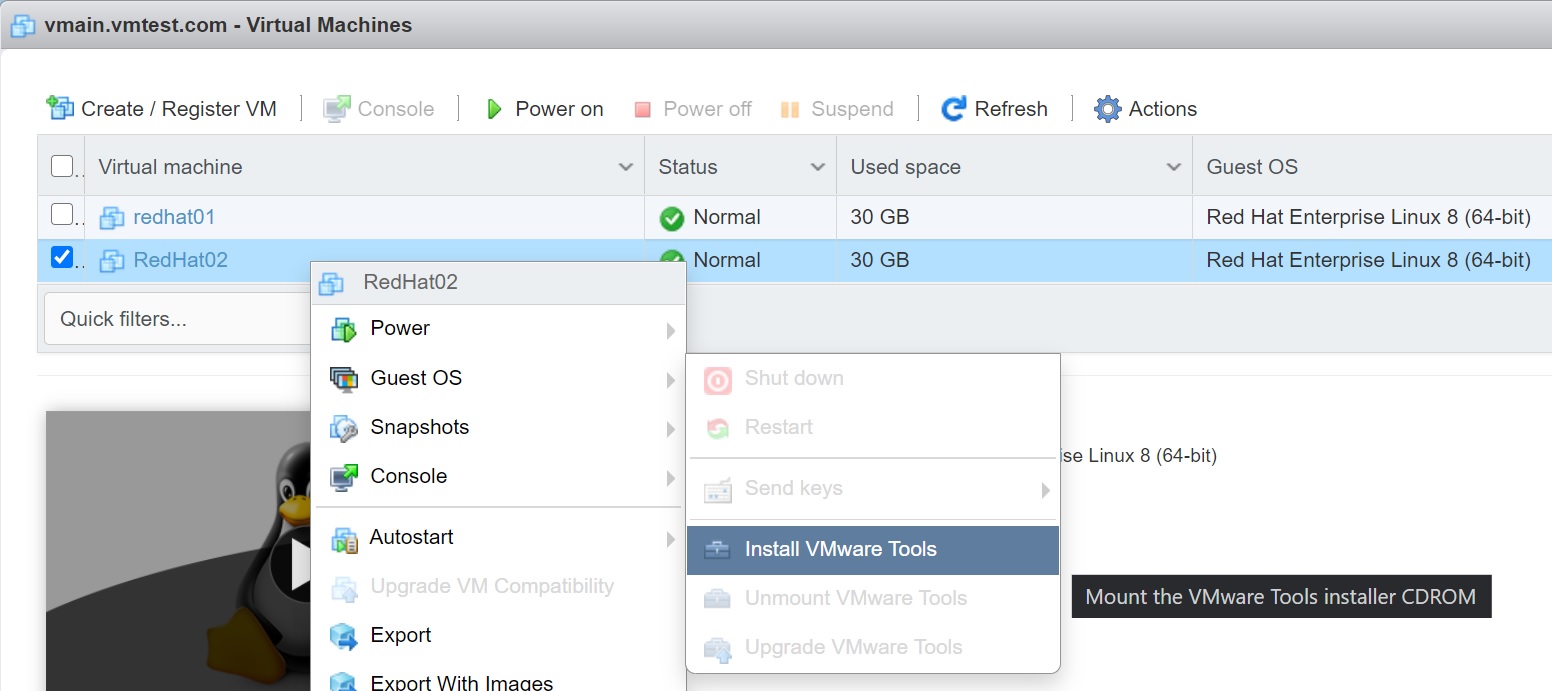
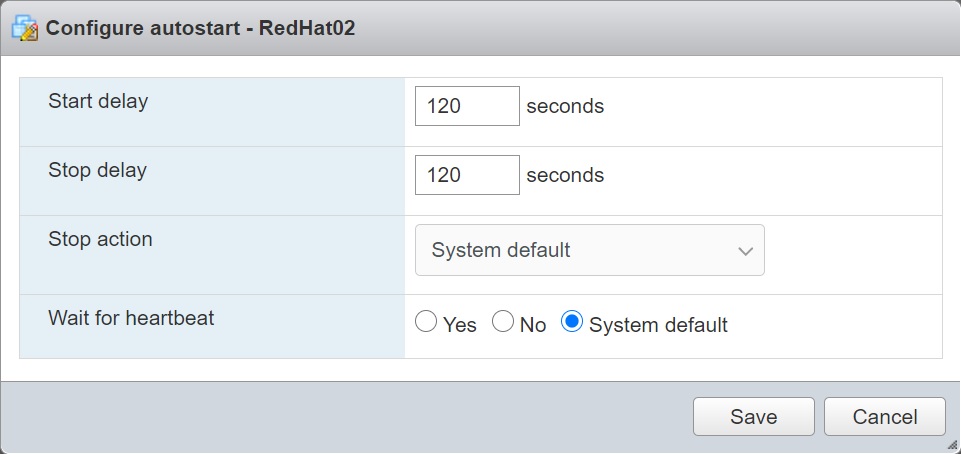
| Automatically start and stop a VM | ESX has the ability to gracefully power off/on your VMs if you chose to shut down or reboot a ESXi server, this guest shutdown feature requires you to install the VMware Tools on to each VM, most O/S now provide there own VM Tools but you can install the tools from the action drop down and selecting -> Guest OS -> Install VMware Tools
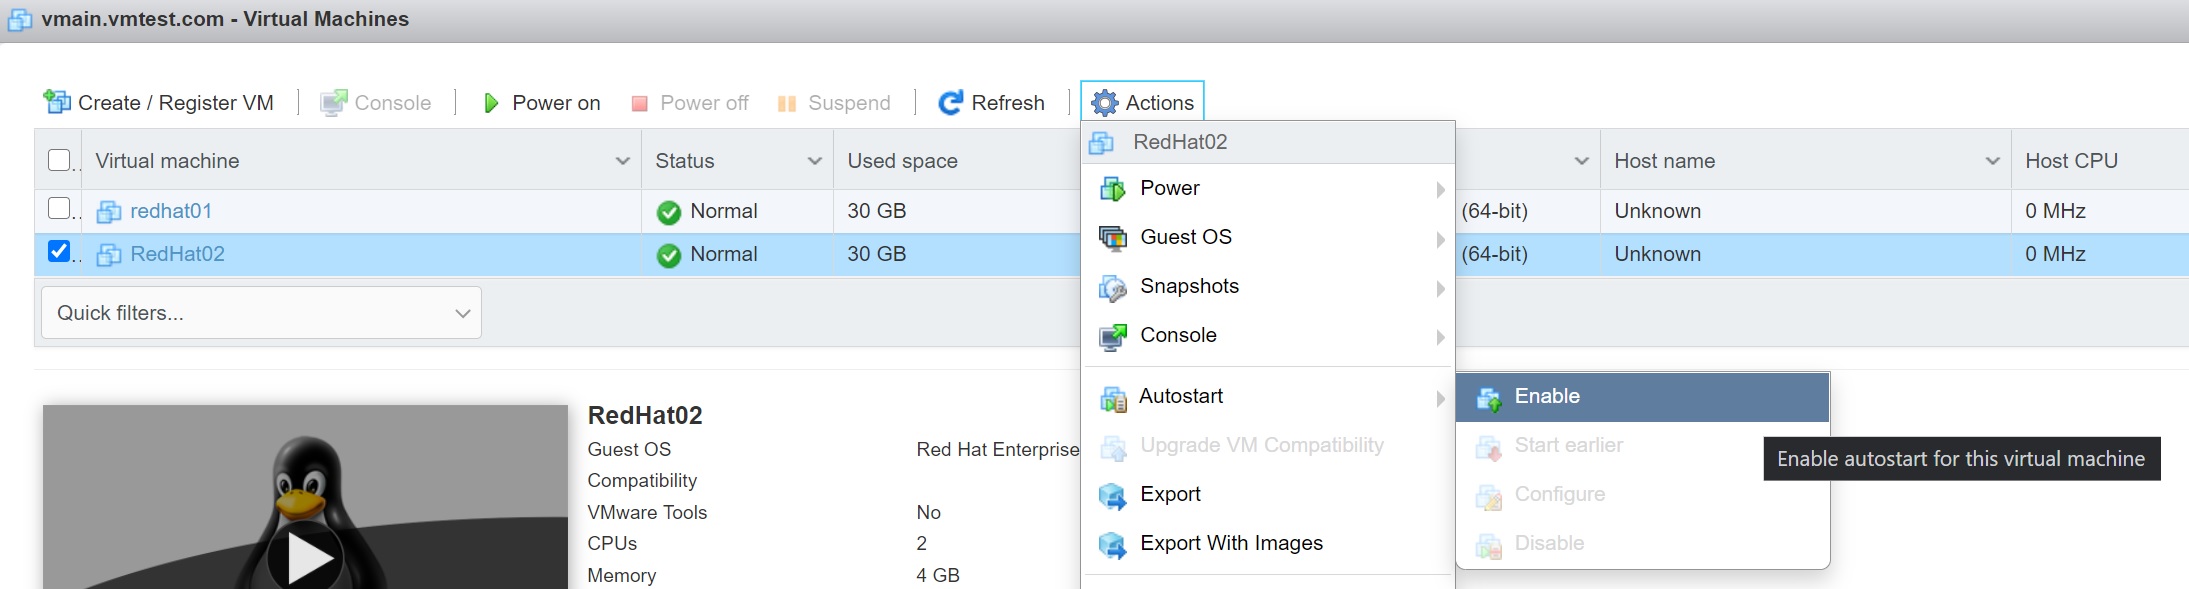
You can autostart the VM when you power on a ESX server again using the actions drop menu and selecting Autostart -> Enable
You can even delay the start to make sure all resources (such as external SAN's) are online
If you use features such as vMotion, DRS and HA do not use this feature as it can cause all sorts of problems |
Virtual Machine Hardware |
|
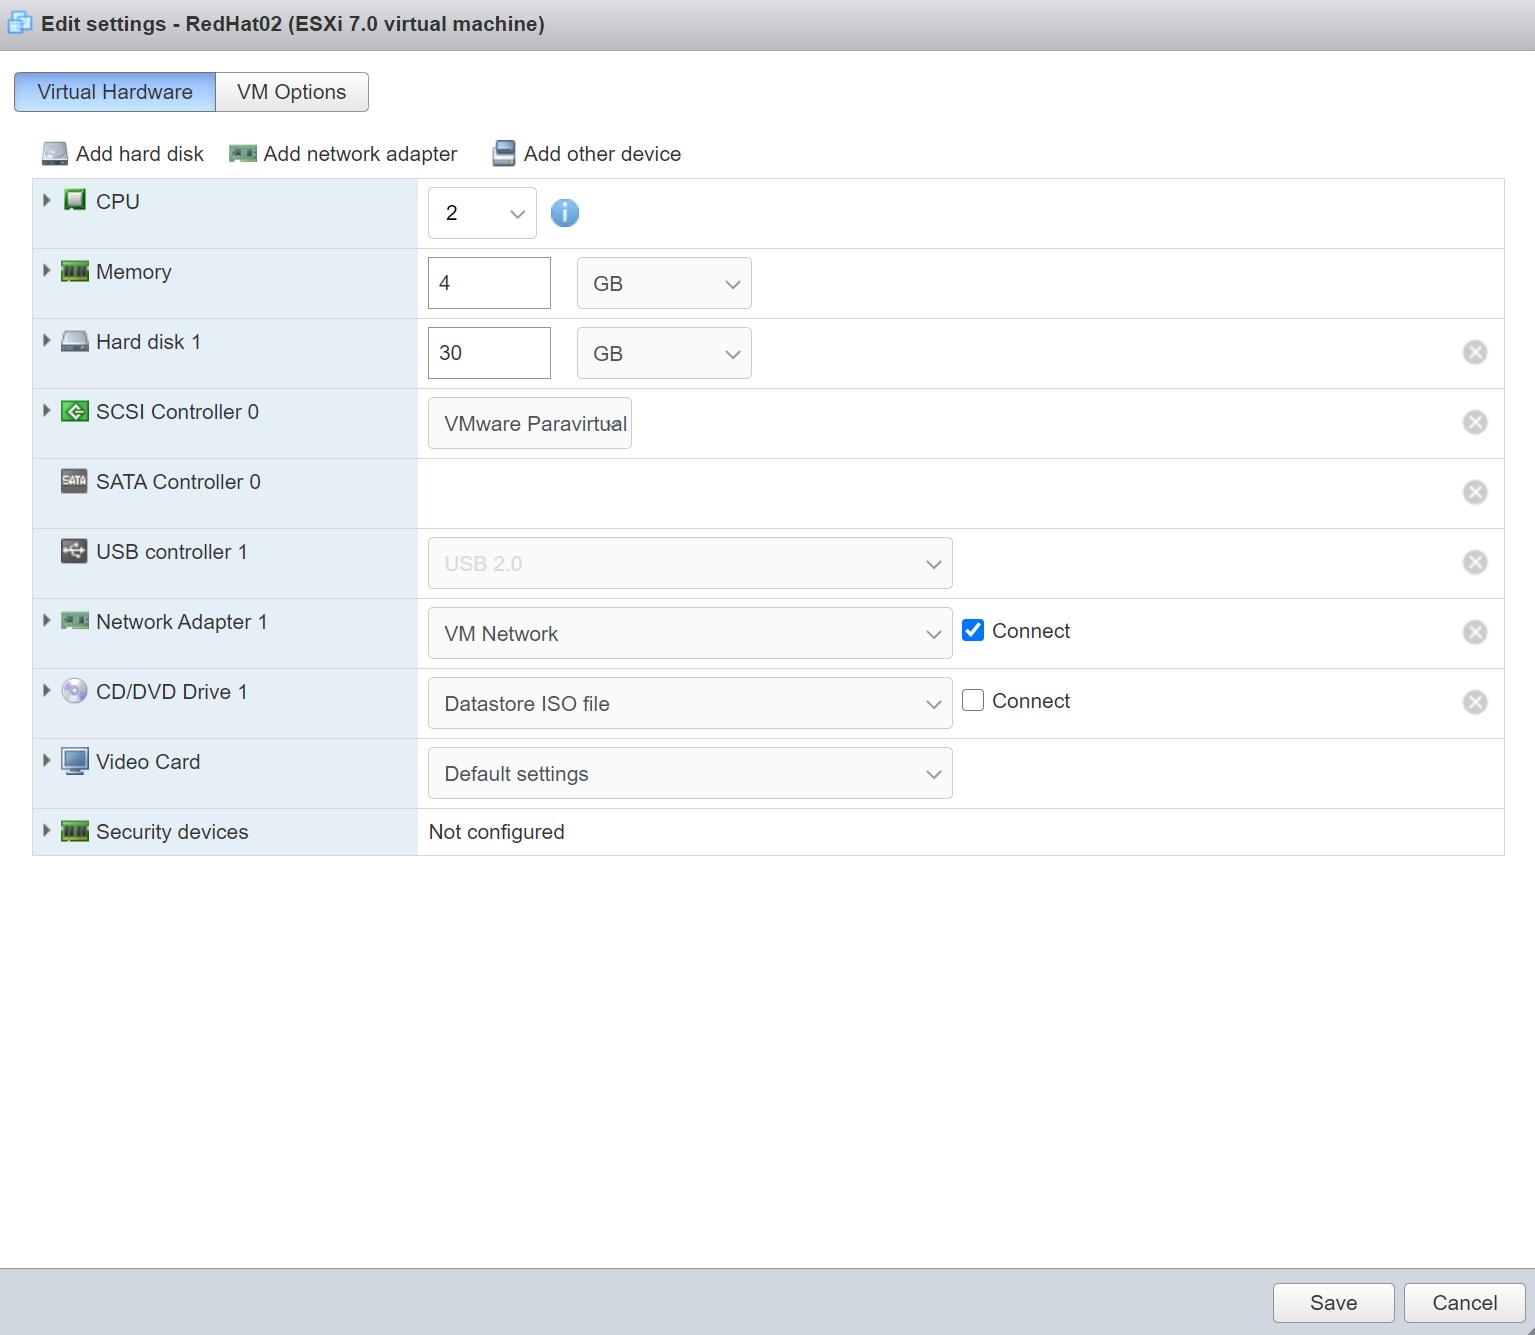
| Editing a VM's resources |
From the virtual machines main screen highlight the VM that you need to change, select the actions drop down and select edit settings, you will be btaken to the below screen, you can add additonal disks, network adapters, CPU's, memory etc
|
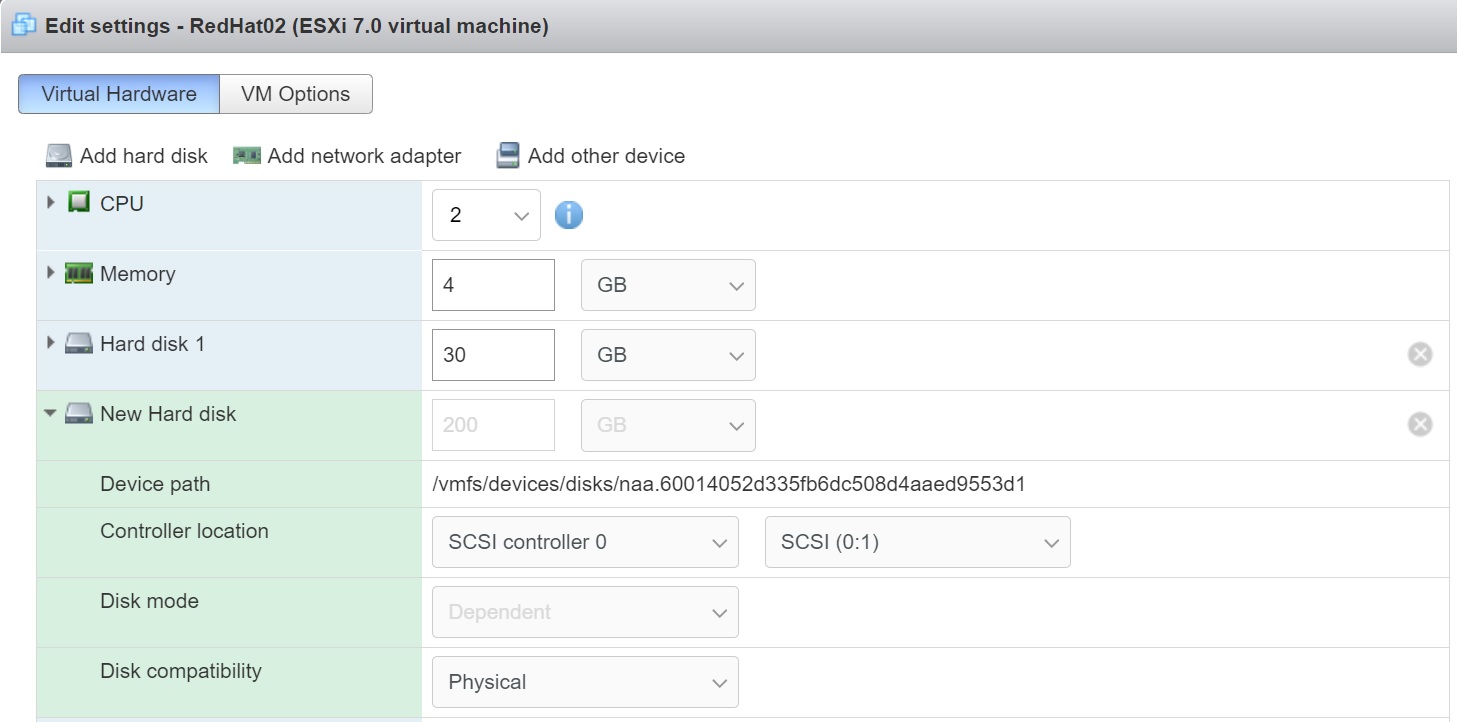
| Giving a VM direct access to a SAN or iSCSI | There are times when you want you VM to have direct access to a SAN or iSCSI, this is achieved by a special mapping file called RDM (Raw Device Mapping), this metadata text file tells the VM which LUN to access, the VMkernel intercedes (binary translation) on its behalf using the VMKernel drivers to access the SAN or iSCSI via the ESXi hosts physical HBA There are several reasons to use RDM files in preference to virtual disks
The maximum size a RDM file can be is 2TB, there are two compatibility modes, note that you can convert a RDM file into a virtual disk file this can be done with either vMotion (SvMotion) or via cold migration, we will cover this in my vMotion section.
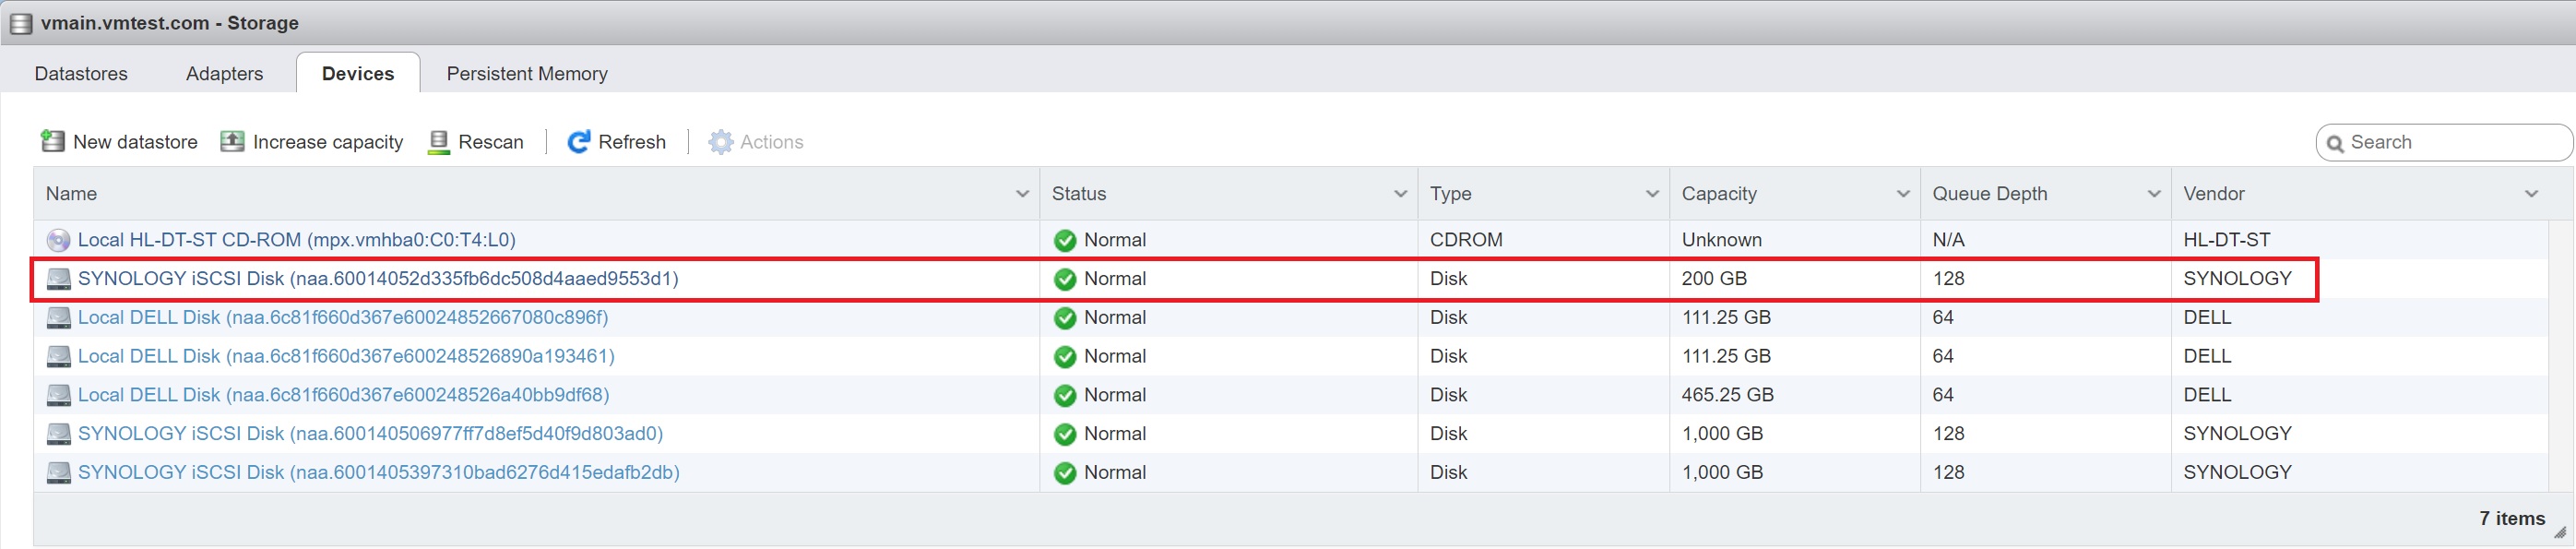
RDM will have a .vmdk extension just like virtual disks, they can be stored alongside the VM's other files or in a different datastore. First you need to setup a LUN to use, as you can see below i have created a 200GB LUN in my Synology SAN, make sure nothing else uses this LUN
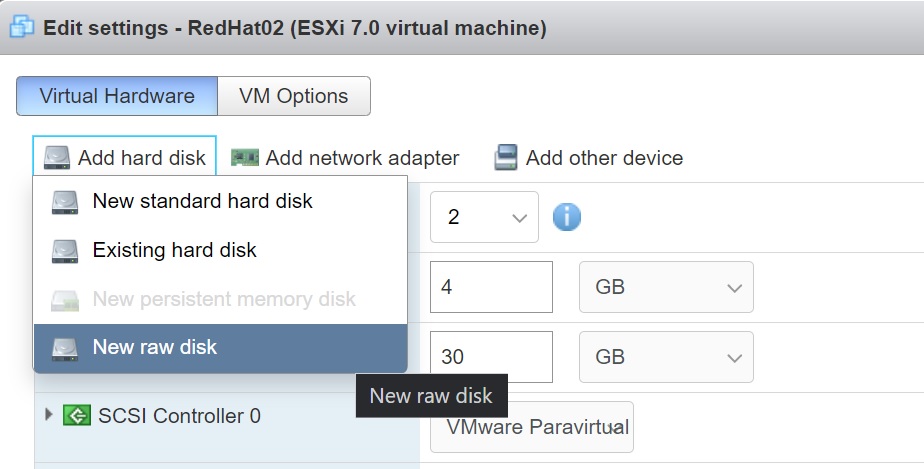
In the virtual machine select the add hard disk and if you have a spare LUN that you can use as a raw disk you will see the New raw disk (otherwise it will be greyed out)
When you select the New raw disk you are taken to a screen that lists all the available LUNs that you can use
Once the LUN is selected it will be added to the VM, as you can see you have to use the whole LUN, it is attached to the SCSI controller and will take the next LUN ID
When you start up the VM depending on the O/S that you are using the LUN will be available |
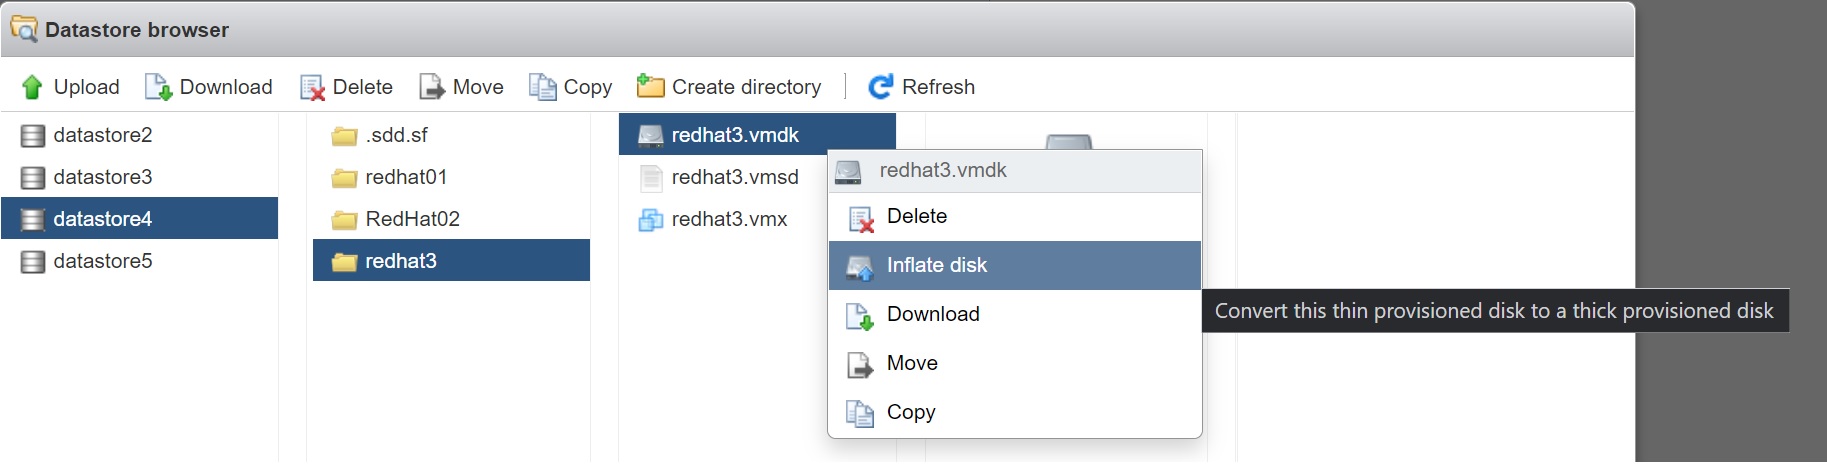
| Convert a thin disk to a thick disk | In older versions of ESX you had to use the vmkfstools command to change a disk type, the VM must be powered off and then locate the virtual disk that you wish to convert from the datastore that it resides in, then using the datastore browser and expand the VM's folder to display all the files, right-click the .vmdk file and select the inflate disk as per below, if this option is not available then the VM is already using thick provisioned disks.
|
Virtual Machines Options |
|
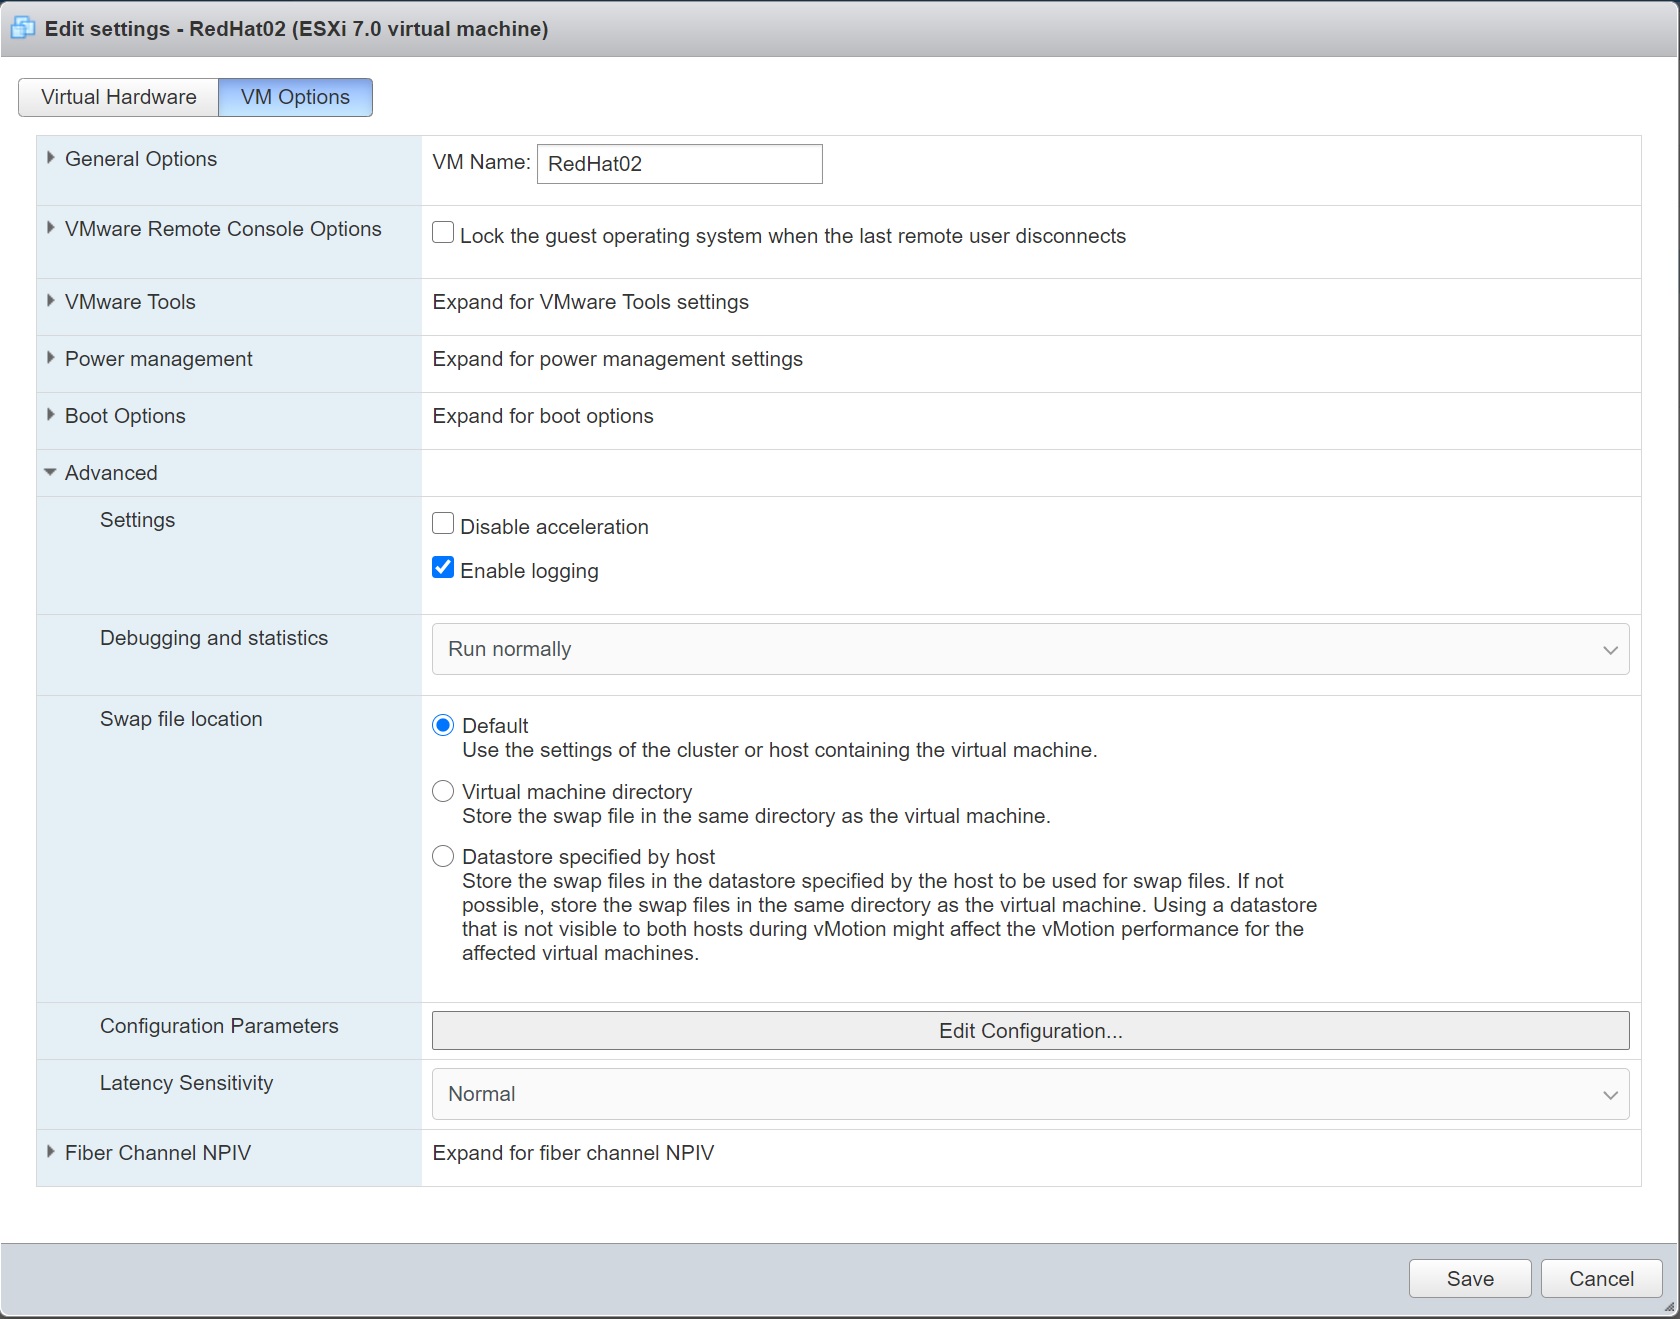
| VM's options | There are a number of options you can change
In previous versions there was one place to change options of the VM, in ESXi 7 you have drop downs in the CPU and Memory plus there is a VM Options button, I have a section regarding the virtual machine options
Below is the VM Options screen of a VM
|
| HOT pluggable CPU and Memory | A number of OS support hot CPU/Memory adding, thus when you add an additional CPU or memory it will be available to the OS immediately, you can enable this feature from the options tab and selecting "Memory/CPU hotplug"
|
Virtual Machine Resources |
|
| VM resource allocation | The last screen is the resource allocation, which I will be covering in great detail in the resource monitoring section
|


Snapshots have much the same functionality as redo files, plus some extra features, they allow you to capture the state of a VM at a single point in time (which includes both disk and memory states)., they can be created and deleted even when the VM is powered on. When you create a snapshot, all the new changes in the disk and memory are actually going to a differences or delta file, its like a bookmark that you can use to return to a set point.
You would use snapshots when you want to make fundamental changes to you VM and you are unsure on what might happen (could completely trash the system). When a VM snapshot is applied, all the read and write events that would normally go to the virtual disk actually get sent to a delta file, normally the virtual disk locked by the file system and cannot be manipulated, however when a snapshot is applied the virtual disk is unlocked and can be copied to another location for backup purposes. Bear in mind that if you revert to an older snapshot any data entered into the system after the snapshot will be lost.
One point to make that you should not 100% rely on snapshotting alone, you should always make sure that you have a backup of the VM as well (belts and braces).
Lets create, revert and delete some snapshots
| Create a snapshot |
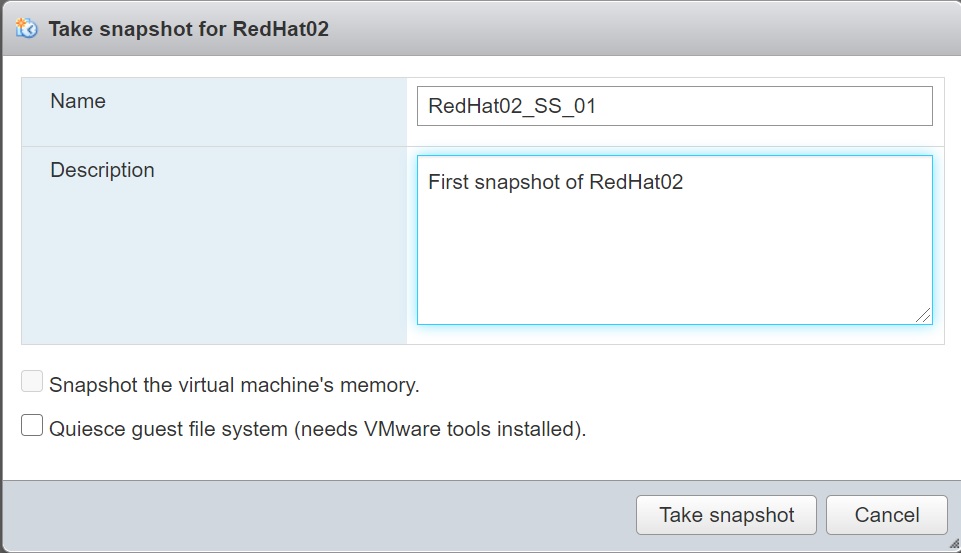
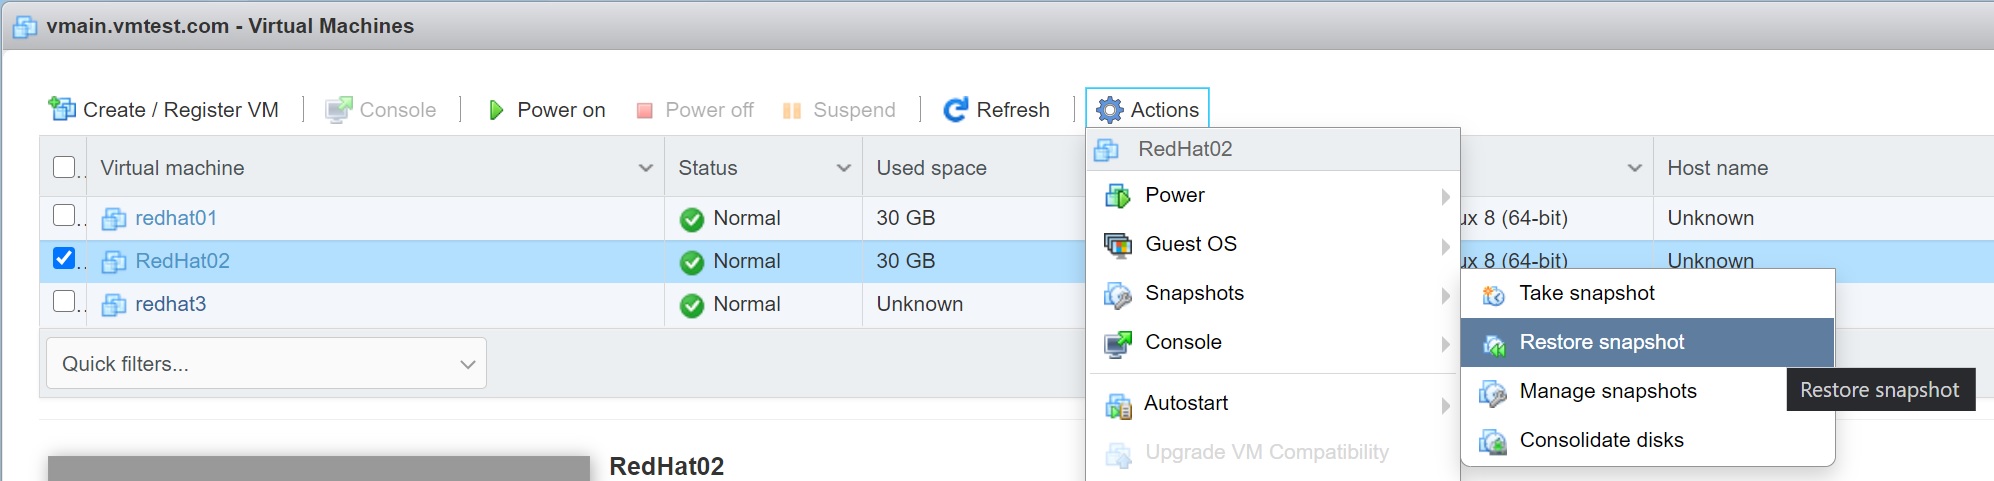
Select the VM and from the Actions drop down select snapshots -> Take snapshot
In the snapshot screen enter a name and a description of the snapshot, normally I reference a change control
You can use the restore snapshot to restore the lastest
However you can also use the snapshot manager (manage snapshots) which lists all the snapshots available
|


A virtual machine template is a master copy of a virtual machine that usually includes the guest OS, a set of applications, and a specific VM configuration. Virtual machine templates are used when you need to deploy many VMs and ensure that they are are consistent and standardized. A VM template can be used many times over for the purposes of VM cloning. You cannot power on or edit the template once it has been created. This is by design, so that nobody can accidentally edit the virtual machine that is used as a template.
The difference between a regular VM clone is an exact copy of the source VM at the appropriate point of time. If you were to periodically clone a VM that is in a running state, the resulting clones would differ from one another. It is preferable to clone a powered-off VM, although standard cloning still doesn’t offer all the benefits of a template.
The difference between OVA and OVF templates are used for distributing pre-configured software as virtual appliances. OVA and OVF are compressed file formats. They can contain multiple VMs, which is useful for cases where software consists of multiple components that must be deployed on different machines. I have created a Rapid Deployment Section covering templates, cloning, etc
| Create a VM template |
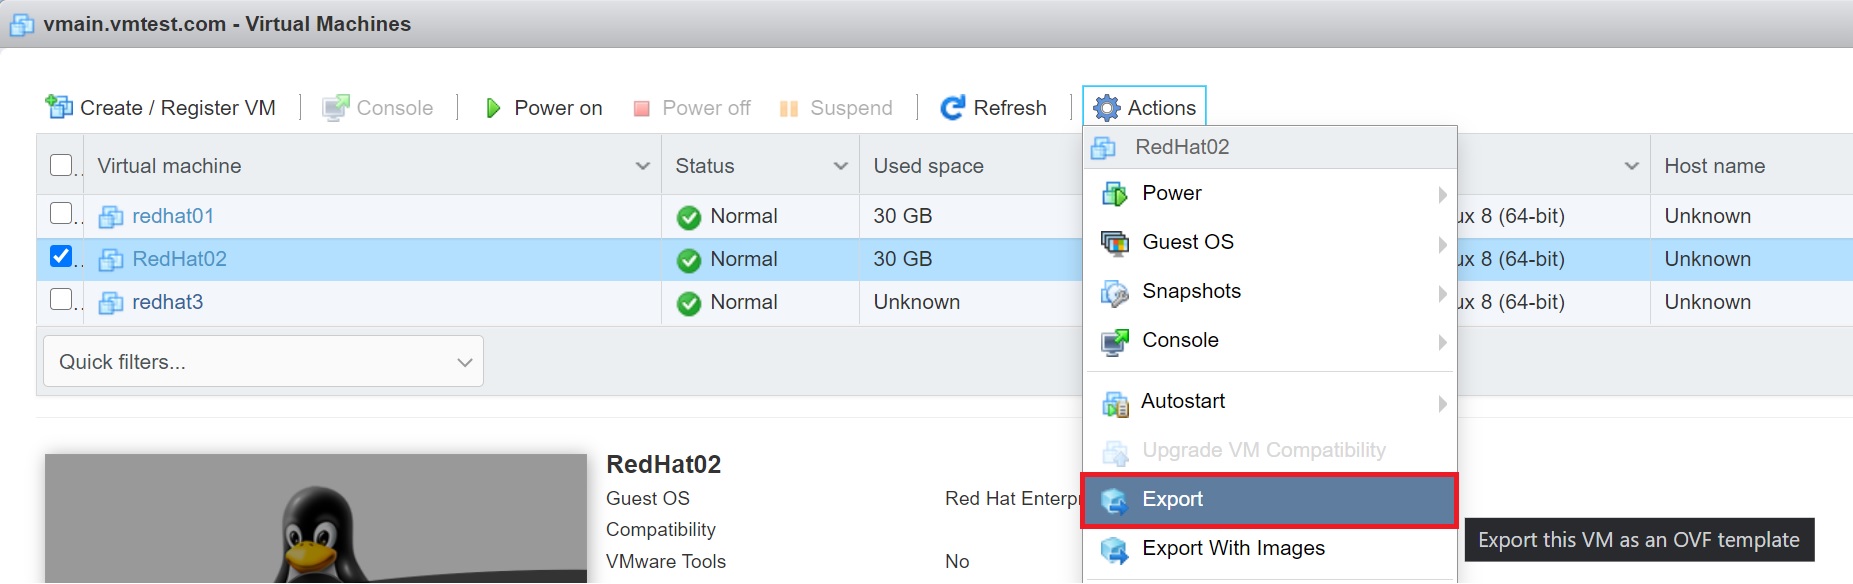
Generally you use vCenter to create and manage VM templates (I will cover vCenter in greater detail in another section), however its entirely possible to create a template using the web client, highlight the VM and from the actions drop down select export
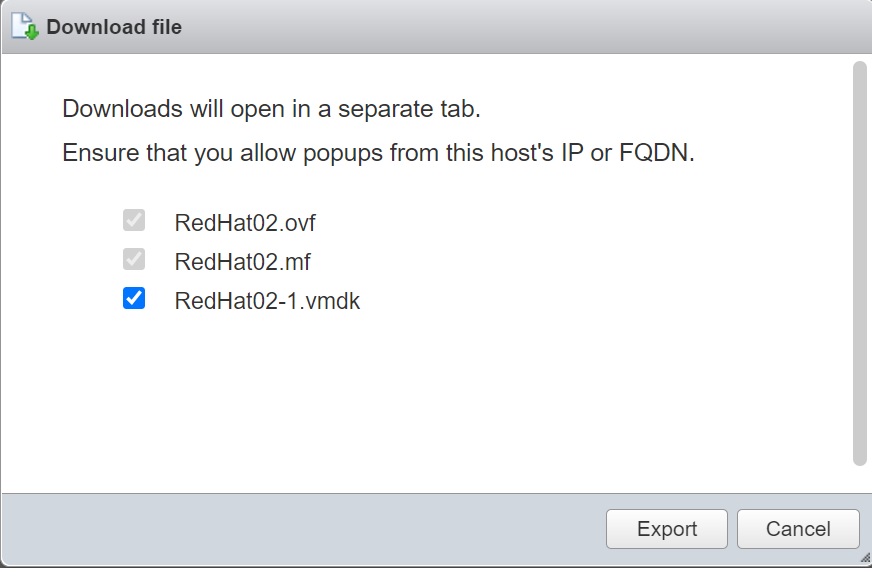
Three files will be created the ovf, mf and the vmdk files, if you selected the export with images you get a ISO file that is created
Once finished you should be able to see the files
|


VM Options (CPU, Memory and Hard Disk)
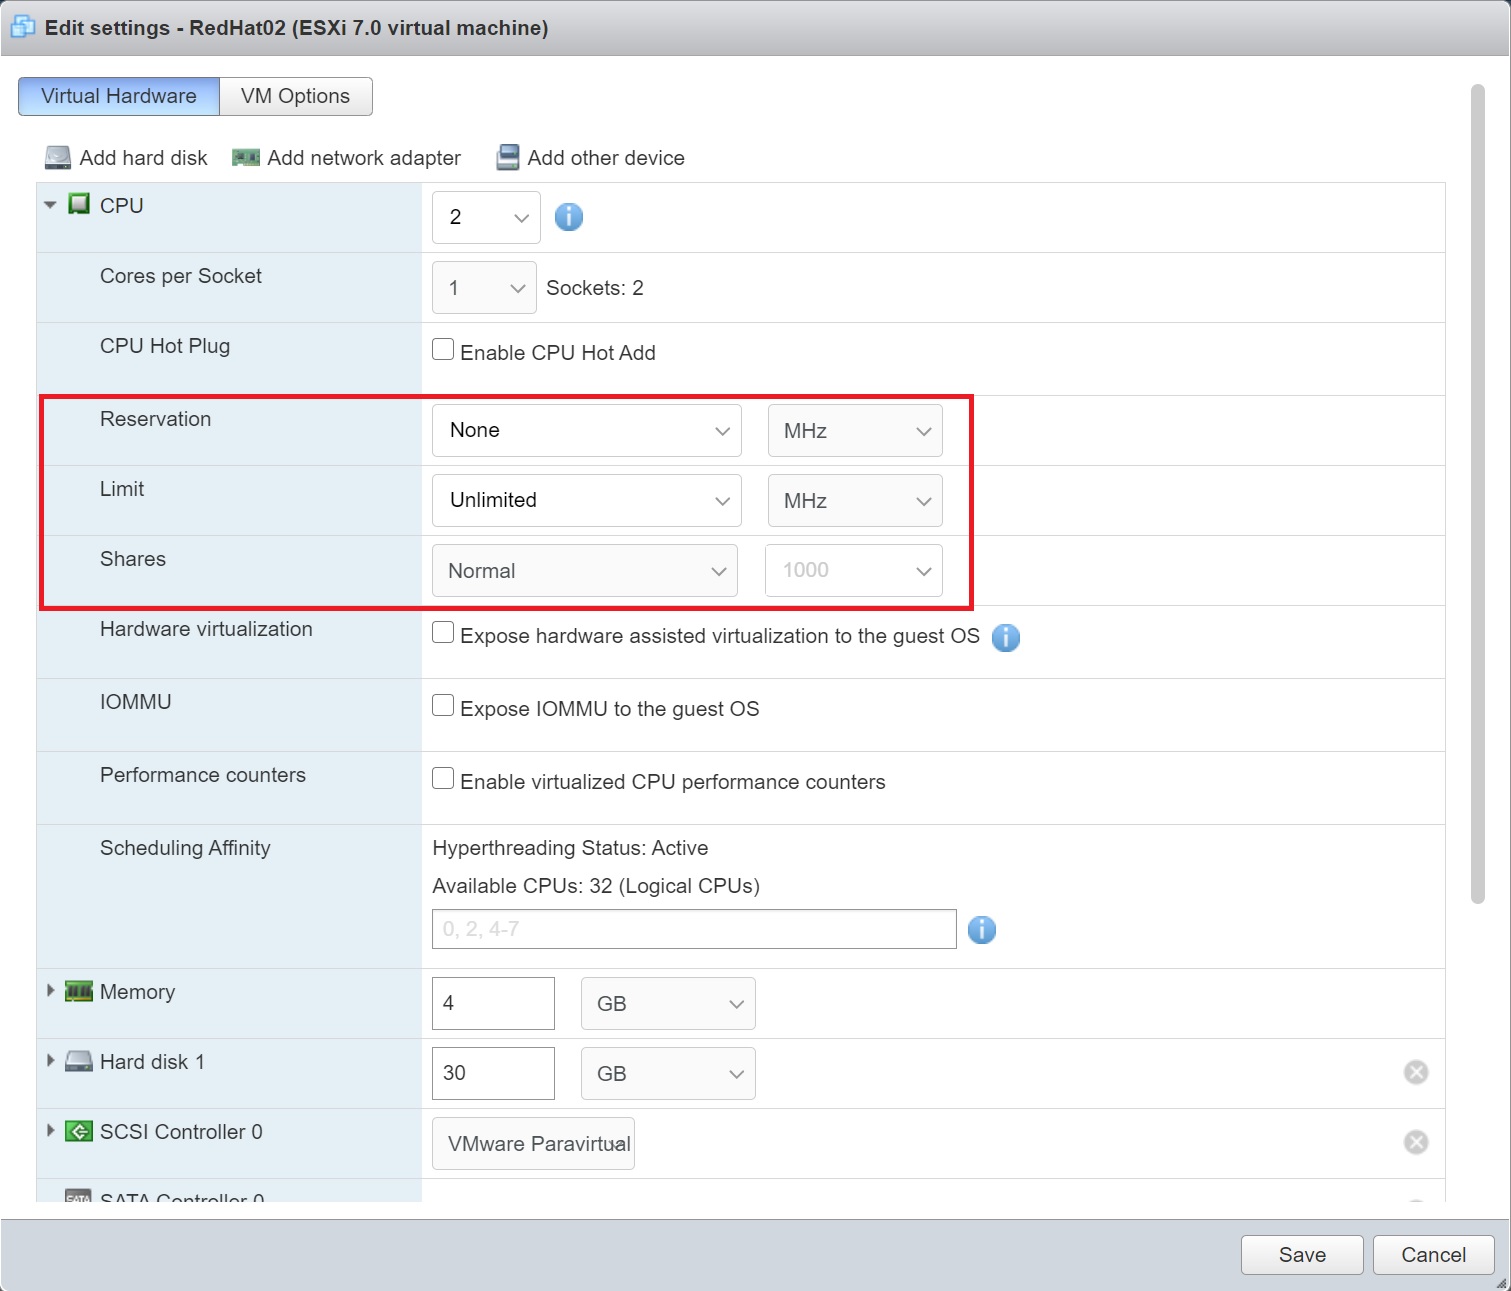
First lets talk about the VM CPU options that you have, which can be seen below

| CPU Hot Plug | By default, you cannot add CPU resources to a virtual machine when the virtual machine is turned on. The CPU hot add option lets you add CPU resources to a running virtual machine. There are a few requirements but you need at least these two latest version of VMware Tools installed and a guest operating system that supports CPU hot add. |
| Reservation,Limit and Shares | To manage workload demands, you can change the amount of CPU resources allocated to a virtual machine by using the shares, reservations, and limits settings. A virtual machine has the following user-defined settings that affect its CPU resource allocation. Limit - Places a limit on the consumption of CPU time for a virtual machine. This value is expressed in MHz or GHz. Reservation - Specifies the guaranteed minimum allocation for a virtual machine. The reservation is expressed in MHz or GHz. Shares - Each virtual machine is granted CPU shares. The more shares a virtual machine has, the more often it receives a time slice of a CPU when there is no CPU idle time. Shares represent a relative metric for allocating CPU capacity. |
| Hardware virtualization | You can expose full CPU virtualization to the guest operating system so that applications that require hardware virtualization can run on virtual machines without binary translation or paravirtualization. |
| IOMMU | You can use Input–Output Memory Management Unit (IOMMU), which is capable of mapping virtual addresses to physical addresses. It connects i/o devices to the DMA bus the same way processor is connected to the memory via the DMA bus. This is used in advanced topics such as SR-IOV and Virtualization-Based Security (VBS) |
| Performance counters | You can use performance tuning tools in the guest operating system for software profiling. You can identify and improve processor performance problems. This capability is useful for software developers who optimize or debug software that runs in the virtual machine. |
| Scheduling Affinity | The Scheduling Affinity option gives you detailed control over how virtual machine CPUs are distributed across the host's physical cores. The option supports hyperthreading if hyperthreading is enabled. ESXi generally manages processor scheduling well, even when hyperthreading is enabled. These settings are useful only for fine-tuning critical virtual machines. Using CPU affinity, you can assign a virtual machine to a specific processor. This assignment allows you to restrict the assignment of virtual machines to a specific available processor in multiprocessor systems. This setting does not appear for virtual machines in a DRS cluster or when the host has only one processor core and no hyperthreading. |
Next we take a look at the memory options
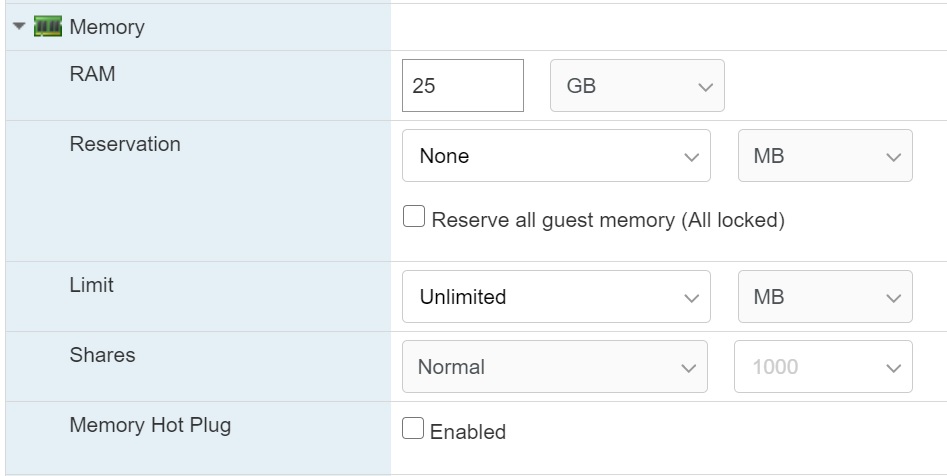
| Reservation, Limit and Shares | Reservation specifies the guaranteed minimum allocation for a virtual machine. Limit specifies an upper bound for CPU, memory, or storage I/O resources that can be allocated to a virtual machine. Select resource allocation settings (reservation, limit and shares) that are appropriate for your ESXi environment. |
| Memory Hot Plug | Memory hot add lets you add memory resources for a virtual machine while that virtual machine is turned on. Enabling memory hot add produces some memory overhead on the ESXi host for the virtual machine. |
Lastly we take a look at the hard disk options
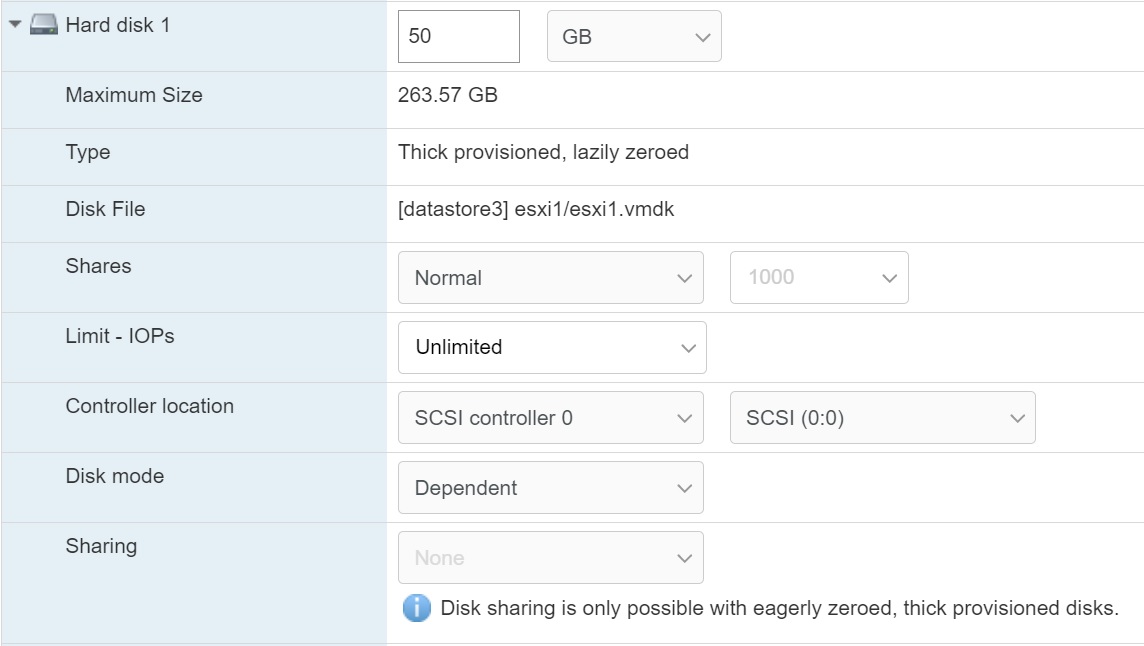
| Shares | You can change the disk resources for a virtual machine. If multiple virtual machines access the same VMFS datastore and the same logical unit number (LUN), use disk shares to prioritize the disk accesses from the virtual machines. Disk shares distinguish high-priority from low-priority virtual machines. Shares is a value that represents the relative metric for controlling disk bandwidth to all virtual machines. The values are compared to the sum of all shares of all virtual machines on the server. You can select an IOP limit, which sets an upper bound for storage resources that are allocated to a virtual machine. IOPs are the number of I/O operations per second. |
| Limit - IOPs | Allows you to customize IOPs. This value is the upper limit of I/O operations per second allocated to the virtual disk. |
| Disk Mode | Disk mode determines how a virtual disk is affected by snapshots, you have the following options: Dependent - disks are included in snapshots. Independent - Persistent - disks in persistent mode behave like conventional disks on your physical computer. All data written to a disk in persistent mode are written permanently to disk. Independent - Nonpersistent - changes to disks in nonpersistent mode are discarded when you turn off or reset the virtual machine. With nonpersistent mode, you can restart the virtual machine with a virtual disk in the same state every time. Changes to the disk are written to and read from a redo log file that is deleted when you turn off or reset the virtual machine. |
| Sharing | Specifies sharing information, disk sharing is only possible with eagerly zeroed, thick provisioned disks. |
A vApp allows you to perform resource management and certain other management activities such as power operations for multiple virtual machines at the same time. You can think of the vApp as the container for the virtual machines, and you can perform the operations on the container. When you create a vApp, you can add it to a folder, standalone host, resource pool, DRS cluster, or another vApp.
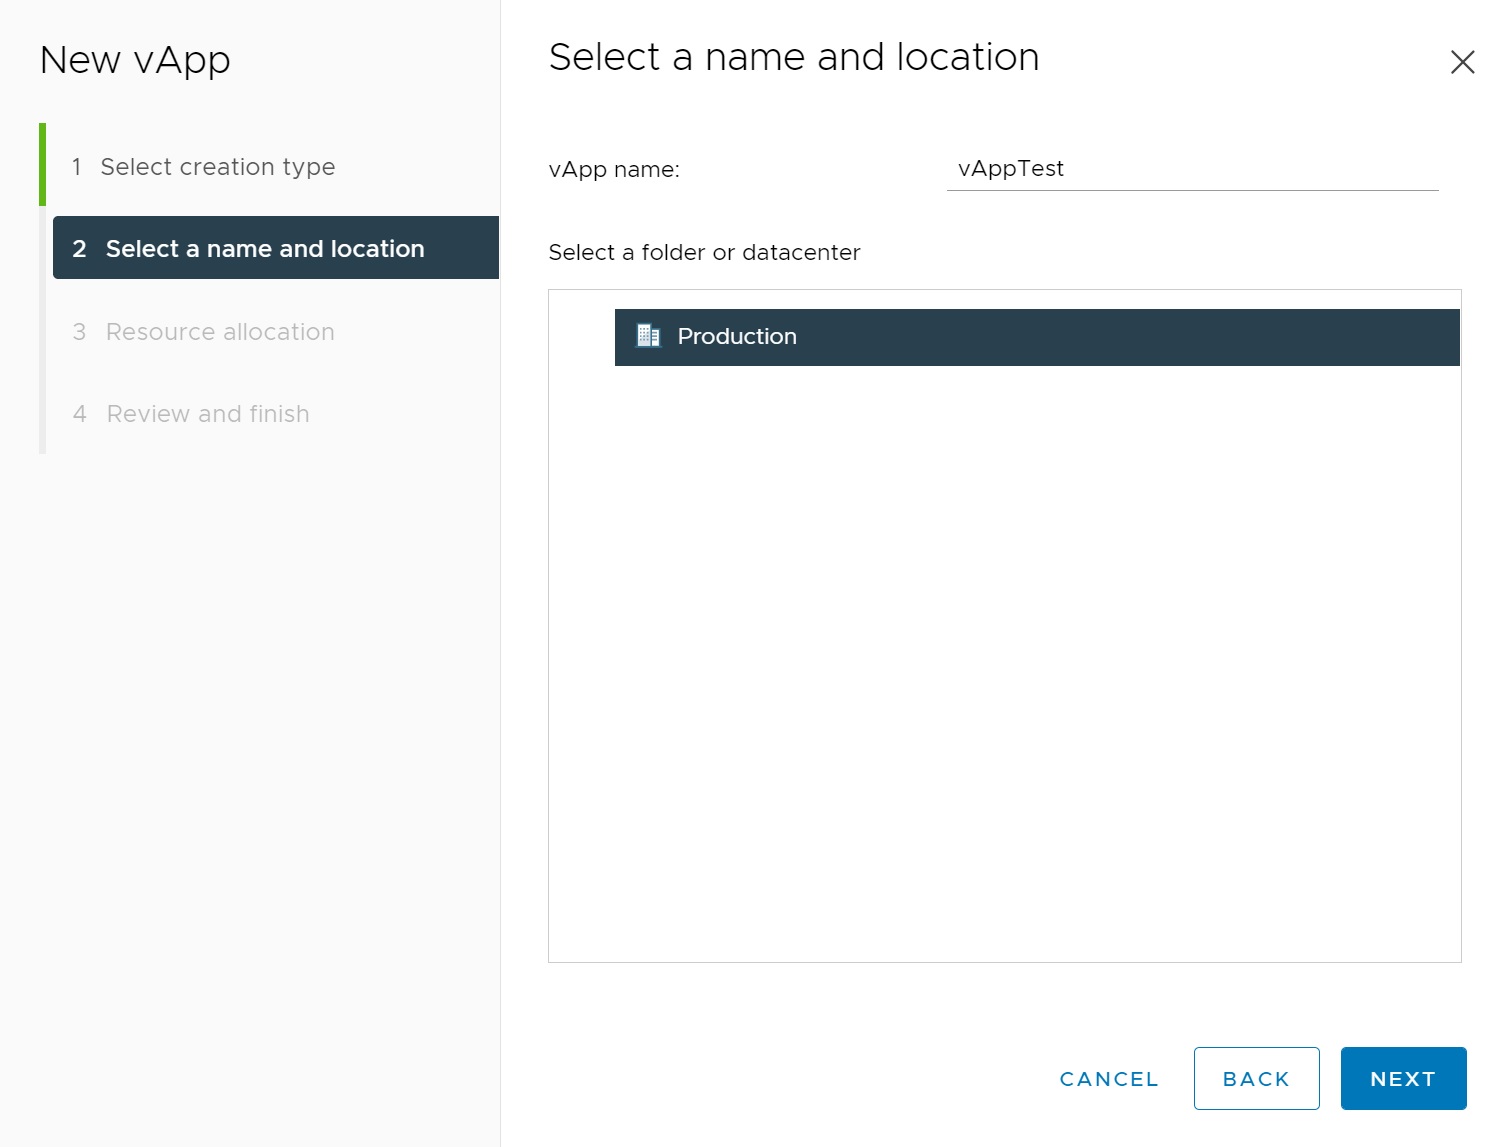
You create a vApp at the ESXi host inside a Datacenter, you will be taken to a series of setup screens

The first screen allows you to create or clone an existing vApp

Next we enter a vApp name and select a datacenter
The next screen we defines the shares, reservation, reservation type and the limit which are detailed in the table below
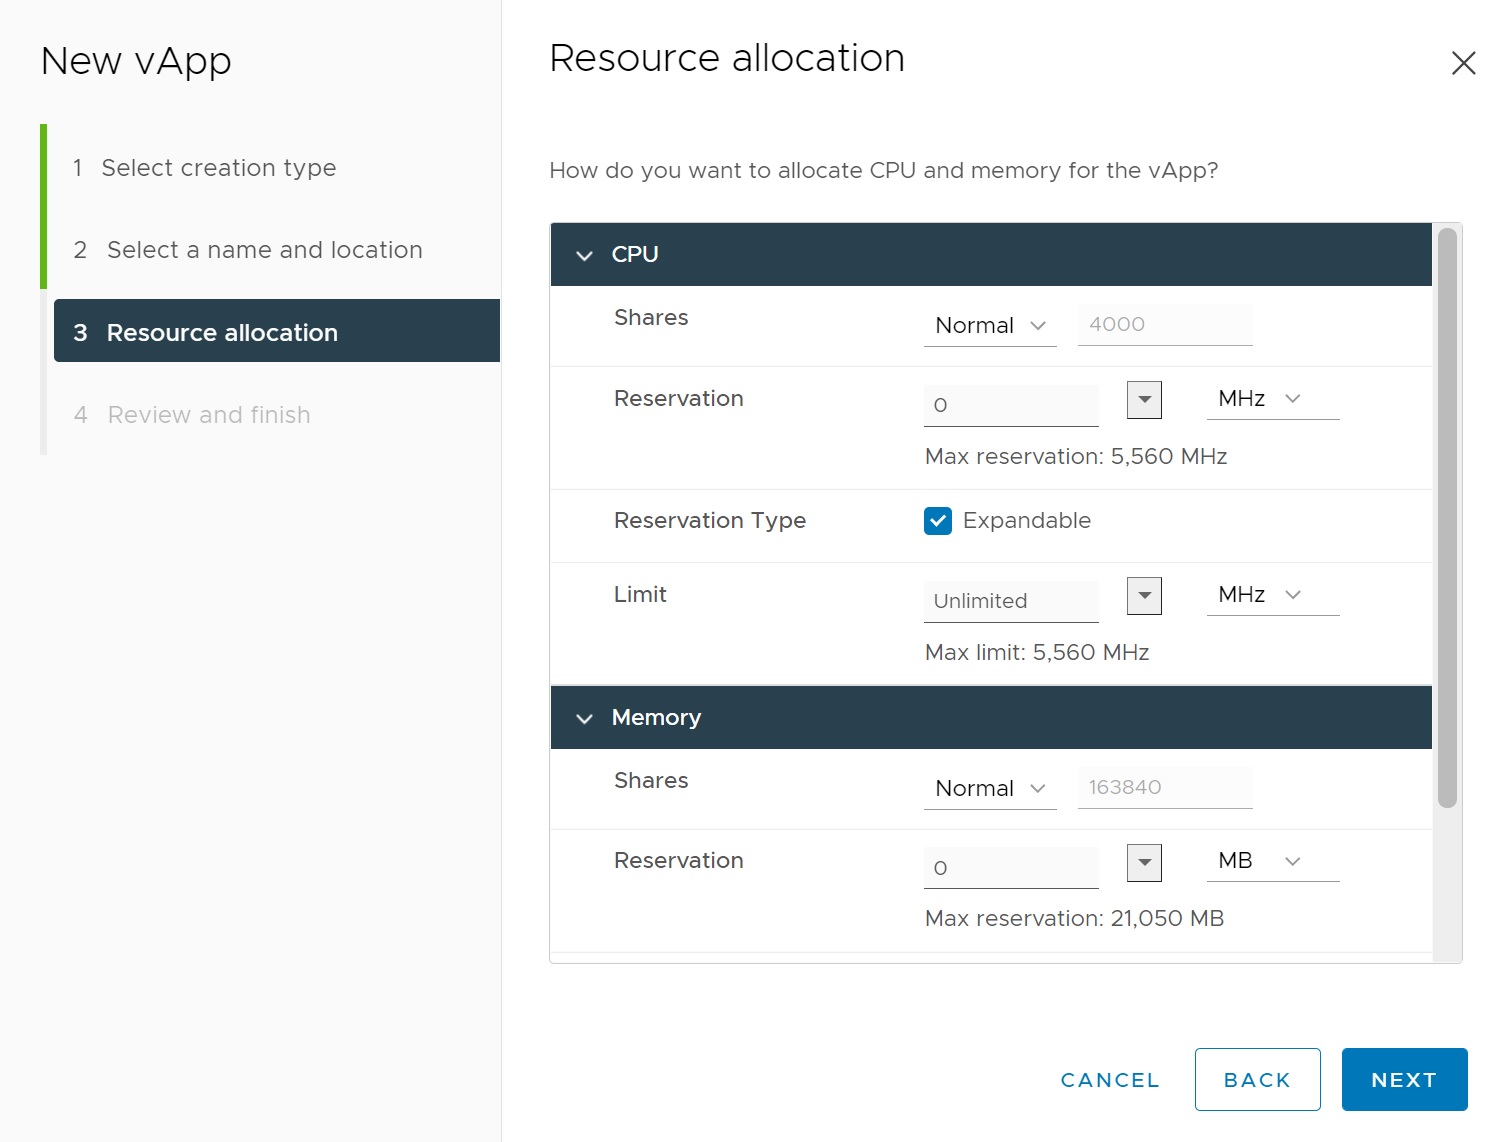
| Shares | Defines the CPU or memory shares for this vApp with respect to the parent’s total. Sibling vApps share resources according to their relative share values bounded by the reservation and limit. Select Low, Normal, or High, which specify share values respectively in a 1:2:4 ratio. Select Custom to give each vApp a specific number of shares that expresses a proportional weight. |
| Reservation | Defines the guaranteed CPU or memory allocation for this vApp. |
| Reservation Type | Defines whether the reservation is expandable. Select the Expandable check box to make the reservation expandable. When the vApp is powered on, if the combined reservations of its virtual machines are larger than the reservation of the vApp, the vApp can use resources from its parent or ancestors. |
| Limit | Defines the upper limit for this vApp's CPU or memory allocation. Select Unlimited to specify no upper limit. |
Finally we get to a summary screen, click FINISH to create the the vApp

Returning to the main vCenter screen we can now see the vApp.

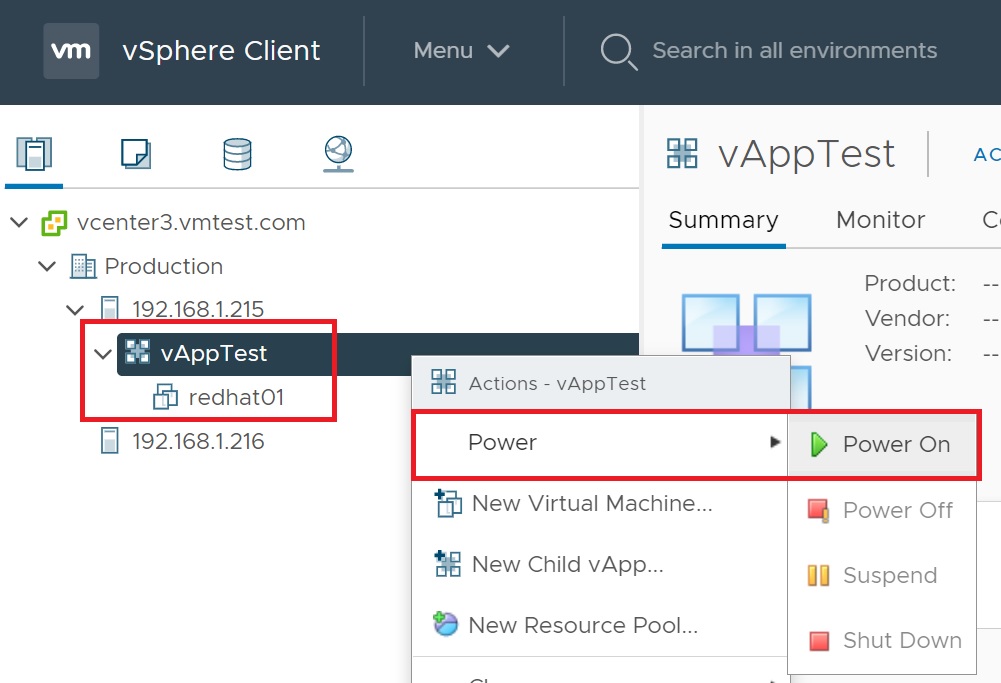
Now that we have created the vApp we can create VM's inside it, create child vApps, create a resource pool, etc. One handly feature is that we could group a number of VM's together that are all part of the same application and we can then power of the vApp and thus powering all the VM's in one go.
In my example below I have dragged a VM into the vApp folder, I could now power on the VM using the vApp, if there was anything else part of the vApp these would also be powered on.
Content libraries are container objects for VM templates, vApp templates, and other types of files. vSphere administrators can use the templates in the library to deploy virtual machines and vApps in the vSphere inventory. Sharing templates and files across multiple vCenter Server instances in same or different locations brings out consistency, compliance, efficiency, and automation in deploying workloads at scale. You create and manage a content library from a single vCenter Server instance, but you can share the library items to other vCenter Server instances if HTTP(S) traffic is allowed between them.
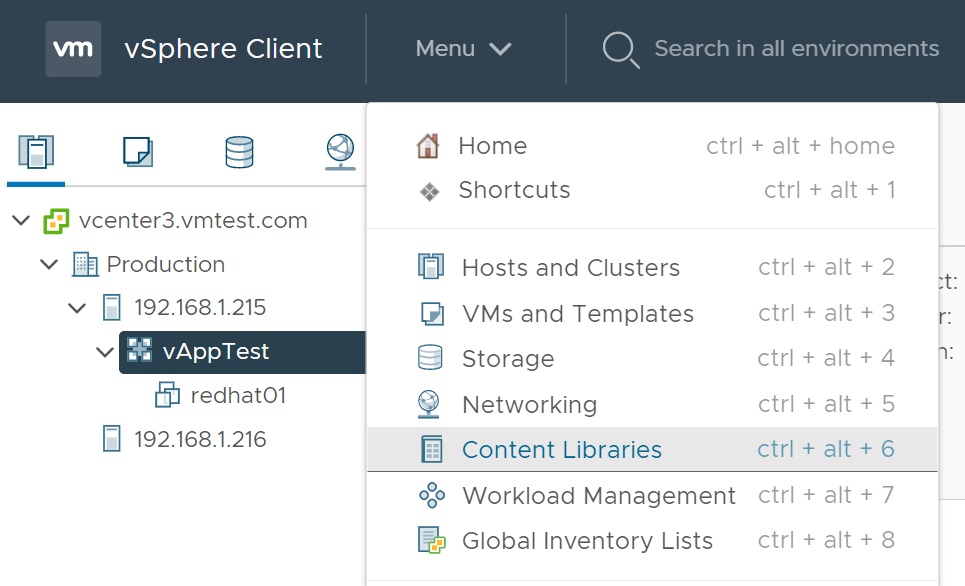
To access the content libraries menu select menu -> Content Libraries
As you can see I have yet to set one up

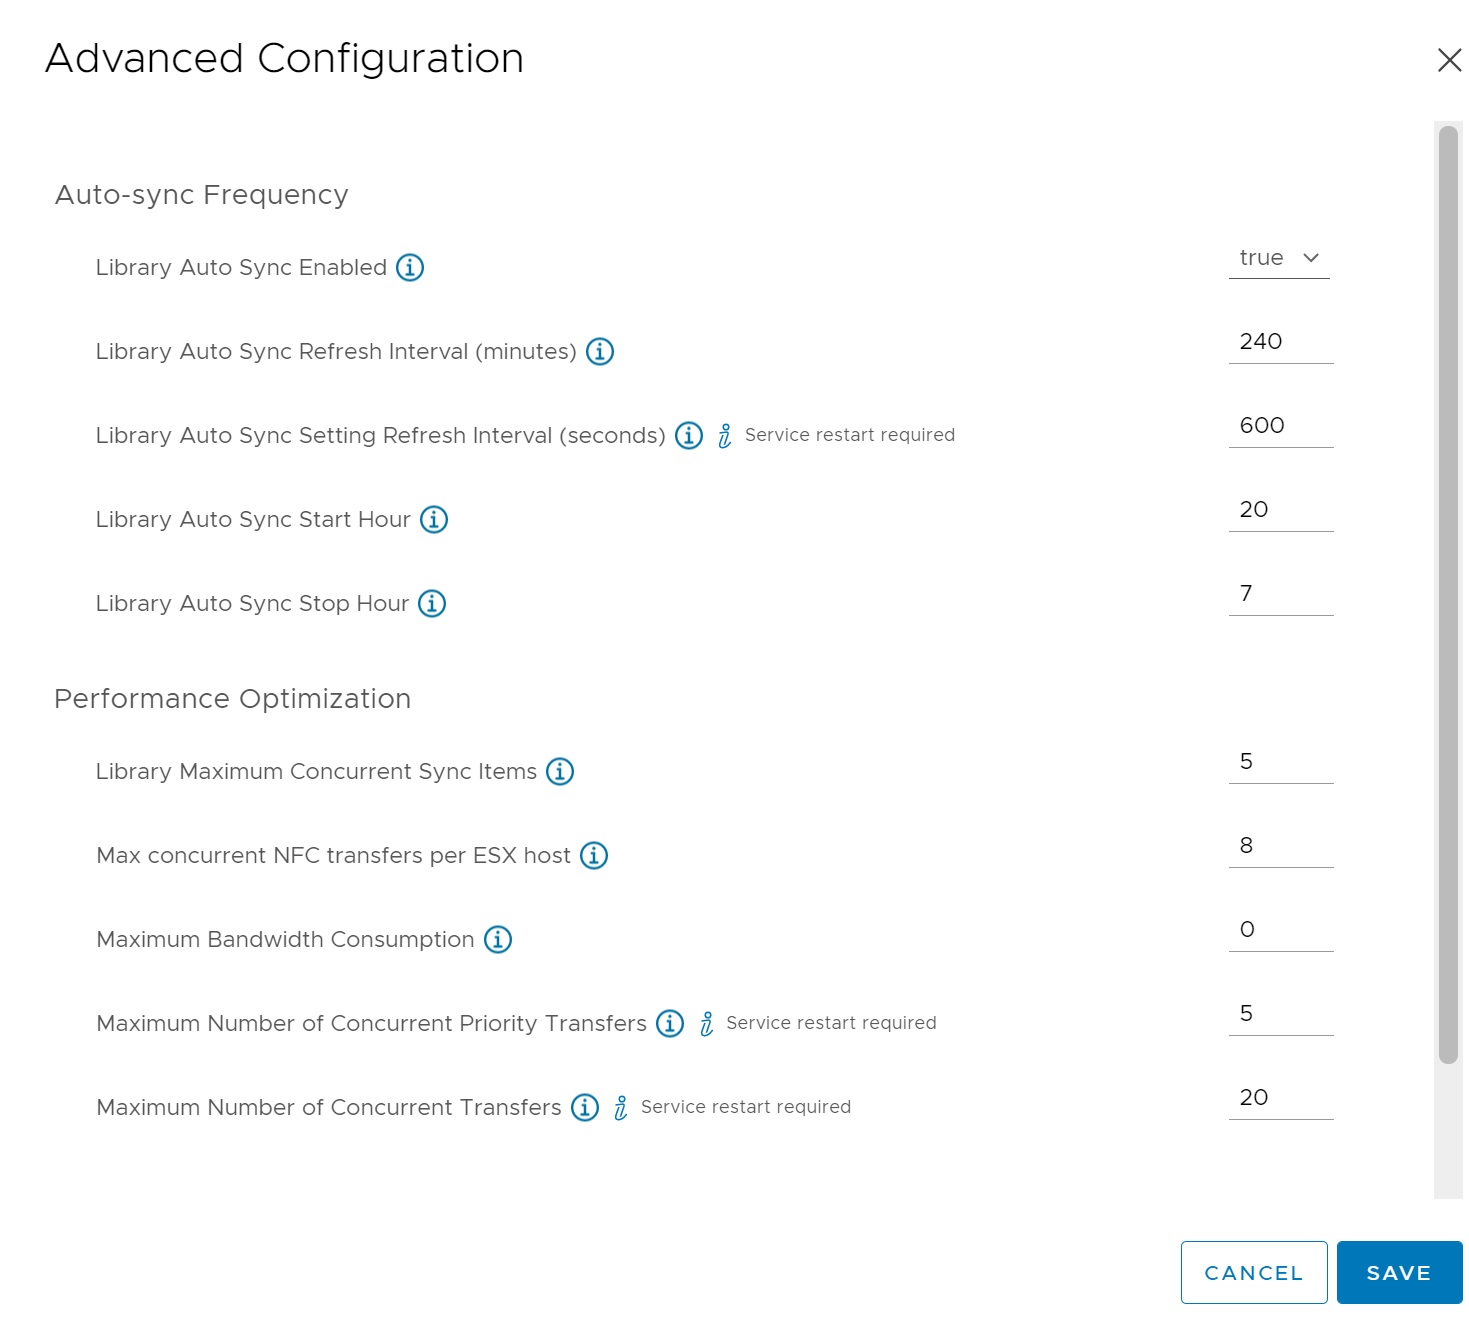
The Advanced options allows you to set some of the global options of the libraries such as if auto sync is enabled, sync refresh rate, max bandwidth, etc.
When you select to create a new library a series of setup screens appear, the first requests the name of the library, notes and the vCenter server, later we will see how you can subscribe to another vCenter and thus you may have options to create the library on a remote vCenter server.

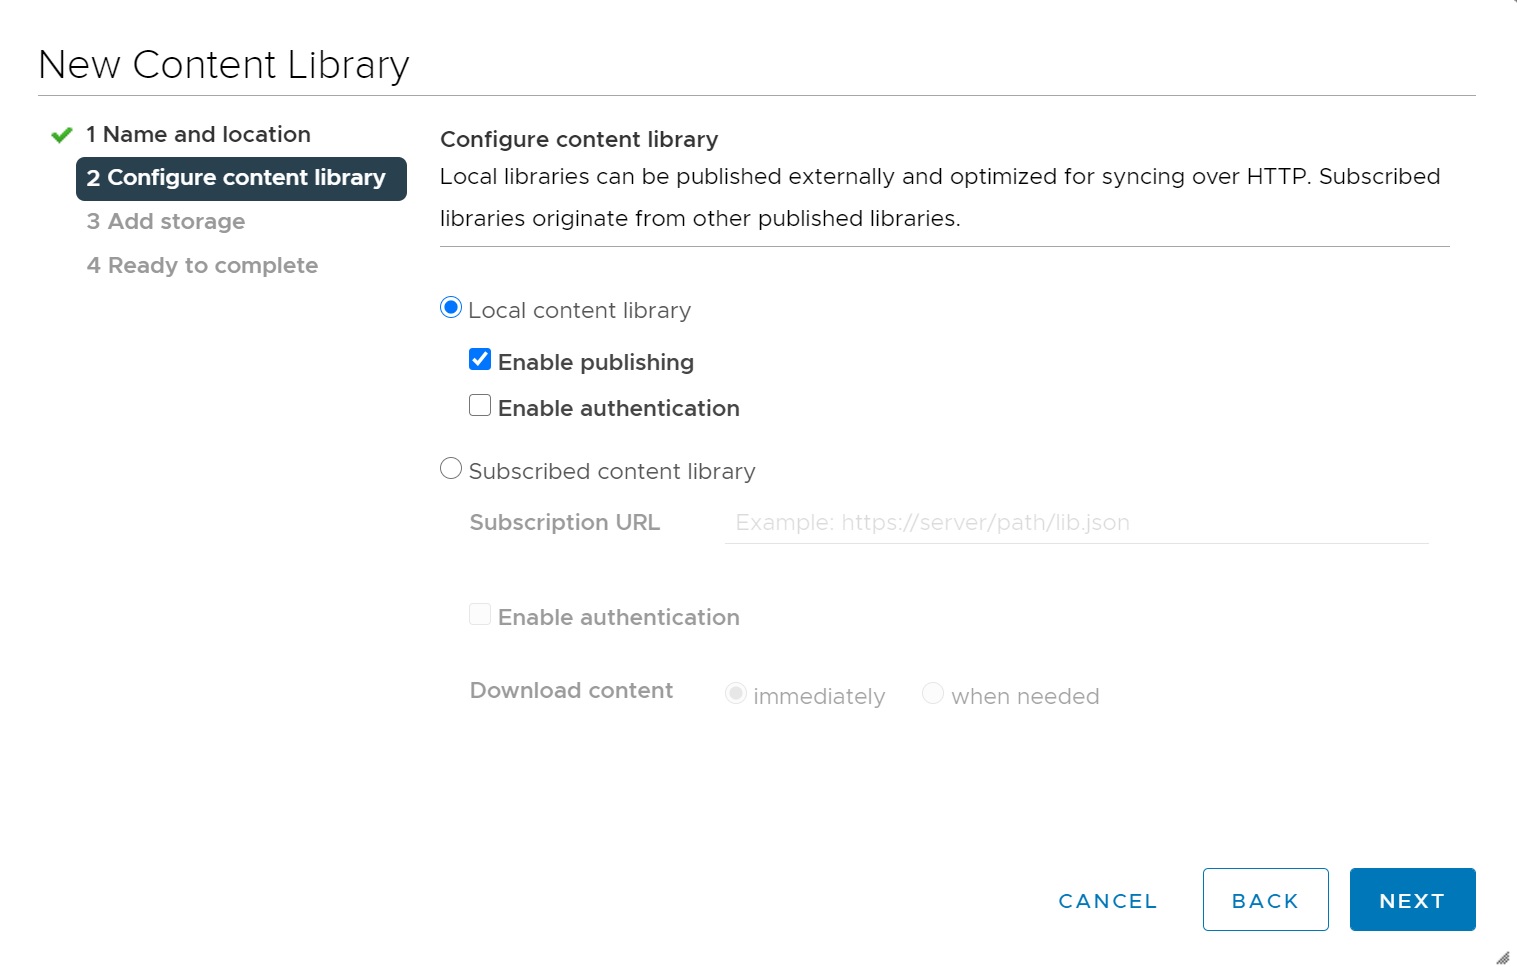
Next we can create a local library or subscribe to a remote vCenter server, you have options to publish your library and even request authentication to access it for added security.
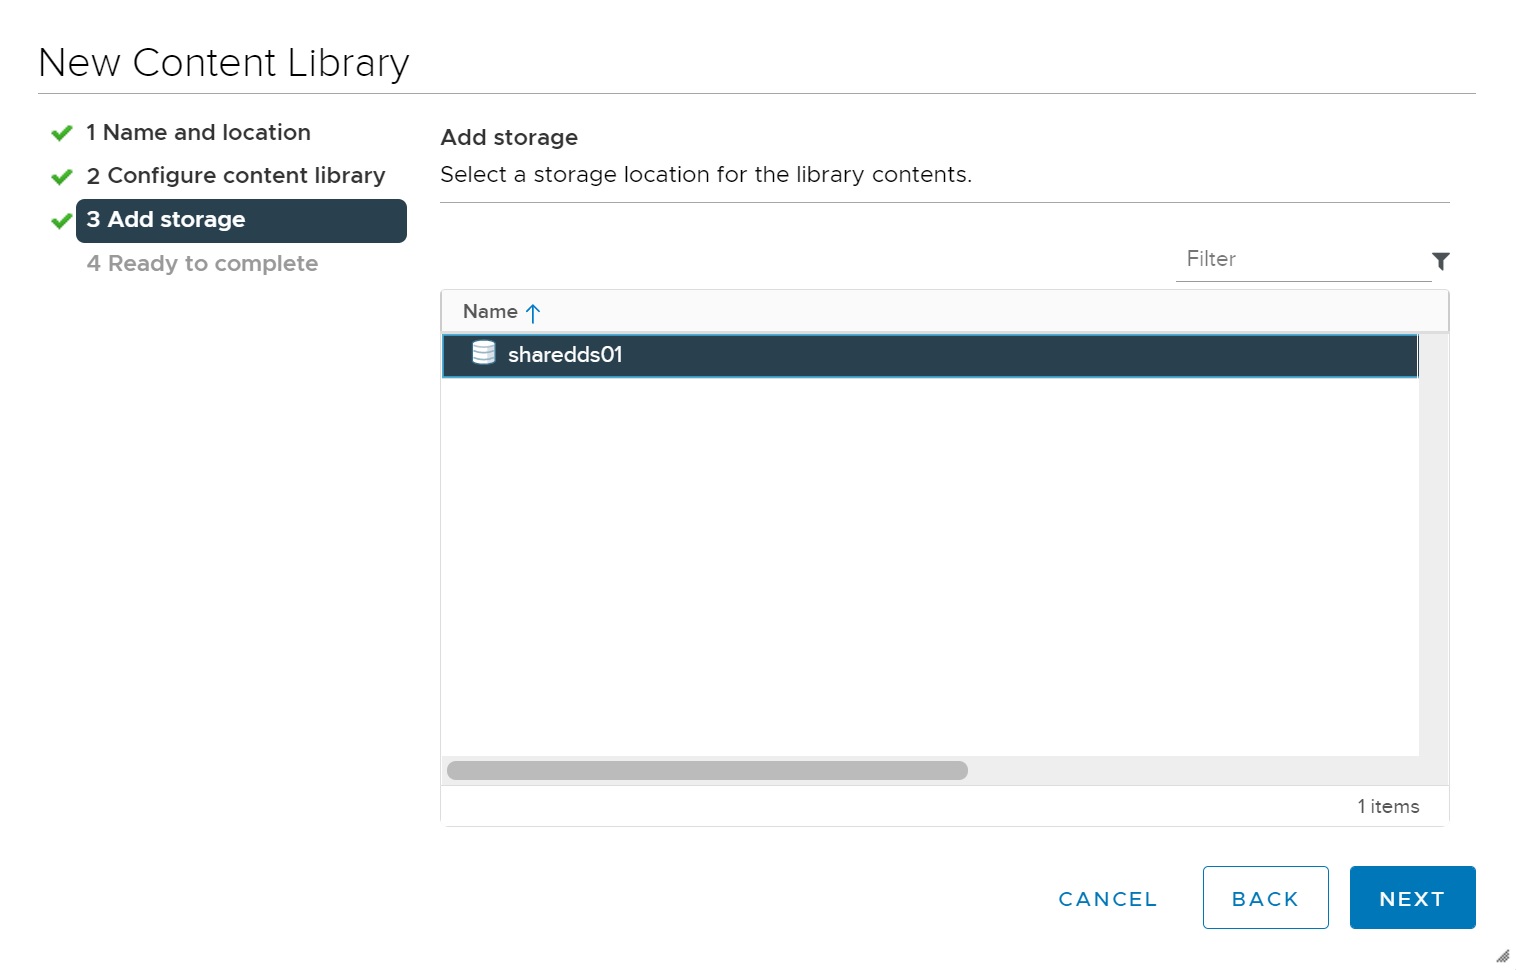
Next we select the datastore where the library wil be located, remember if you are storing large VM's, Templates, ISO images make sure you have enough space.
Finally we get to a summary screen, check and click FINISH to create the local library in my case.

Returning to main content library screen you can see the library I have just created, click on the library

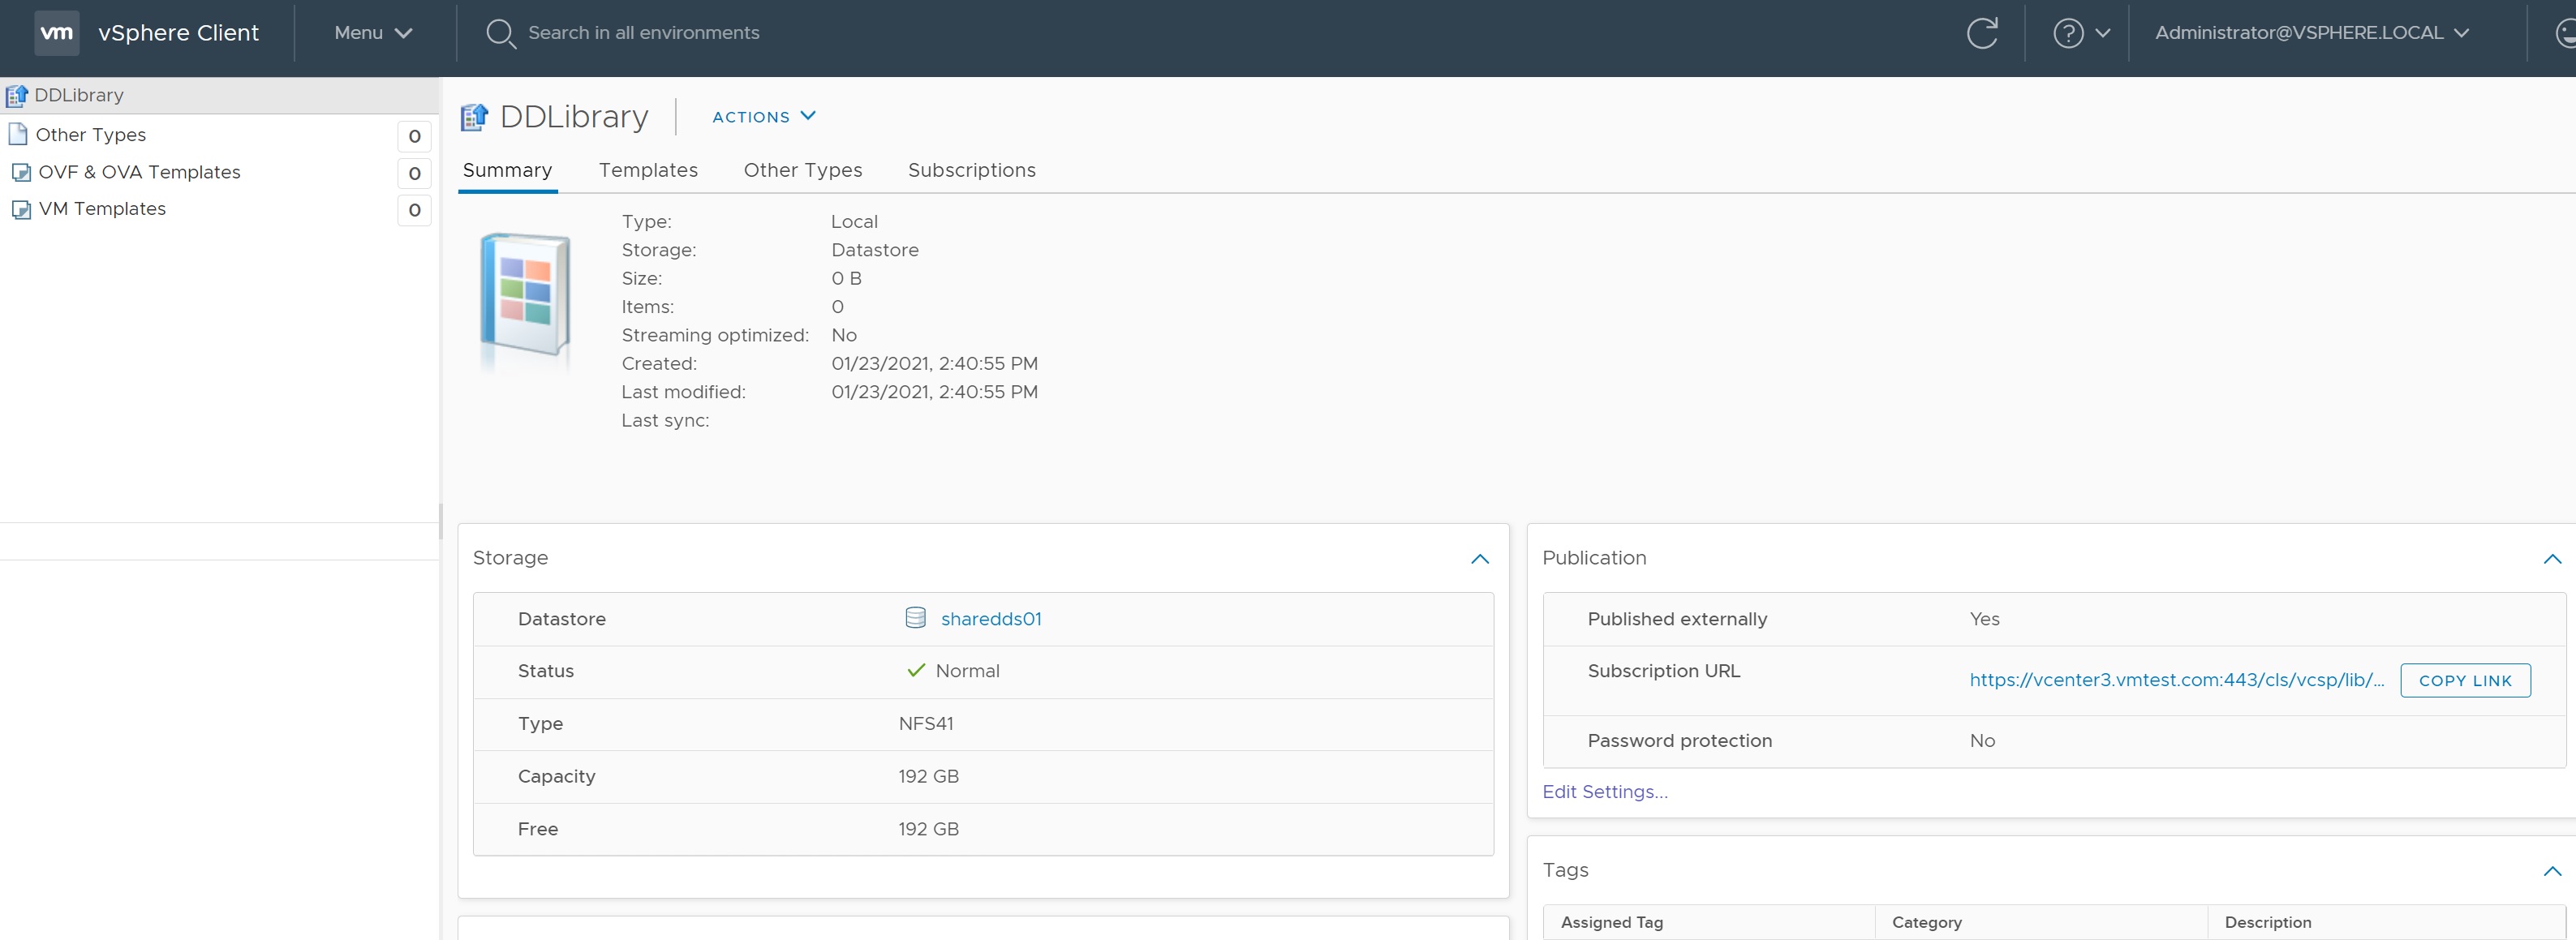
You are taken to the specific main library screen, here you get details on what the library contains and other information.
So lets clone a VM to a template in our library, I am not going to go through every setup screen (see Rapid Deploy for more details on templates, cloning, etc) and will only show you the library screens

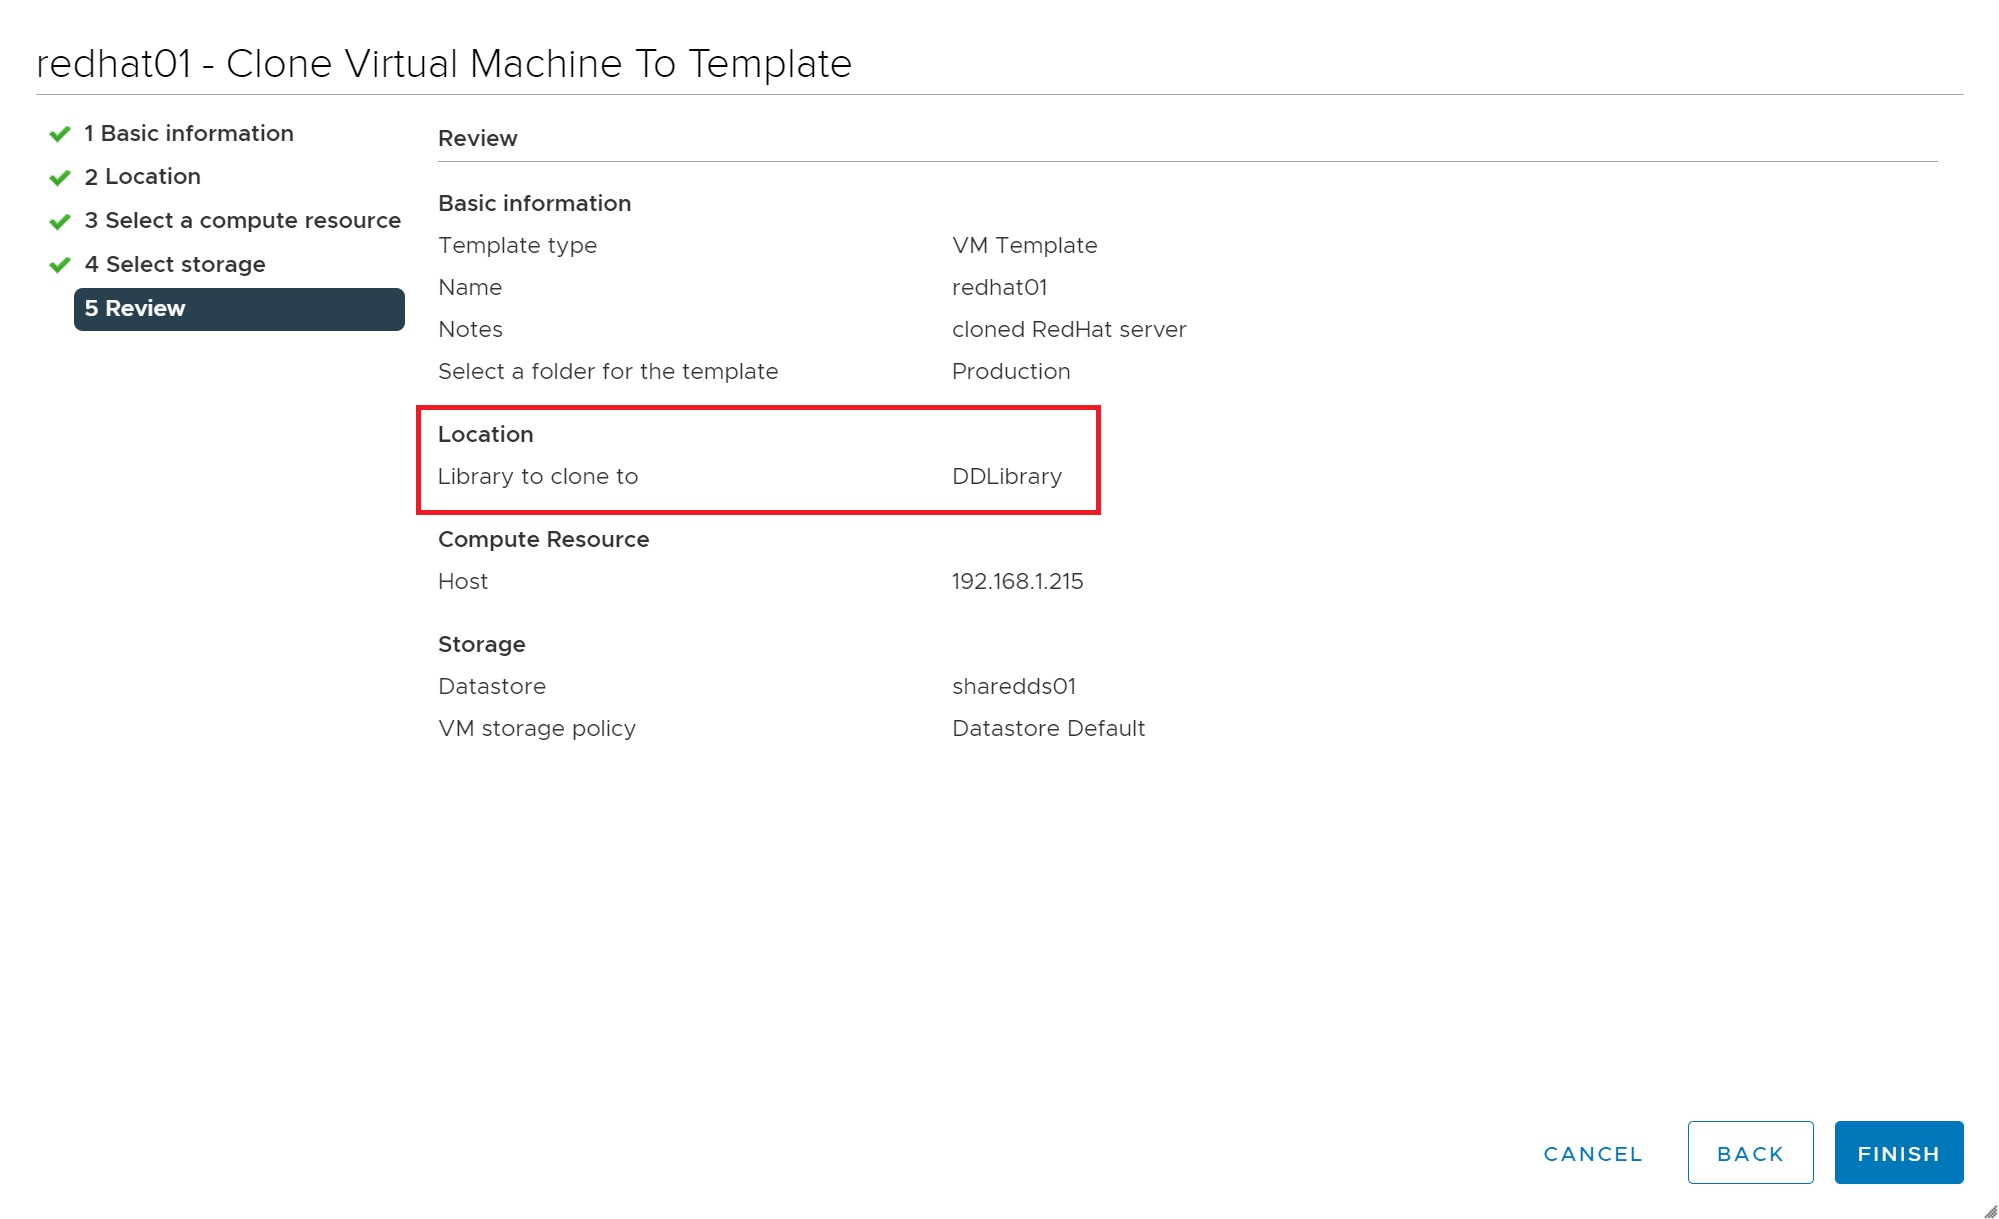
During the setup you will be asked what library you wish to store the template in, I have selected the one I created earlier

When you get to the review screen double check that you have selected the right library
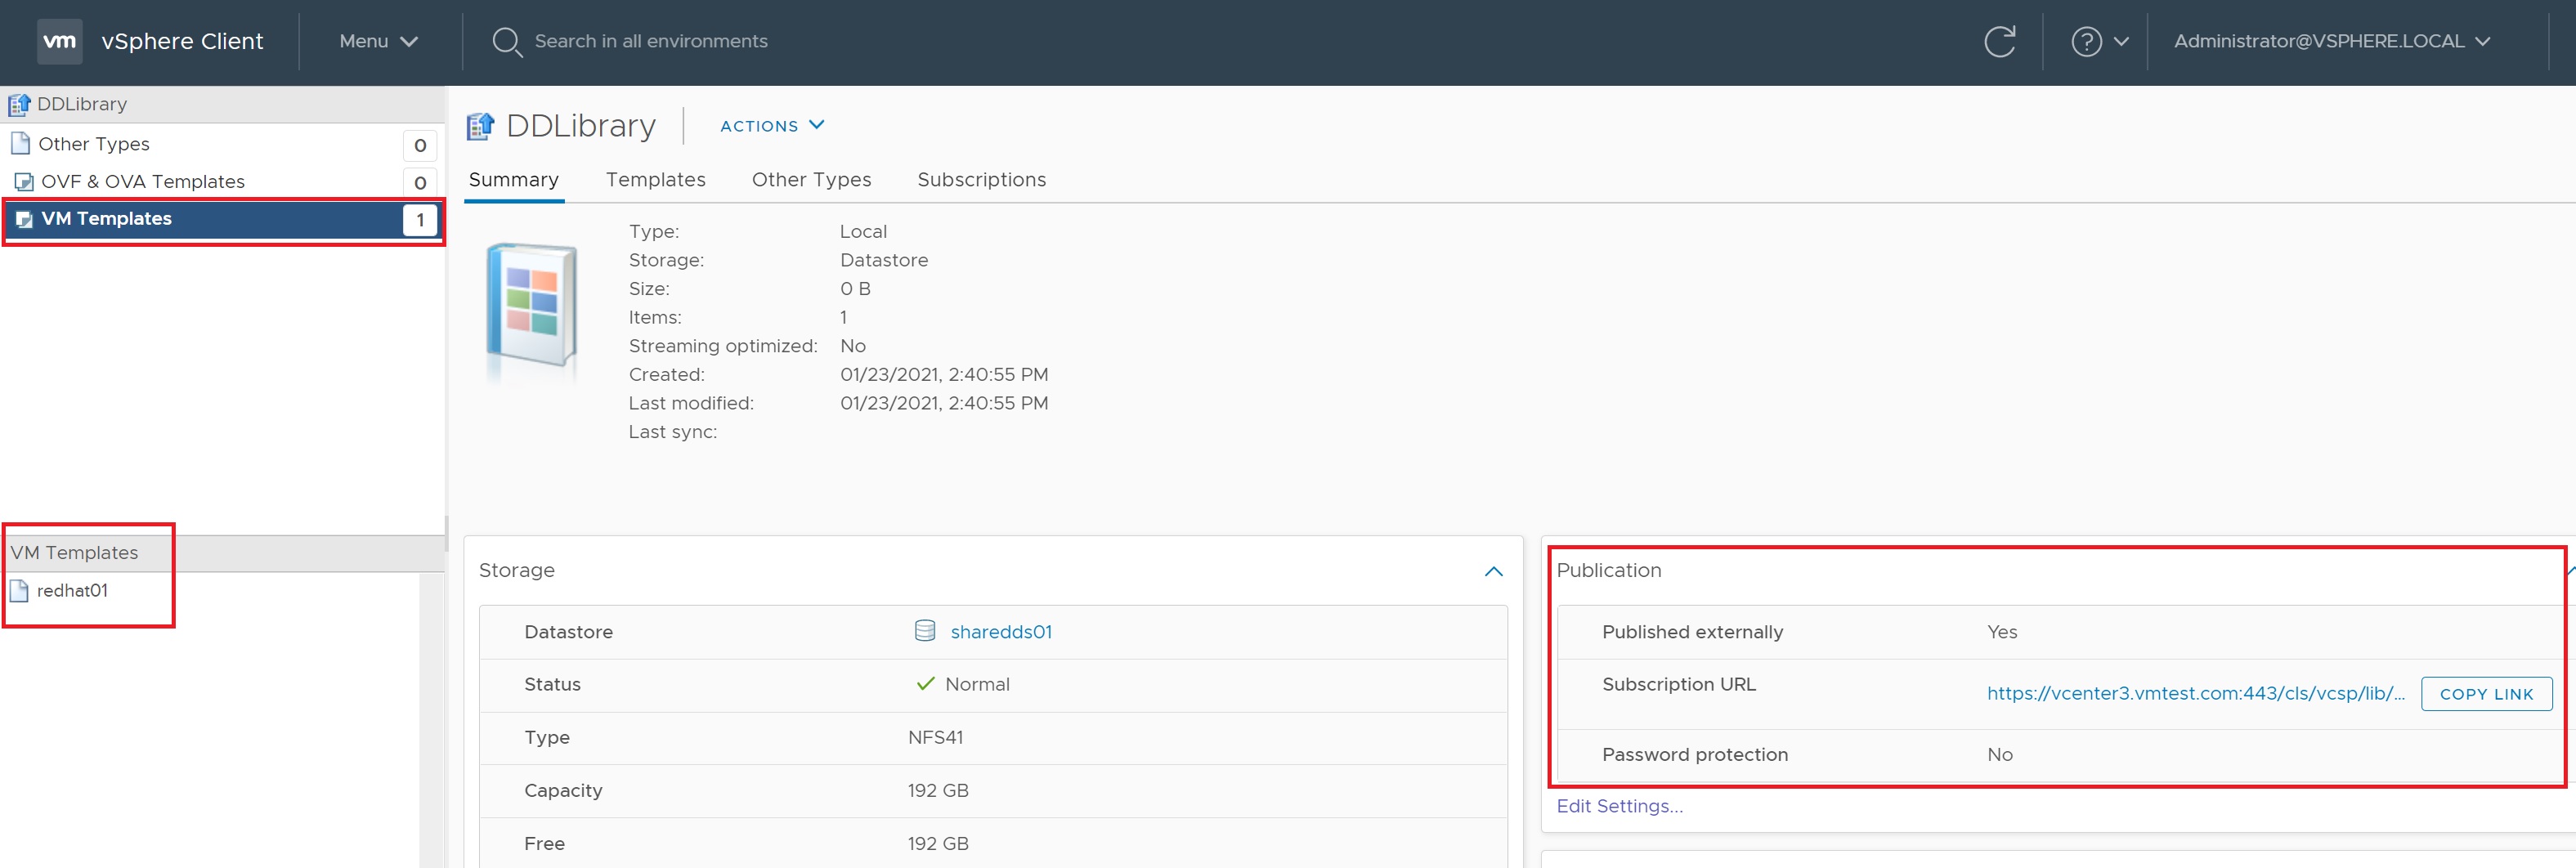
Once the template has been created, we return to the specific library menu and you will see that it now has a template stored, now that we have a template we could get other vCenter to subscribe to this library using the Publication details (the URL) on the right-hand side.
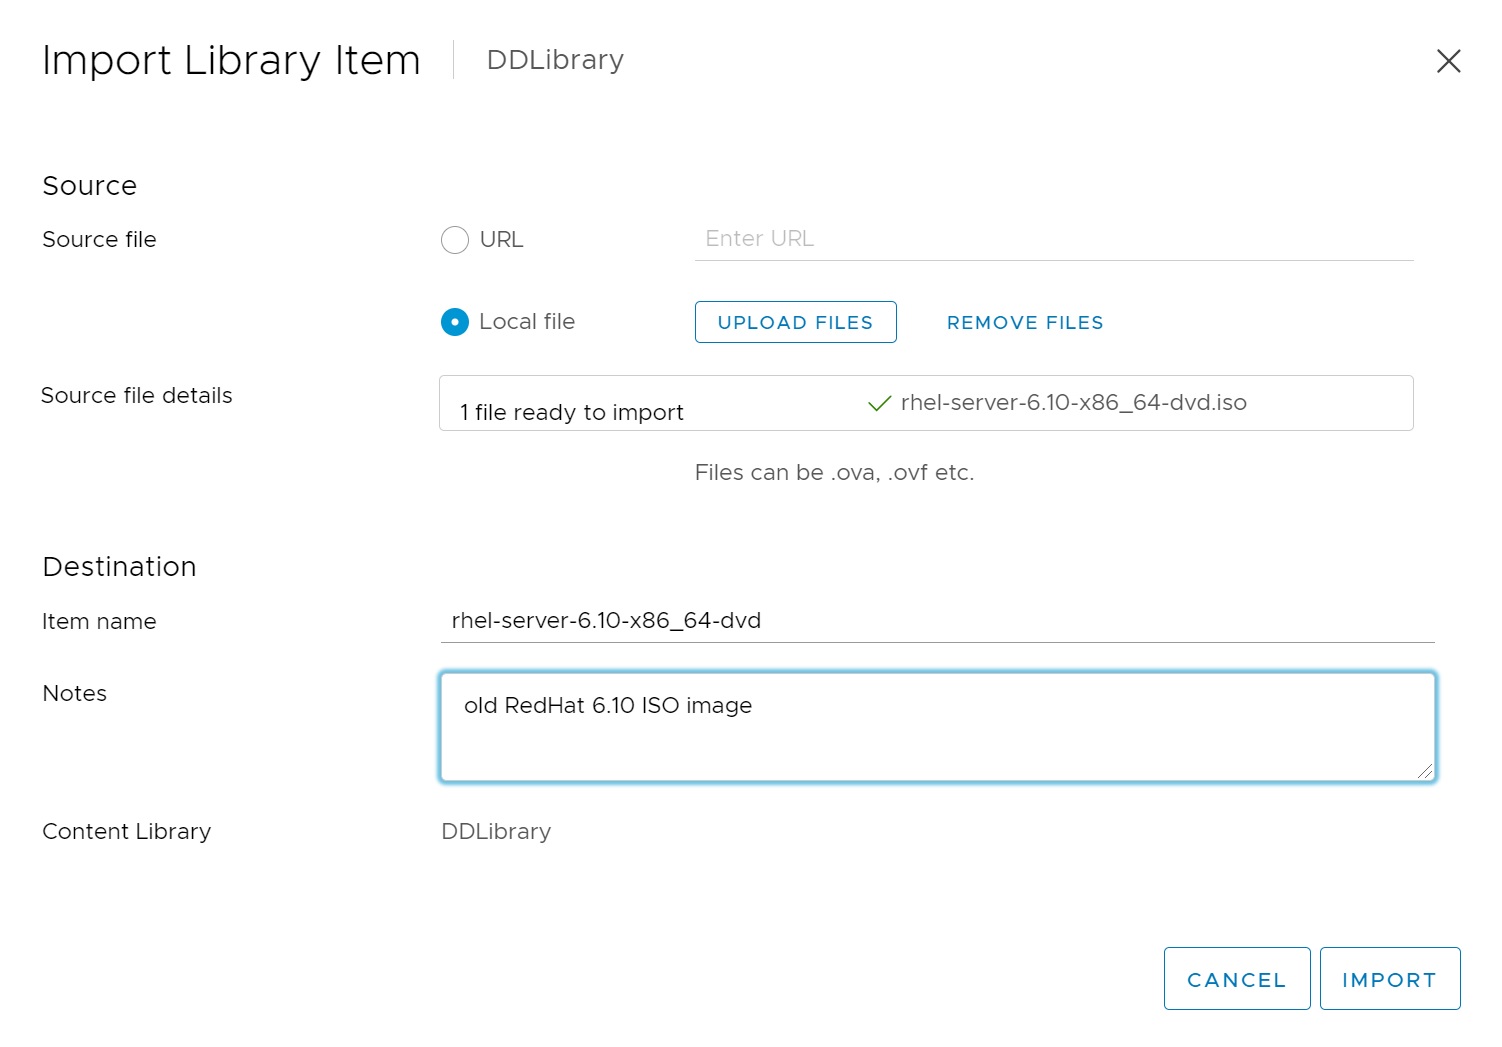
Next lets upload a RedHat 6.10 ISO image file, selecting the Other Types tab -> ACTIONS -> Import Item

The next screen you select the ISO image file and add any notes.
After a while (after the ISO image has uploaded) the ISO image file will appear in the library

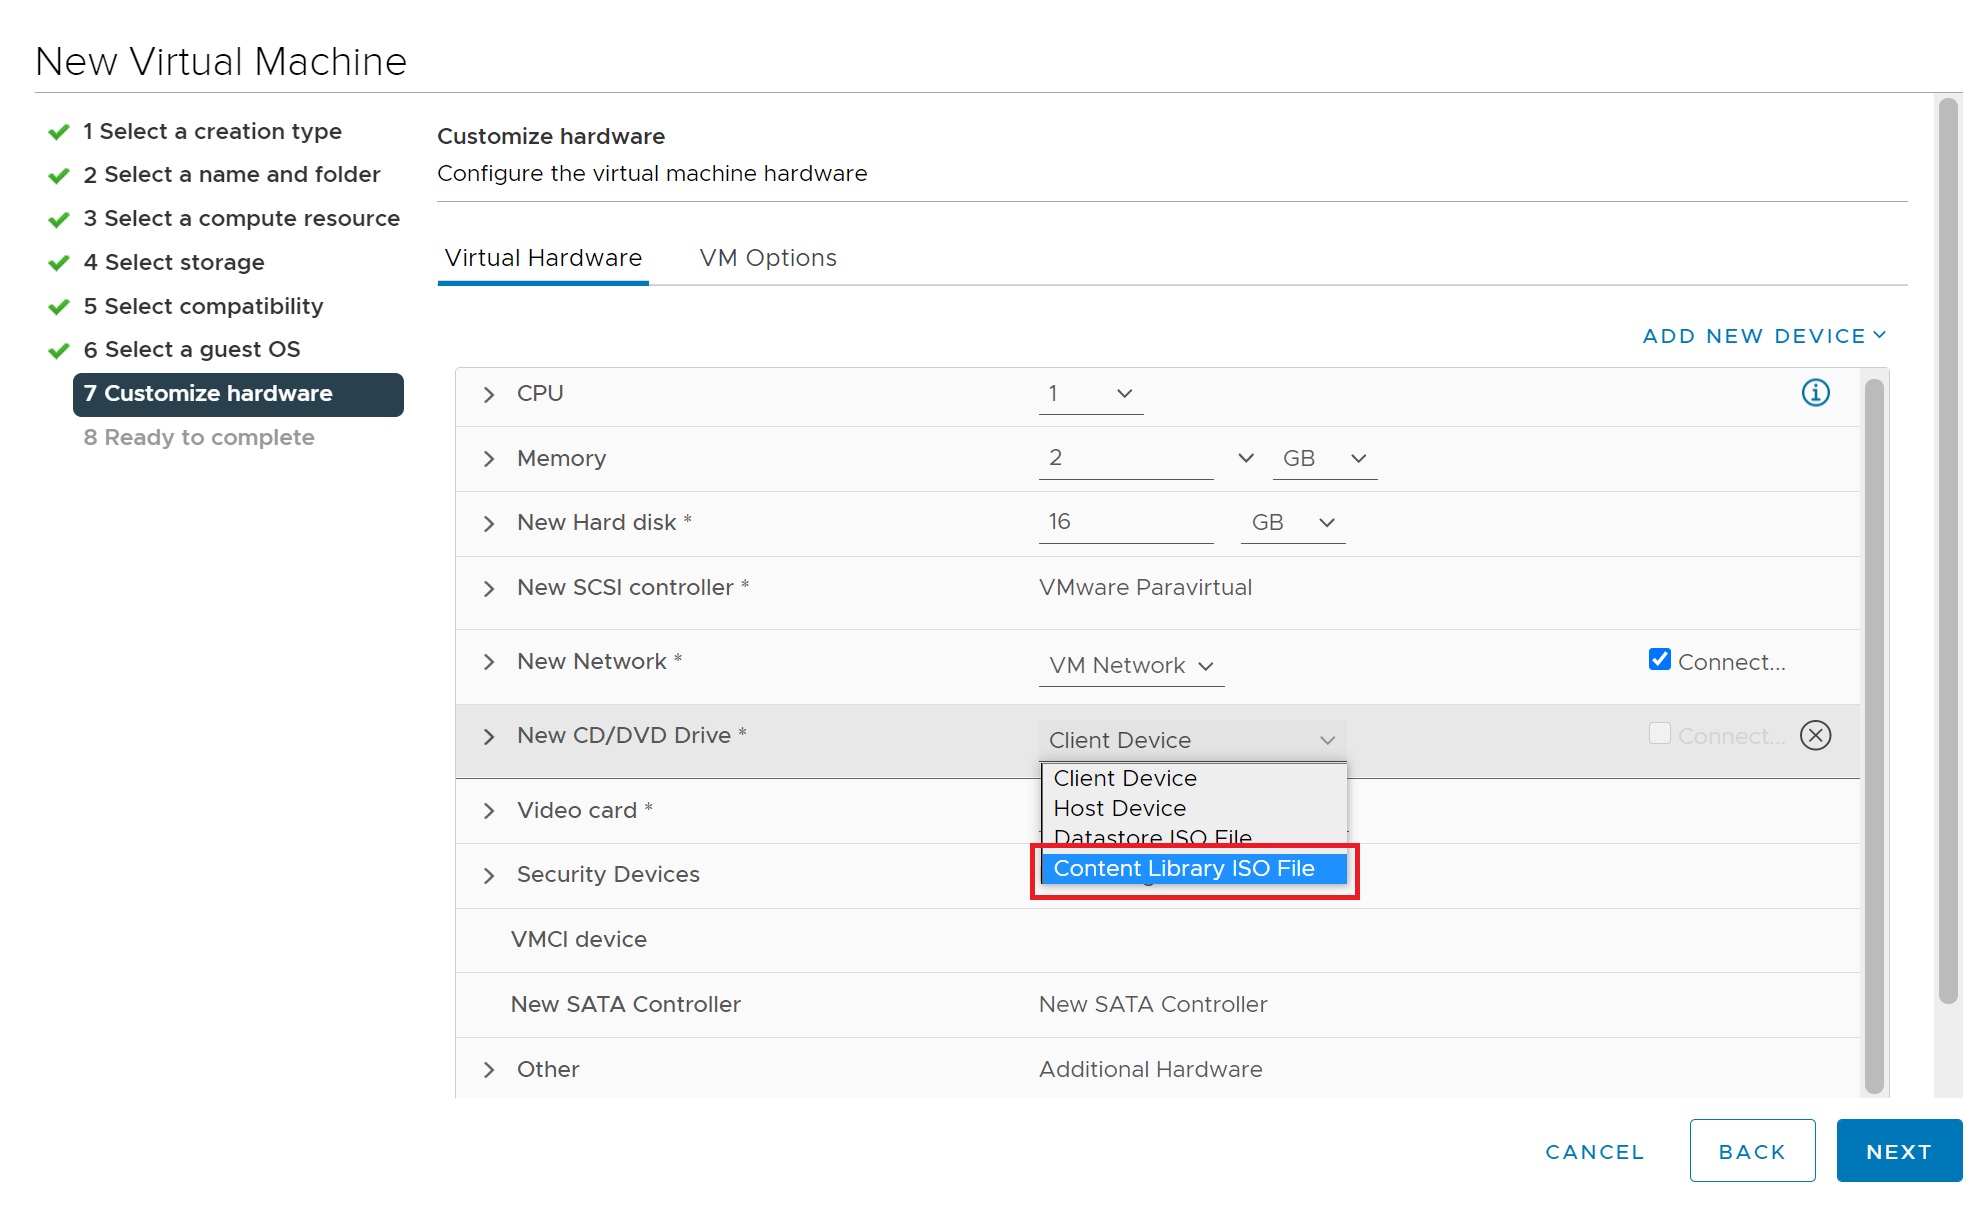
Now that we have an ISO image in the library when creating a VM we have the option to attach the ISO image from the library during the VM setup screens
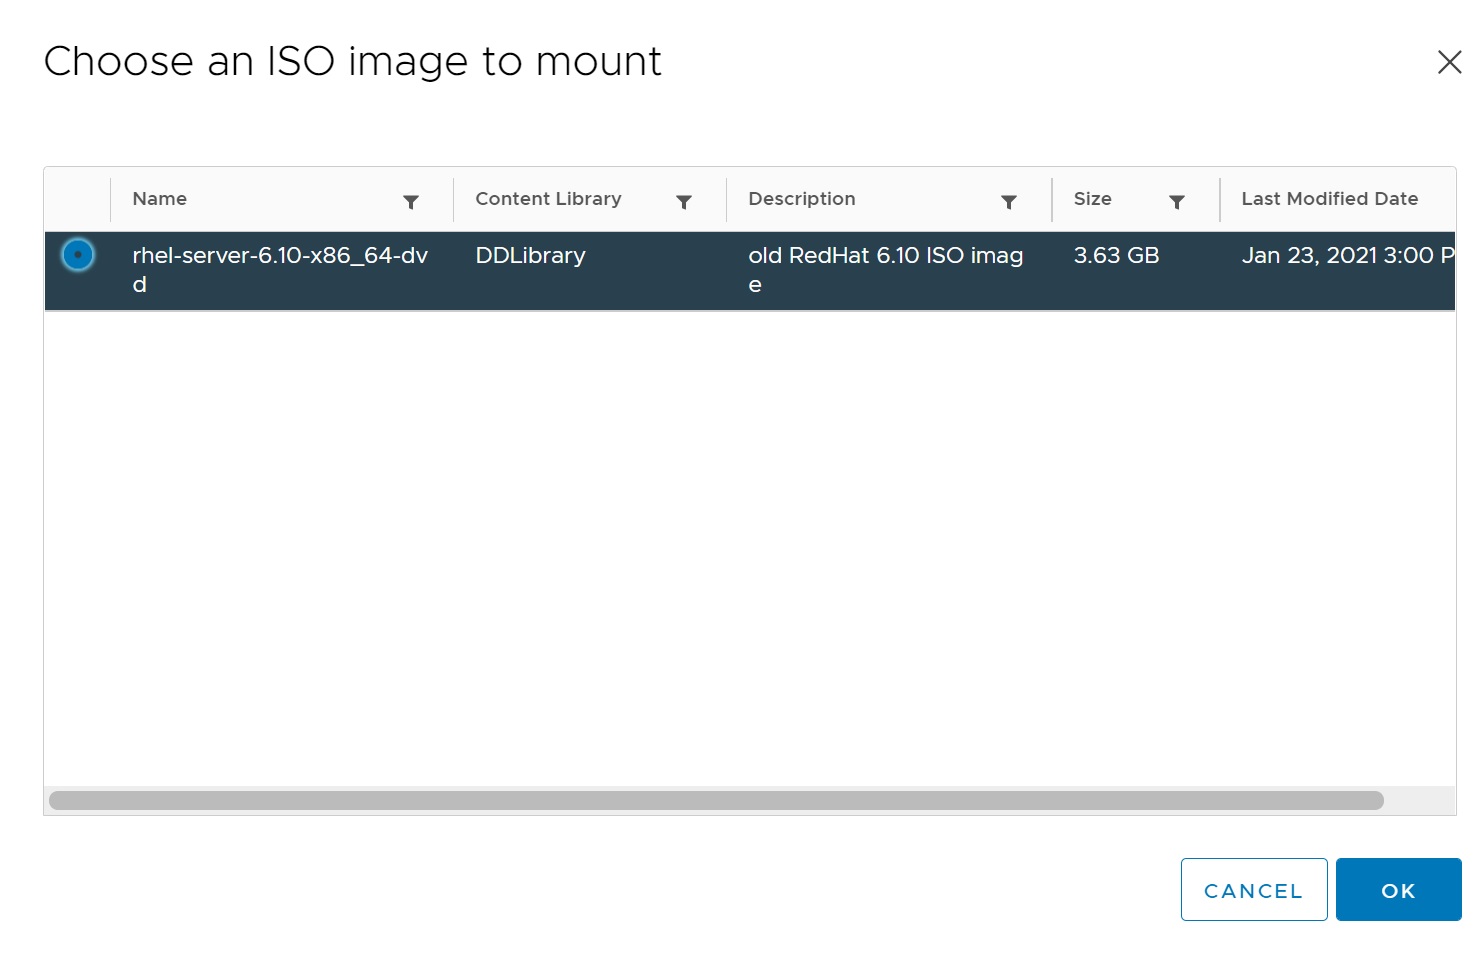
A popup screen list all the ISO image files in all the libraries that you have created
As mentioned at the start of the content library section we are using a publish/subscribe and thus you can publish our libraries so that other vCenter servers can subscribe and we could also subscribe to them thus all vCenters could share templates, ISO, etc.
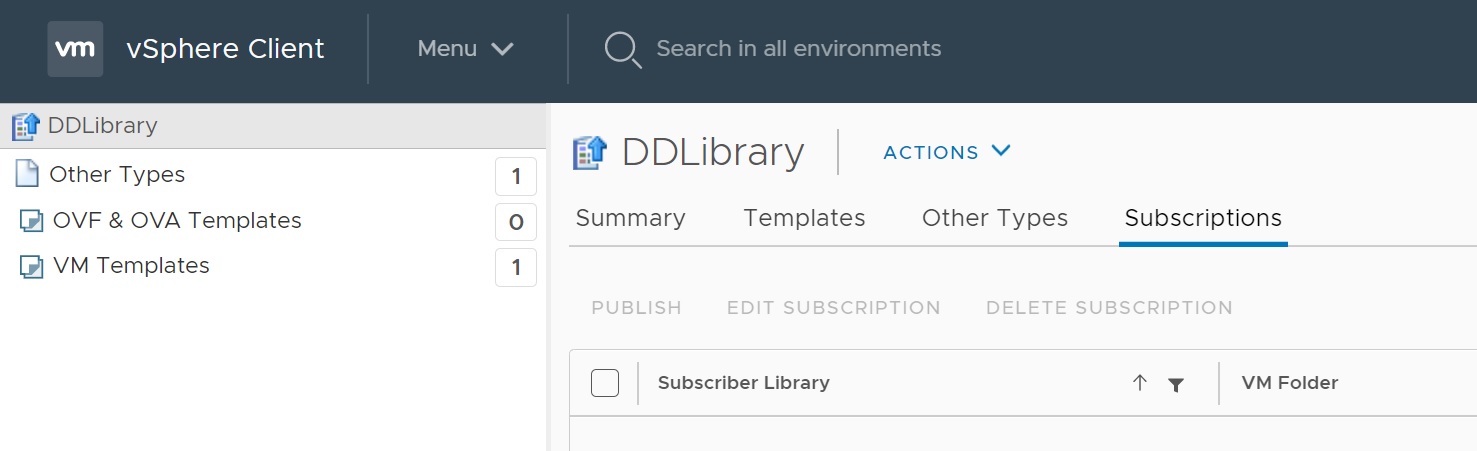
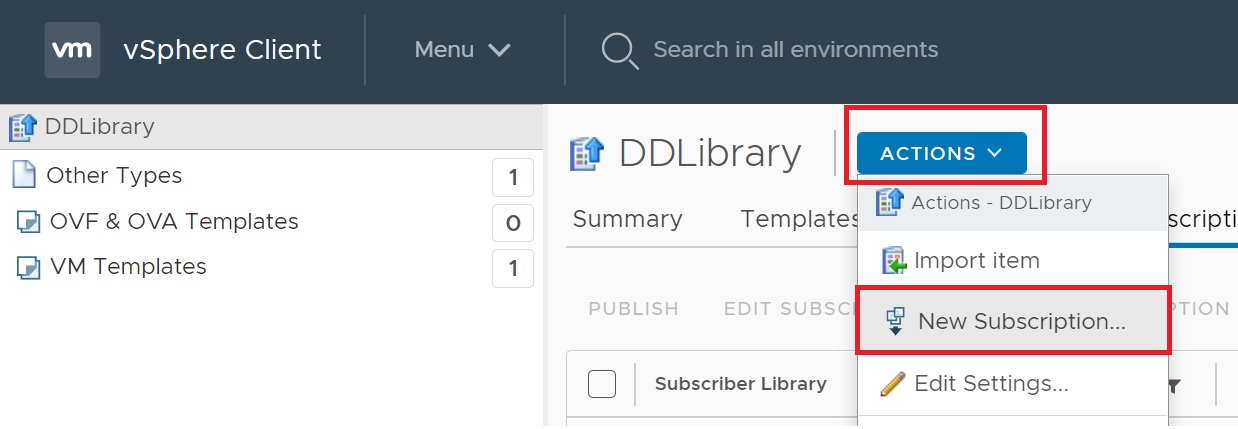
I will subscribe to the same vCenter server but it's no different when subscribing to another vCenter server, select the subscriptions tab -> ACTIONS -> New Subscription
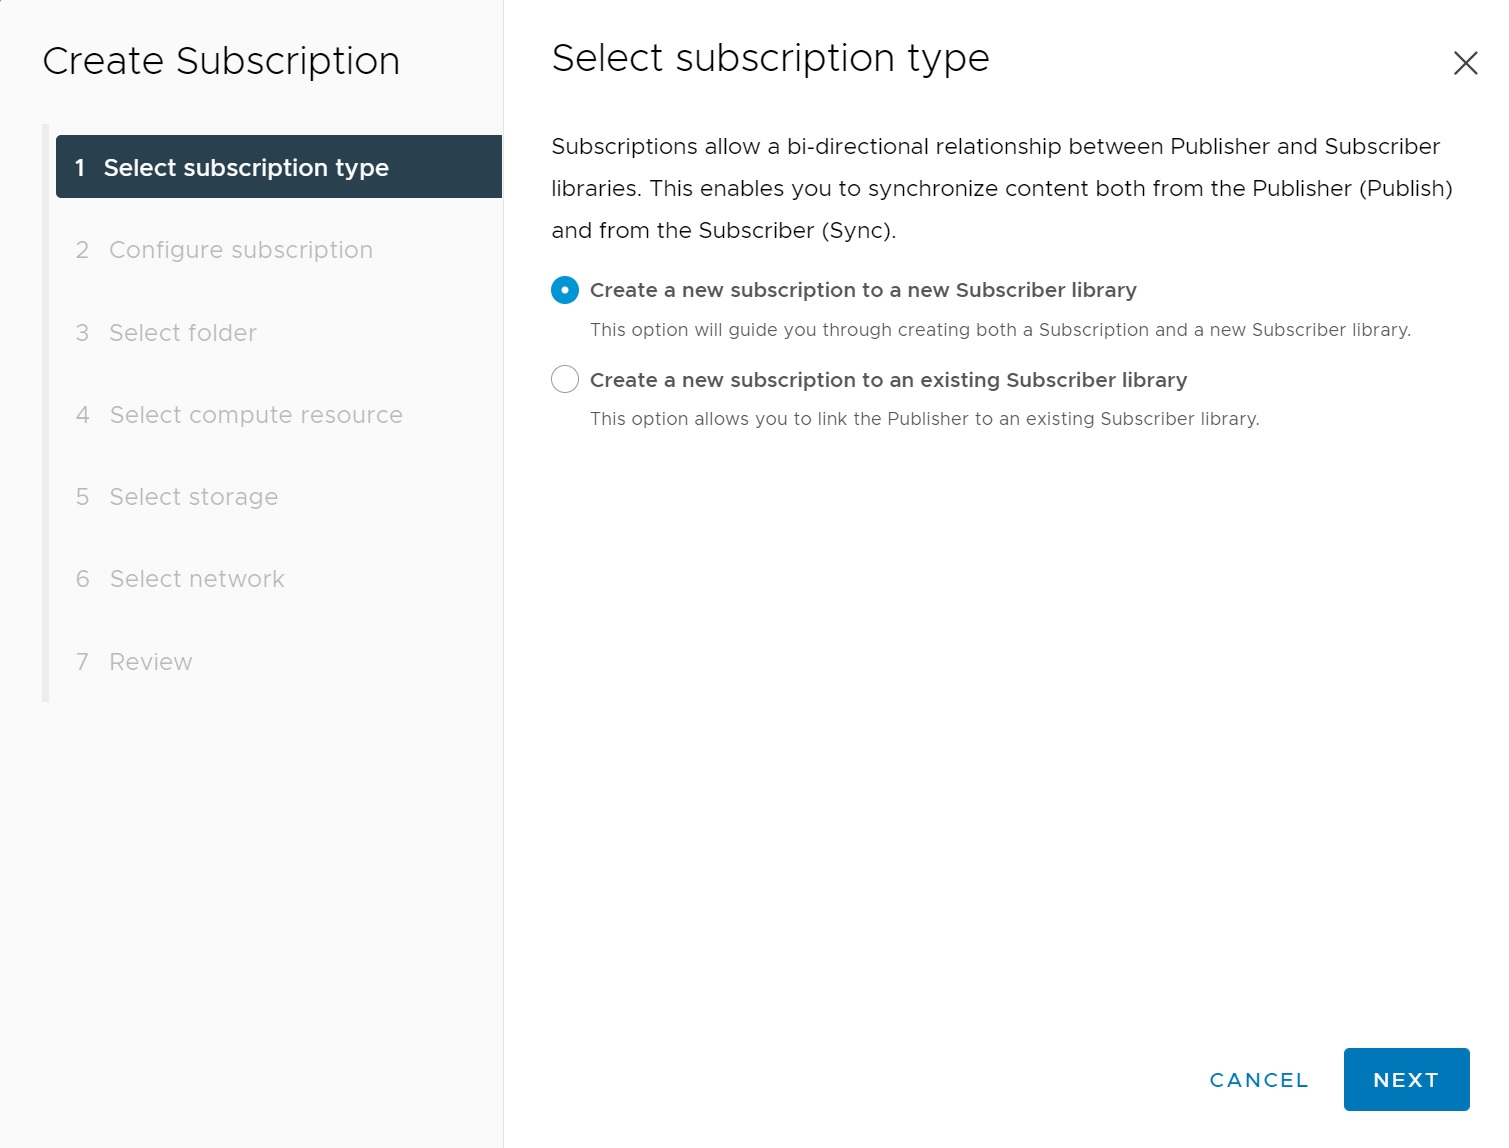
Depending on what you want to subscribe follow the setup screen which are self explaining
Once finished you will be subscribe to an another vCenter and thus can use the templates, ISO images from there. Notice the type of library I have a local and a subscribed one, also notice that the size of the subscribe 0 bytes and has no sync time

After a period of time the subscription will sync with the other vCenter server and thus you can see that the size has changed and we now have a sync time.

If you go to the datastore that you created the library in you can see the content libraries here (local and subscribed).
